12 简易版 RPC 框架实现(下)
在上一课时中,我们介绍了整个简易 RPC 框架项目的结构和工作原理,并且介绍了简易 RPC 框架底层的协议结构、序列化/反序列化实现、压缩实现以及编解码器的具体实现。本课时我们将继续自底向上,介绍简易 RPC 框架的剩余部分实现。
transport 相关实现
正如前文介绍 Netty 线程模型的时候提到,我们不能在 Netty 的 I/O 线程中执行耗时的业务逻辑。在 Demo RPC 框架的 Server 端接收到请求时,首先会通过上面介绍的 DemoRpcDecoder 反序列化得到请求消息,之后我们会通过一个自定义的 ChannelHandler(DemoRpcServerHandler)将请求提交给业务线程池进行处理。
在 Demo RPC 框架的 Client 端接收到响应消息的时候,也是先通过 DemoRpcDecoder 反序列化得到响应消息,之后通过一个自定义的 ChannelHandler(DemoRpcClientHandler)将响应返回给上层业务。
DemoRpcServerHandler 和 DemoRpcClientHandler 都继承自 SimpleChannelInboundHandler,如下图所示:
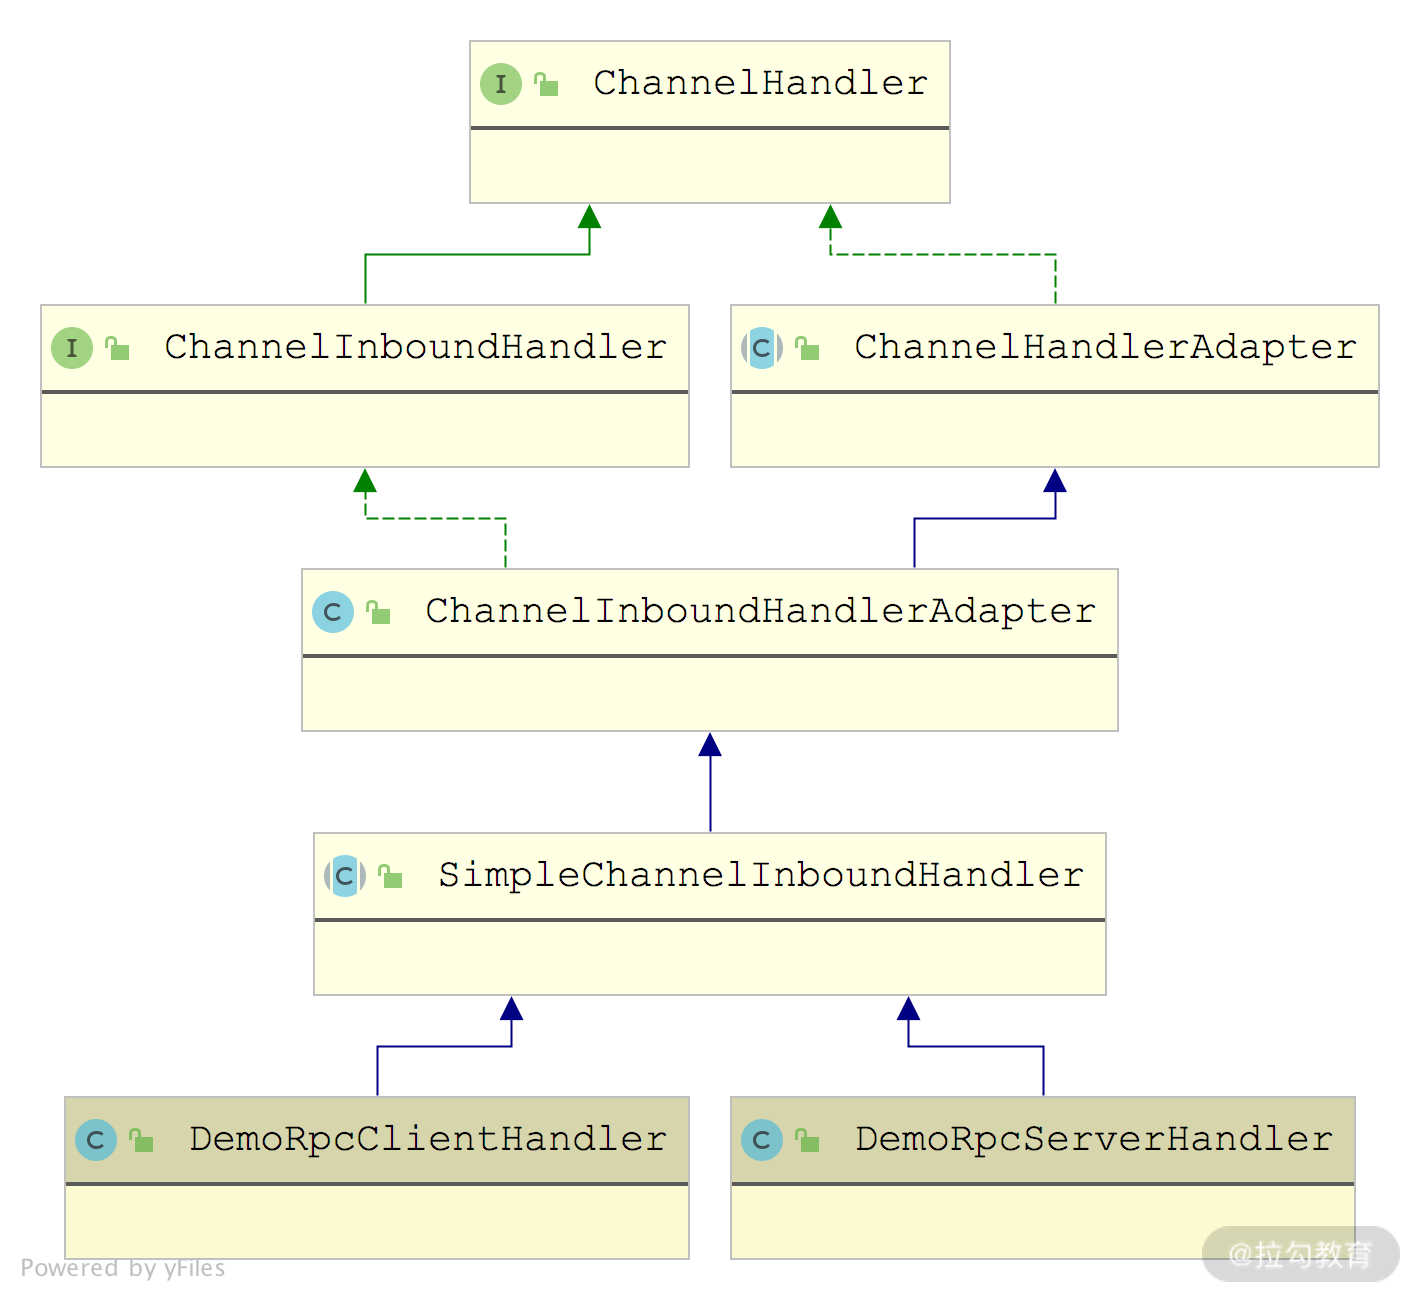
DemoRpcClientHandler 和 DemoRpcServerHandler 的继承关系图
下面我们就来看一下这两个自定义的 ChannelHandler 实现:
1
2
3
4
5
6
7
8
9
10
11
12
13
14
15
16
17
18
19
20
21
22
23
24
25
26
27
28
29
30
31
32
| public class DemoRpcServerHandler extends
SimpleChannelInboundHandler<Message<Request>> {
// 业务线程池
static Executor executor = Executors.newCachedThreadPool();
protected void channelRead0(final ChannelHandlerContext ctx,
Message<Request> message) throws Exception {
byte extraInfo = message.getHeader().getExtraInfo();
if (Constants.isHeartBeat(extraInfo)) { // 心跳消息,直接返回即可
channelHandlerContext.writeAndFlush(message);
return;
}
// 非心跳消息,直接封装成Runnable提交到业务线程
executor.execute(new InvokeRunnable(message, cxt));
}
}
public class DemoRpcClientHandler extends
SimpleChannelInboundHandler<Message<Response>> {
protected void channelRead0(ChannelHandlerContext ctx,
Message<Response> message) throws Exception {
NettyResponseFuture responseFuture =
Connection.IN_FLIGHT_REQUEST_MAP
.remove(message.getHeader().getMessageId());
Response response = message.getContent();
// 心跳消息特殊处理
if (response == null && Constants.isHeartBeat(
message.getHeader().getExtraInfo())) {
response = new Response();
response.setCode(Constants.HEARTBEAT_CODE);
}
responseFuture.getPromise().setSuccess(response);
}
}
|
注意,这里有两个点需要特别说明一下。一个点是 Server 端的 InvokeRunnable,在这个 Runnable 任务中会根据请求的 serviceName、methodName 以及参数信息,调用相应的方法:
1
2
3
4
5
6
7
8
9
10
11
12
13
14
15
16
17
18
19
20
21
22
23
24
25
| class InvokeRunnable implements Runnable {
private ChannelHandlerContext ctx;
private Message<Request> message;
public void run() {
Response response = new Response();
Object result = null;
try {
Request request = message.getContent();
String serviceName = request.getServiceName();
// 这里提供BeanManager对所有业务Bean进行管理,其底层在内存中维护了
// 一个业务Bean实例的集合。感兴趣的同学可以尝试接入Spring等容器管
// 理业务Bean
Object bean = BeanManager.getBean(serviceName);
// 下面通过反射调用Bean中的相应方法
Method method = bean.getClass().getMethod(
request.getMethodName(), request.getArgTypes());
result = method.invoke(bean, request.getArgs());
} catch (Exception e) { // 省略异常处理
} finally {
}
response.setResult(result); // 设置响应结果
// 将响应消息返回给客户端
ctx.writeAndFlush(new Message(message.getHeader(), response));
}
}
|
另一个点是 Client 端的 Connection,它是用来暂存已发送出去但未得到响应的请求,这样,在响应返回时,就可以查找到相应的请求以及 Future,从而将响应结果返回给上层业务逻辑,具体实现如下:
1
2
3
4
5
6
7
8
9
10
11
12
13
14
15
16
17
18
19
20
21
22
23
24
25
26
27
28
29
30
| public class Connection implements Closeable {
private static AtomicLong ID_GENERATOR = new AtomicLong(0);
public static Map<Long, NettyResponseFuture<Response>>
IN_FLIGHT_REQUEST_MAP = new ConcurrentHashMap<>();
private ChannelFuture future;
private AtomicBoolean isConnected = new AtomicBoolean();
public Connection(ChannelFuture future, boolean isConnected) {
this.future = future;
this.isConnected.set(isConnected);
}
public NettyResponseFuture<Response> request(Message<Request> message, long timeOut) {
// 生成并设置消息ID
long messageId = ID_GENERATOR.incrementAndGet();
message.getHeader().setMessageId(messageId);
// 创建消息关联的Future
NettyResponseFuture responseFuture = new NettyResponseFuture(System.currentTimeMillis(),
timeOut, message, future.channel(), new DefaultPromise(new DefaultEventLoop()));
// 将消息ID和关联的Future记录到IN_FLIGHT_REQUEST_MAP集合中
IN_FLIGHT_REQUEST_MAP.put(messageId, responseFuture);
try {
future.channel().writeAndFlush(message); // 发送请求
} catch (Exception e) {
// 发送请求异常时,删除对应的Future
IN_FLIGHT_REQUEST_MAP.remove(messageId);
throw e;
}
return responseFuture;
}
// 省略getter/setter以及close()方法
}
|
我们可以看到,Connection 中没有定时清理 IN_FLIGHT_REQUEST_MAP 集合的操作,在无法正常获取响应的时候,就会导致 IN_FLIGHT_REQUEST_MAP 不断膨胀,最终 OOM。你也可以添加一个时间轮定时器,定时清理过期的请求消息,这里我们就不再展开讲述了。
完成自定义 ChannelHandler 的编写之后,我们需要再定义两个类—— DemoRpcClient 和 DemoRpcServer,分别作为 Client 和 Server 的启动入口。DemoRpcClient 的实现如下:
1
2
3
4
5
6
7
8
9
10
11
12
13
14
15
16
17
18
19
20
21
22
23
24
25
26
27
28
29
30
31
32
33
34
35
36
37
| public class DemoRpcClient implements Closeable {
protected Bootstrap clientBootstrap;
protected EventLoopGroup group;
private String host;
private int port;
public DemoRpcClient(String host, int port) throws Exception {
this.host = host;
this.port = port;
clientBootstrap = new Bootstrap();
// 创建并配置客户端Bootstrap
group = NettyEventLoopFactory.eventLoopGroup(
Constants.DEFAULT_IO_THREADS, "NettyClientWorker");
clientBootstrap.group(group)
.option(ChannelOption.TCP_NODELAY, true)
.option(ChannelOption.SO_KEEPALIVE, true)
.channel(NioSocketChannel.class)
// 指定ChannelHandler的顺序
.handler(new ChannelInitializer<SocketChannel>() {
protected void initChannel(SocketChannel ch) {
ch.pipeline().addLast("demo-rpc-encoder",
new DemoRpcEncoder());
ch.pipeline().addLast("demo-rpc-decoder",
new DemoRpcDecoder());
ch.pipeline().addLast("client-handler",
new DemoRpcClientHandler());
}
});
}
public ChannelFuture connect() { // 连接指定的地址和端口
ChannelFuture connect = clientBootstrap.connect(host, port);
connect.awaitUninterruptibly();
return connect;
}
public void close() {
group.shutdownGracefully();
}
}
|
通过 DemoRpcClient 的代码我们可以看到其 ChannelHandler 的执行顺序如下:
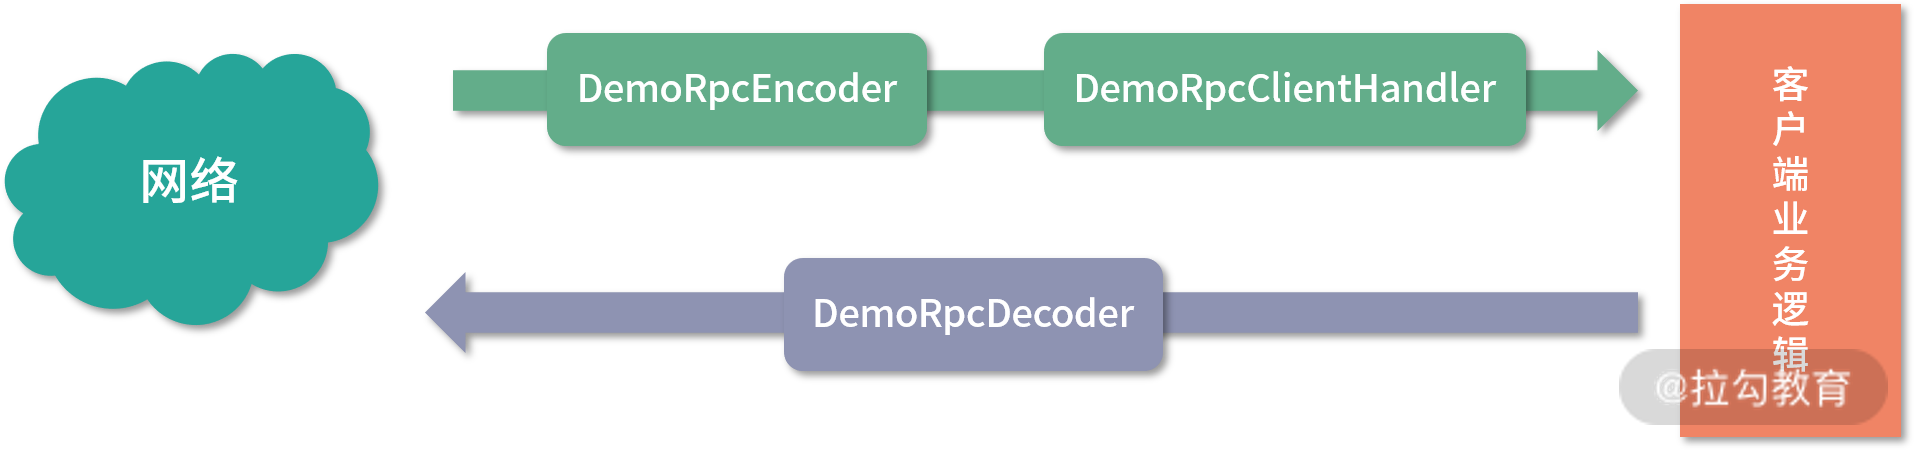
客户端 ChannelHandler 结构图
另外,在创建EventLoopGroup时并没有直接使用NioEventLoopGroup,而是在 NettyEventLoopFactory 中根据当前操作系统进行选择,对于 Linux 系统,会使用 EpollEventLoopGroup,其他系统则使用 NioEventLoopGroup。
接下来我们再看DemoRpcServer 的具体实现:
1
2
3
4
5
6
7
8
9
10
11
12
13
14
15
16
17
18
19
20
21
22
23
24
25
26
27
28
29
30
31
32
33
34
35
36
37
38
| public class DemoRpcServer {
private EventLoopGroup bossGroup;
private EventLoopGroup workerGroup;
private ServerBootstrap serverBootstrap;
private Channel channel;
protected int port;
public DemoRpcServer(int port) throws InterruptedException {
this.port = port;
// 创建boss和worker两个EventLoopGroup,注意一些小细节,
// workerGroup 是按照中的线程数是按照 CPU 核数计算得到的,
bossGroup = NettyEventLoopFactory.eventLoopGroup(1, "boos");
workerGroup = NettyEventLoopFactory.eventLoopGroup(
Math.min(Runtime.getRuntime().availableProcessors() + 1,
32), "worker");
serverBootstrap = new ServerBootstrap().group(bossGroup,
workerGroup).channel(NioServerSocketChannel.class)
.option(ChannelOption.SO_REUSEADDR, Boolean.TRUE)
.childOption(ChannelOption.TCP_NODELAY, Boolean.TRUE)
.handler(new LoggingHandler(LogLevel.INFO))
.childHandler(new ChannelInitializer<SocketChannel>()
{ // 指定每个Channel上注册的ChannelHandler以及顺序
protected void initChannel(SocketChannel ch) {
ch.pipeline().addLast("demp-rpc-decoder",
new DemoRpcDecoder());
ch.pipeline().addLast("demo-rpc-encoder",
new DemoRpcEncoder());
ch.pipeline().addLast("server-handler",
new DemoRpcServerHandler());
}
});
}
public ChannelFuture start() throws InterruptedException {
ChannelFuture channelFuture = serverBootstrap.bind(port);
channel = channelFuture.channel();
channel.closeFuture();
return channelFuture;
}
}
|
通过对 DemoRpcServer 实现的分析,我们可以知道每个 Channel 上的 ChannelHandler 顺序如下:
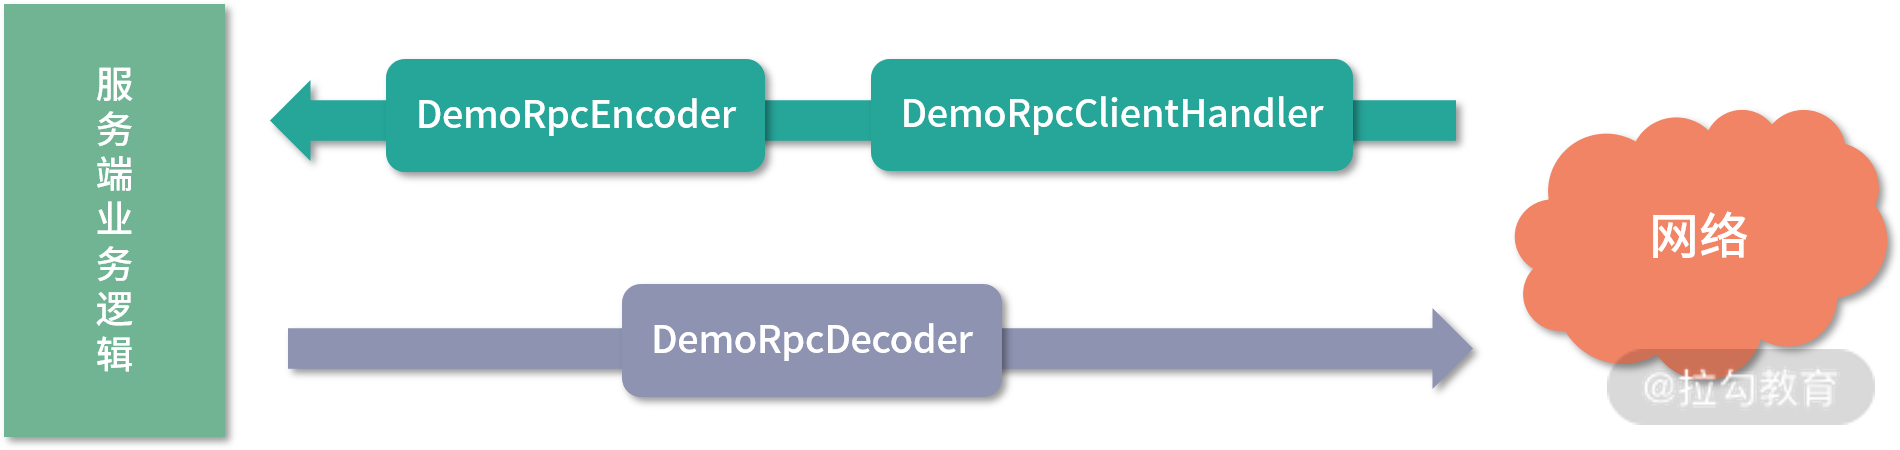
服务端 ChannelHandler 结构图
registry 相关实现
介绍完客户端和服务端的通信之后,我们再来看简易 RPC 框架的另一个基础能力——服务注册与服务发现能力,对应 demo-rpc 项目源码中的 registry 包。
registry 包主要是依赖 Apache Curator 实现了一个简易版本的 ZooKeeper 客户端,并基于 ZooKeeper 实现了注册中心最基本的两个功能:Provider 注册以及 Consumer 订阅。
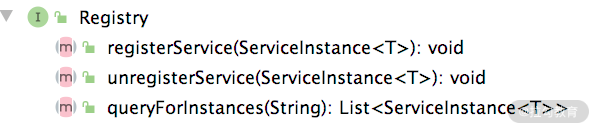
这里我们先定义一个 Registry 接口,其中提供了注册以及查询服务实例的方法,如下图所示:
ZooKeeperRegistry 是基于 curator-x-discovery 对 Registry 接口的实现类型,其中封装了之前课时介绍的 ServiceDiscovery,并在其上添加了 ServiceCache 缓存提高查询效率。ZooKeeperRegistry 的具体实现如下:
1
2
3
4
5
6
7
8
9
10
11
12
13
14
15
16
17
18
19
20
21
22
23
24
25
26
27
28
29
30
31
32
33
34
35
36
37
38
39
40
41
42
43
44
45
46
| public class ZookeeperRegistry<T> implements Registry<T> {
private InstanceSerializer serializer =
new JsonInstanceSerializer<>(ServerInfo.class);
private ServiceDiscovery<T> serviceDiscovery;
private ServiceCache<T> serviceCache;
private String address = "localhost:2181";
public void start() throws Exception {
String root = "/demo/rpc";
// 初始化CuratorFramework
CuratorFramework client = CuratorFrameworkFactory
.newClient(address, new ExponentialBackoffRetry(1000, 3));
client.start(); // 启动Curator客户端
client.blockUntilConnected(); // 阻塞当前线程,等待连接成
client.createContainers(root);
// 初始化ServiceDiscovery
serviceDiscovery = ServiceDiscoveryBuilder
.builder(ServerInfo.class)
.client(client).basePath(root)
.serializer(serializer)
.build();
serviceDiscovery.start(); // 启动ServiceDiscovery
// 创建ServiceCache,监Zookeeper相应节点的变化,也方便后续的读取
serviceCache = serviceDiscovery.serviceCacheBuilder()
.name(root)
.build();
serviceCache.start(); // 启动ServiceCache
}
@Override
public void registerService(ServiceInstance<T> service)
throws Exception {
serviceDiscovery.registerService(service);
}
@Override
public void unregisterService(ServiceInstance service)
throws Exception {
serviceDiscovery.unregisterService(service);
}
@Override
public List<ServiceInstance<T>> queryForInstances(
String name) throws Exception {
// 直接根据name进行过滤ServiceCache中的缓存数据
return serviceCache.getInstances().stream()
.filter(s -> s.getName().equals(name))
.collect(Collectors.toList());
}
}
|
通过对 ZooKeeperRegistry的分析可以得知,它是基于 Curator 中的 ServiceDiscovery 组件与 ZooKeeper 进行交互的,并且对 Registry 接口的实现也是通过直接调用 ServiceDiscovery 的相关方法实现的。在查询时,直接读取 ServiceCache 中的缓存数据,ServiceCache 底层在本地维护了一个 ConcurrentHashMap 缓存,通过 PathChildrenCache 监听 ZooKeeper 中各个子节点的变化,同步更新本地缓存。这里我们简单看一下 ServiceCache 的核心实现:
1
2
3
4
5
6
7
8
9
10
11
12
13
14
15
16
17
18
19
20
21
22
23
24
25
26
27
28
29
30
| public class ServiceCacheImpl<T> implements ServiceCache<T>,
PathChildrenCacheListener{//实现PathChildrenCacheListener接口
// 关联的ServiceDiscovery实例
private final ServiceDiscoveryImpl<T> discovery;
// 底层的PathChildrenCache,用于监听子节点的变化
private final PathChildrenCache cache;
// 本地缓存
private final ConcurrentMap<String, ServiceInstance<T>> instances
= Maps.newConcurrentMap();
public List<ServiceInstance<T>> getInstances(){ // 返回本地缓存内容
return Lists.newArrayList(instances.values());
}
public void childEvent(CuratorFramework client,
PathChildrenCacheEvent event) throws Exception{
switch(event.getType()){
case CHILD_ADDED:
case CHILD_UPDATED:{
addInstance(event.getData(), false); // 更新本地缓存
notifyListeners = true;
break;
}
case CHILD_REMOVED:{ // 更新本地缓存
instances.remove(instanceIdFromData(event.getData()));
notifyListeners = true;
break;
}
}
... // 通知ServiceCache上注册的监听器
}
}
|
proxy 相关实现
在简易版 Demo RPC 框架中,Proxy 主要是为 Client 端创建一个代理,帮助客户端程序屏蔽底层的网络操作以及与注册中心之间的交互。
简易版 Demo RPC 使用 JDK 动态代理的方式生成代理,这里需要编写一个 InvocationHandler 接口的实现,即下面的 DemoRpcProxy。其中有两个核心方法:一个是 newInstance() 方法,用于生成代理对象;另一个是 invoke() 方法,当调用目标对象的时候,会执行 invoke() 方法中的代理逻辑。
下面是 DemoRpcProxy 的具体实现:
1
2
3
4
5
6
7
8
9
10
11
12
13
14
15
16
17
18
19
20
21
22
23
24
25
26
27
28
29
30
31
32
33
34
35
36
37
38
39
40
41
42
43
44
45
46
47
48
49
50
51
52
| public class DemoRpcProxy implements InvocationHandler {
// 需要代理的服务(接口)名称
private String serviceName;
// 用于与Zookeeper交互,其中自带缓存
private Registry<ServerInfo> registry;
public DemoRpcProxy(String serviceName, Registry<ServerInfo>
registry) throws Exception { // 初始化上述两个字段
this.serviceName = serviceName;
this.registry = registry;
}
public static <T> T newInstance(Class<T> clazz,
Registry<ServerInfo> registry) throws Exception {
// 创建代理对象
return (T) Proxy.newProxyInstance(Thread.currentThread()
.getContextClassLoader(), new Class[]{clazz},
new DemoRpcProxy(clazz.getName(), registry));
}
@Override
public Object invoke(Object proxy, Method method, Object[] args)
throws Throwable {
// 从Zookeeper缓存中获取可用的Server地址,并随机从中选择一个
List<ServiceInstance<ServerInfo>> serviceInstances =
registry.queryForInstances(serviceName);
ServiceInstance<ServerInfo> serviceInstance = serviceInstances
.get(ThreadLocalRandom.current()
.nextInt(serviceInstances.size()));
// 创建请求消息,然后调用remoteCall()方法请求上面选定的Server端
String methodName = method.getName();
Header header =new Header(MAGIC, VERSION_1...);
Message<Request> message = new Message(header,
new Request(serviceName, methodName, args));
return remoteCall(serviceInstance.getPayload(), message);
}
protected Object remoteCall(ServerInfo serverInfo,
Message message) throws Exception {
if (serverInfo == null) {
throw new RuntimeException("get available server error");
}
// 创建DemoRpcClient连接指定的Server端
DemoRpcClient demoRpcClient = new DemoRpcClient(
serverInfo.getHost(), serverInfo.getPort());
ChannelFuture channelFuture = demoRpcClient.connect()
.awaitUninterruptibly();
// 创建对应的Connection对象,并发送请求
Connection connection = new Connection(channelFuture, true);
NettyResponseFuture responseFuture =
connection.request(message, Constants.DEFAULT_TIMEOUT);
// 等待请求对应的响应
return responseFuture.getPromise().get(
Constants.DEFAULT_TIMEOUT, TimeUnit.MILLISECONDS);
}
}
|
从 DemoRpcProxy 的实现中我们可以看到,它依赖了 ServiceInstanceCache 获取ZooKeeper 中注册的 Server 端地址,同时依赖了 DemoRpcClient 与Server 端进行通信,上层调用方拿到这个代理对象后,就可以像调用本地方法一样进行调用,而不再关心底层网络通信和服务发现的细节。当然,这个简易版 DemoRpcProxy 的实现还有很多可以优化的地方,例如:
- 缓存 DemoRpcClient 客户端对象以及相应的 Connection 对象,不必每次进行创建。
- 可以添加失败重试机制,在请求出现超时的时候,进行重试。
- 可以添加更加复杂和灵活的负载均衡机制,例如,根据 Hash 值散列进行负载均衡、根据节点 load 情况进行负载均衡等。
你若感兴趣的话可以尝试进行扩展,以实现一个更加完善的代理层。
使用方接入
介绍完 Demo RPC 的核心实现之后,下面我们讲解下Demo RPC 框架的使用方式。这里涉及Consumer、DemoServiceImp、Provider三个类以及 DemoService 业务接口。
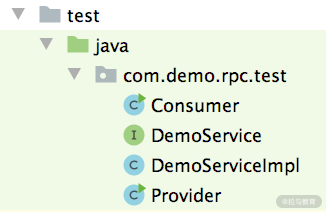
使用接入的相关类
首先,我们定义DemoService 接口作为业务 Server 接口,具体定义如下:
1
2
3
| public interface DemoService {
String sayHello(String param);
}
|
DemoServiceImpl对 DemoService 接口的实现也非常简单,如下所示,将参数做简单修改后返回:
1
2
3
4
5
| public class DemoServiceImpl implements DemoService {
public String sayHello(String param) {
return "hello:" + param;
}
}
|
了解完相应的业务接口和实现之后,我们再来看Provider的实现,它的角色类似于 Dubbo 中的 Provider,其会创建 DemoServiceImpl 这个业务 Bean 并将自身的地址信息暴露出去,如下所示:
1
2
3
4
5
6
7
8
9
10
11
12
13
14
15
16
17
18
19
| public class Provider {
public static void main(String[] args) throws Exception {
// 创建DemoServiceImpl,并注册到BeanManager中
BeanManager.registerBean("demoService",
new DemoServiceImpl());
// 创建ZookeeperRegistry,并将Provider的地址信息封装成ServerInfo
// 对象注册到Zookeeper
ZookeeperRegistry<ServerInfo> discovery =
new ZookeeperRegistry<>();
discovery.start();
ServerInfo serverInfo = new ServerInfo("127.0.0.1", 20880);
discovery.registerService(
ServiceInstance.<ServerInfo>builder().name("demoService")
.payload(serverInfo).build());
// 启动DemoRpcServer,等待Client的请求
DemoRpcServer rpcServer = new DemoRpcServer(20880);
rpcServer.start();
}
}
|
最后是Consumer,它类似于 Dubbo 中的 Consumer,其会订阅 Provider 地址信息,然后根据这些信息选择一个 Provider 建立连接,发送请求并得到响应,这些过程在 Proxy 中都予以了封装,那Consumer 的实现就很简单了,可参考如下示例代码:
1
2
3
4
5
6
7
8
9
10
11
| public class Consumer {
public static void main(String[] args) throws Exception {
// 创建ZookeeperRegistr对象
ZookeeperRegistry<ServerInfo> discovery = new ZookeeperRegistry<>();
// 创建代理对象,通过代理调用远端Server
DemoService demoService = DemoRpcProxy.newInstance(DemoService.class, discovery);
// 调用sayHello()方法,并输出结果
String result = demoService.sayHello("hello");
System.out.println(result);
}
}
|
总结
本课时我们首先介绍了简易 RPC 框架中的transport 包,它在上一课时介绍的编解码器基础之上,实现了服务端和客户端的通信能力。之后讲解了registry 包如何实现与 ZooKeeper 的交互,完善了简易 RPC 框架的服务注册与服务发现的能力。接下来又分析了proxy 包的实现,其中通过 JDK 动态代理的方式,帮接入方屏蔽了底层网络通信的复杂性。最后,我们编写了一个简单的 DemoService 业务接口,以及相应的 Provider 和 Consumer 接入简易 RPC 框架。
在本课时最后,留给你一个小问题:在 transport 中创建 EventLoopGroup 的时候,为什么针对 Linux 系统使用的 EventLoopGroup会有所不同呢?期待你的留言。
简易版 RPC 框架 Demo 的链接:https://github.com/xxxlxy2008/demo-prc 。