05 自动配置:如何正确理解 Spring Boot 自动配置实现原理? 通过前面几个课时内容的介绍,相信你对 Spring Boot 中的配置体系已经有了全面的了解。Spring Boot 中的配置体系是一套强大而复杂的体系,其中最基础、最核心的要数自动配置(AutoConfiguration)机制了。今天我们将围绕这个话题详细展开讨论,看看 Spring Boot 如何实现自动配置。那我们就先从 @SpringBootApplication 注解开始讲起。
@SpringBootApplication 注解 @SpringBootApplication 注解位于 spring-boot-autoconfigure 工程的 org.springframework.boot.autoconfigure 包中,定义如下:
1
2
3
4
5
6
7
8
9
10
11
12
13
14
15
16
17
18
19
20
21
22
23
24
25
26
27
28
29
30
31
32
33
34
35
36
37
38
39
40
41
42
43
44
45
46
47
48
49
50
51
52
53
54
55
56
57
58
59
60
61
62
63
64
65
66
67
68
69
70
71
72
73
74
75
76
77
78
79
80
81
82
83
84
85
@Target(ElementType.TYPE) @Retention(RetentionPolicy.RUNTIME) @Documented @Inherited @SpringBootConfiguration @EnableAutoConfiguration @ComponentScan(excludeFilters = { @Filter(type = FilterType.CUSTOM, classes = TypeExcludeFilter.class), @Filter(type = FilterType.CUSTOM, classes = AutoConfigurationExcludeFilter.class) }) public @interface SpringBootApplication { @AliasFor(annotation = EnableAutoConfiguration.class) Class<?>[] exclude() default {}; @AliasFor(annotation = EnableAutoConfiguration.class) String[] excludeName() default {}; @AliasFor(annotation = ComponentScan.class, attribute = "basePackages") String[] scanBasePackages() default {}; @AliasFor(annotation = ComponentScan.class, attribute = "basePackageClasses") Class<?>[] scanBasePackageClasses() default {}; }
相较一般的注解,@SpringBootApplication 注解显得有点复杂。我们可以通过 exclude 和 excludeName 属性来配置不需要实现自动装配的类或类名,也可以通过 scanBasePackages 和 scanBasePackageClasses 属性来配置需要进行扫描的包路径和类路径。
注意到 @SpringBootApplication 注解实际上是一个组合注解,它由三个注解组合而成,分别是 @SpringBootConfiguration、@EnableAutoConfiguration 和 @ComponentScan。
@ComponentScan 注解不是 Spring Boot 引入的新注解,而是属于 Spring 容器管理的内容。@ComponentScan 注解就是扫描基于 @Component 等注解所标注的类所在包下的所有需要注入的类,并把相关 Bean 定义批量加载到容器中。显然,Spring Boot 应用程序中同样需要这个功能。
@SpringBootConfiguration 注解 @SpringBootConfiguration 注解比较简单,事实上它是一个空注解,只是使用了 Spring 中的 @Configuration 注解。@Configuration 注解比较常见,提供了 JavaConfig 配置类实现。
@EnableAutoConfiguration 注解 @EnableAutoConfiguration 注解是我们需要重点剖析的对象,下面进行重点展开。该注解的定义如下代码所示:
1
2
3
4
5
6
7
8
9
10
11
12
13
14
15
16
17
18
19
20
21
22
23
24
25
26
27
28
29
30
31
32
33
34
35
36
37
38
39
40
41
42
43
44
45
46
47
48
49
50
51
52
53
@Target(ElementType.TYPE) @Retention(RetentionPolicy.RUNTIME) @Documented @Inherited @AutoConfigurationPackage @Import(AutoConfigurationImportSelector.class) public @interface EnableAutoConfiguration { String ENABLED_OVERRIDE_PROPERTY = "spring.boot.enableautoconfiguration"; Class<?>[] exclude() default {}; String[] excludeName() default {}; }
这里我们关注两个新注解,@AutoConfigurationPackage 和 @Import(AutoConfigurationImportSelector.class)。
@AutoConfigurationPackage 注解 @AutoConfigurationPackage 注解定义如下:
1
2
3
4
5
6
7
8
9
10
11
12
13
14
15
16
17
18
19
20
21
22
23
24
25
@Target(ElementType.TYPE) @Retention(RetentionPolicy.RUNTIME) @Documented @Inherited @Import(AutoConfigurationPackages.Registrar.class) public @interface AutoConfigurationPackage { }
从命名上讲,在这个注解中我们对该注解所在包下的类进行自动配置,而在实现方式上用到了 Spring 中的 @Import 注解。在使用 Spring Boot 时,@Import 也是一个非常常见的注解,可以用来动态创建 Bean。为了便于理解后续内容,这里有必要对 @Import 注解的运行机制做一些展开,该注解定义如下:
1
2
3
4
5
6
7
8
9
10
11
12
13
14
15
16
17
18
19
20
21
@Target(ElementType.TYPE) @Retention(RetentionPolicy.RUNTIME) @Documented public @interface Import { Class<?>[] value(); }
在 @Import 注解的属性中可以设置需要引入的类名,例如 @AutoConfigurationPackage 注解上的 @Import(AutoConfigurationPackages.Registrar.class)。根据该类的不同类型,Spring 容器针对 @Import 注解有以下四种处理方式:
如果该类实现了 ImportSelector 接口,Spring 容器就会实例化该类,并且调用其 selectImports 方法; 如果该类实现了 DeferredImportSelector 接口,则 Spring 容器也会实例化该类并调用其 selectImports方法。DeferredImportSelector 继承了 ImportSelector,区别在于 DeferredImportSelector 实例的 selectImports 方法调用时机晚于 ImportSelector 的实例,要等到 @Configuration 注解中相关的业务全部都处理完了才会调用; 如果该类实现了 ImportBeanDefinitionRegistrar 接口,Spring 容器就会实例化该类,并且调用其 registerBeanDefinitions 方法; 如果该类没有实现上述三种接口中的任何一个,Spring 容器就会直接实例化该类。 有了对 @Import 注解的基本理解,我们再来看 AutoConfigurationPackages.Registrar 类,定义如下:
1
2
3
4
5
6
7
8
9
10
11
12
13
14
15
16
17
18
19
20
21
22
23
24
25
26
27
28
29
30
31
32
33
34
35
36
37
38
39
40
41
42
43
44
45
static class Registrar implements ImportBeanDefinitionRegistrar, DeterminableImports { @Override public void registerBeanDefinitions(AnnotationMetadata metadata, BeanDefinitionRegistry registry) { register(registry, new PackageImport(metadata).getPackageName()); } @Override public Set<Object> determineImports(AnnotationMetadata metadata) { return Collections.singleton(new PackageImport(metadata)); } }
可以看到这个 Registrar 类实现了前面第三种情况中提到的 ImportBeanDefinitionRegistrar 接口并重写了 registerBeanDefinitions 方法,该方法中调用 AutoConfigurationPackages 自身的 register 方法:
1
2
3
4
5
6
7
8
9
10
11
12
13
14
15
16
17
18
19
20
21
22
23
24
25
26
27
28
29
30
31
32
33
34
35
36
37
38
39
40
41
42
43
44
45
46
47
48
49
50
51
52
53
54
55
56
57
58
59
60
61
62
63
64
65
public static void register(BeanDefinitionRegistry registry, String... packageNames) { if (registry.containsBeanDefinition(BEAN)) { BeanDefinition beanDefinition = registry.getBeanDefinition(BEAN); ConstructorArgumentValues constructorArguments = beanDefinition .getConstructorArgumentValues(); constructorArguments.addIndexedArgumentValue(0, addBasePackages(constructorArguments, packageNames)); } else { GenericBeanDefinition beanDefinition = new GenericBeanDefinition(); beanDefinition.setBeanClass(BasePackages.class); beanDefinition.getConstructorArgumentValues().addIndexedArgumentValue(0, packageNames); beanDefinition.setRole(BeanDefinition.ROLE_INFRASTRUCTURE); registry.registerBeanDefinition(BEAN, beanDefinition); } }
这个方法的逻辑是先判断整个 Bean 有没有被注册,如果已经注册则获取 Bean 的定义,通过 Bean 获取构造函数的参数并添加参数值;如果没有,则创建一个新的 Bean 的定义,设置 Bean 的类型为 AutoConfigurationPackages 类型并进行 Bean 的注册。
AutoConfigurationImportSelector 然后我们再来看 @EnableAutoConfiguration 注解中的 @Import(AutoConfigurationImportSelector.class) 部分,首先我们明确 AutoConfigurationImportSelector 类实现了 @Import 注解第二种情况中的 DeferredImportSelector 接口,所以会执行如下所示的 selectImports 方法:
1
2
3
4
5
6
7
8
9
10
11
12
13
14
15
16
17
18
19
20
21
22
23
24
25
26
27
28
29
30
31
32
33
34
35
36
37
38
39
40
41
42
43
44
45
46
47
48
49
50
51
52
53
54
55
56
57
58
59
60
61
62
63
64
65
66
67
68
69
70
71
72
73
74
75
76
77
@Override public String[] selectImports(AnnotationMetadata annotationMetadata) { if (!isEnabled(annotationMetadata)) { return NO_IMPORTS; } AutoConfigurationMetadata autoConfigurationMetadata = AutoConfigurationMetadataLoader .loadMetadata(this.beanClassLoader); AnnotationAttributes attributes = getAttributes(annotationMetadata); //获取 configurations 集合 List<String> configurations = getCandidateConfigurations(annotationMetadata, attributes); configurations = removeDuplicates(configurations); Set<String> exclusions = getExclusions(annotationMetadata, attributes); checkExcludedClasses(configurations, exclusions); configurations.removeAll(exclusions); configurations = filter(configurations, autoConfigurationMetadata); fireAutoConfigurationImportEvents(configurations, exclusions); return StringUtils.toStringArray(configurations); }
这段代码的核心是通过 getCandidateConfigurations 方法获取 configurations 集合并进行过滤。getCandidateConfigurations 方法如下所示:
1
2
3
4
5
6
7
8
9
10
11
12
13
14
15
16
17
18
19
20
21
22
23
24
25
26
27
28
29
30
31
32
33
protected List<String> getCandidateConfigurations(AnnotationMetadata metadata, AnnotationAttributes attributes) { List<String> configurations = SpringFactoriesLoader.loadFactoryNames( getSpringFactoriesLoaderFactoryClass(), getBeanClassLoader()); Assert.notEmpty(configurations, "No auto configuration classes found in META-INF/spring.factories. If you " + "are using a custom packaging, make sure that file is correct."); return configurations; }
这段代码中可以先关注 Assert 校验,该校验是一个非空校验,会提示 “在 META-INF/spring.factories 中没有找到自动配置类” 这个异常信息。看到这里,不得不提到 JDK 中的 SPI 机制,因为无论从 SpringFactoriesLoader 这个类的命名上,还是 META-INF/spring.factories 这个文件目录,两者之间都存在很大的相通性。关于 JDK 中的 SPI 机制,我们在 05 讲的后续内容中马上就会介绍到。
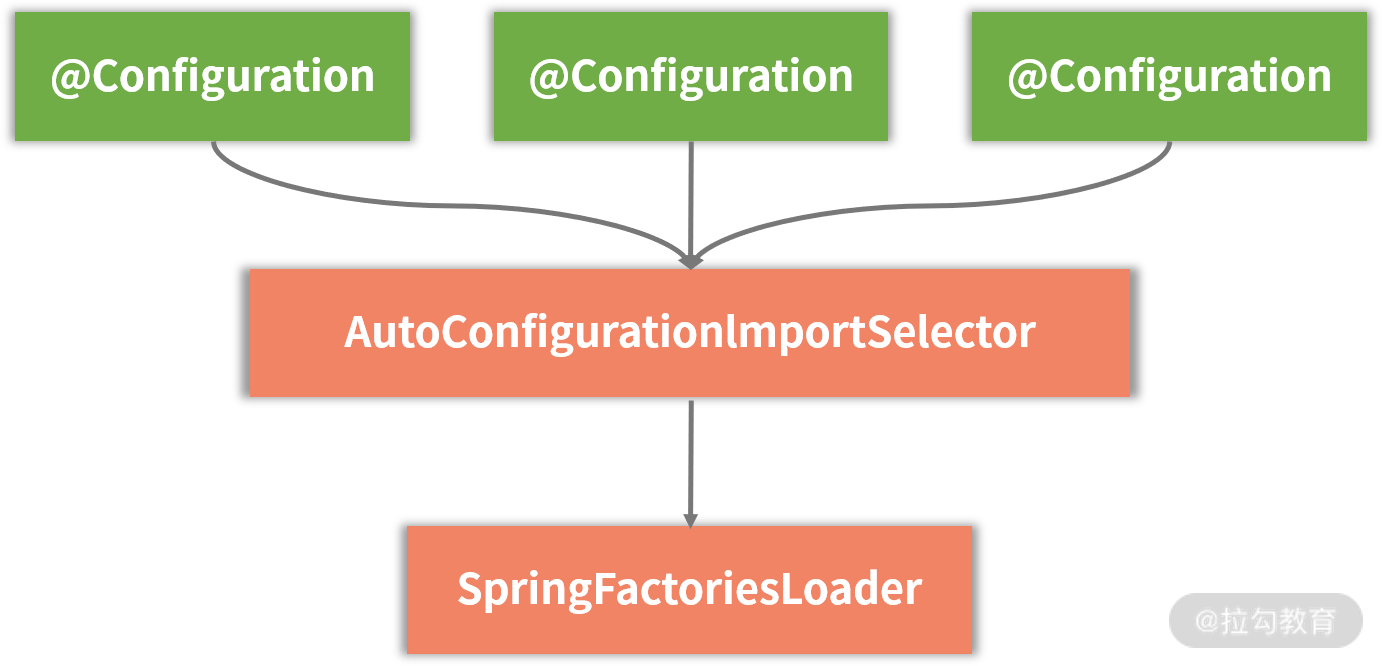
从类名上看,AutoConfigurationImportSelector 类是一种选择器,负责从各种配置项中找到需要导入的具体配置类。该类的结构如下图所示:
AutoConfigurationImportSelector 类层结构图
显然,AutoConfigurationImportSelector 所依赖的最关键组件就是 SpringFactoriesLoader,下面我们对其进行具体展开。
SPI 机制和 SpringFactoriesLoader 要想理解 SpringFactoriesLoader 类,我们首先需要了解 JDK 中 SPI(Service Provider Interface,服务提供者接口)机制。
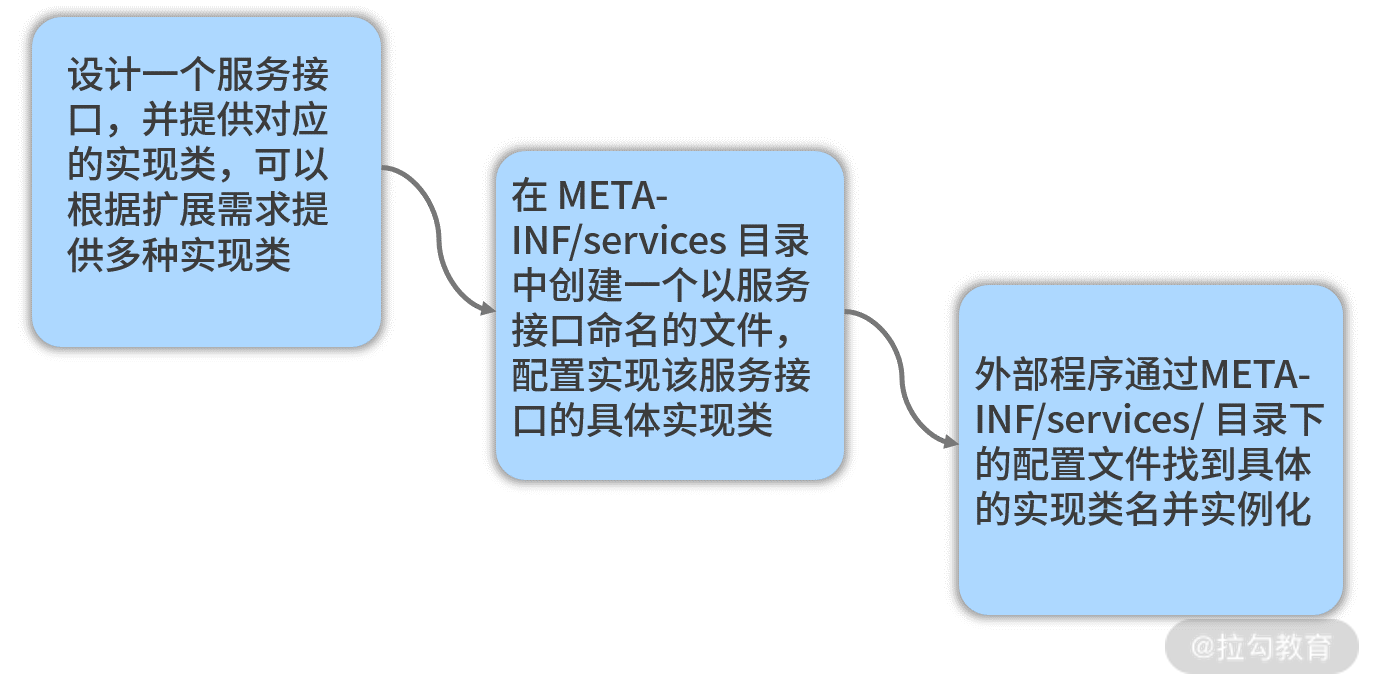
JDK 中的 SPI 机制 JDK 提供了用于服务查找的一个工具类 java.util.ServiceLoader 来实现 SPI 机制。当服务提供者提供了服务接口的一种实现之后,我们可以在 jar 包的 META-INF/services/ 目录下创建一个以服务接口命名的文件,该文件里配置着一组 Key-Value,用于指定服务接口与实现该服务接口具体实现类的映射关系。而当外部程序装配这个 jar 包时,就能通过该 jar 包 META-INF/services/ 目录中的配置文件找到具体的实现类名,并装载实例化,从而完成模块的注入。SPI 提供了一种约定,基于该约定就能很好地找到服务接口的实现类,而不需要在代码里硬编码指定。JDK 中 SPI 机制开发流程如下图所示:
JDK 中 SPI 机制开发流程图
SpringFactoriesLoader SpringFactoriesLoader 类似这种 SPI 机制,只不过以服务接口命名的文件是放在 META-INF/spring.factories 文件夹下,对应的 Key 为 EnableAutoConfiguration。SpringFactoriesLoader 会查找所有 META-INF/spring.factories 文件夹中的配置文件,并把 Key 为 EnableAutoConfiguration 所对应的配置项通过反射实例化为配置类并加载到容器中。这一点我们可以在 SpringFactoriesLoader 的 loadSpringFactories 方法中进行印证:
1
2
3
4
5
6
7
8
9
10
11
12
13
14
15
16
17
18
19
20
21
22
23
24
25
26
27
28
29
30
31
32
33
34
35
36
37
38
39
40
41
42
43
44
45
46
47
48
49
50
51
52
53
54
55
56
57
58
59
60
61
62
63
64
65
66
67
68
69
70
71
72
73
74
75
76
77
78
79
80
81
82
83
84
85
86
87
88
89
90
91
92
93
94
95
96
97
98
99
100
101
102
103
104
105
106
107
108
109
110
111
112
113
114
115
116
117
private static Map<String, List<String>> loadSpringFactories(@Nullable ClassLoader classLoader) { MultiValueMap<String, String> result = cache.get(classLoader); if (result != null) { return result; } try { Enumeration<URL> urls = (classLoader != null ? classLoader.getResources(FACTORIES_RESOURCE_LOCATION) : ClassLoader.getSystemResources(FACTORIES_RESOURCE_LOCATION)); result = new LinkedMultiValueMap<>(); while (urls.hasMoreElements()) { URL url = urls.nextElement(); UrlResource resource = new UrlResource(url); Properties properties = PropertiesLoaderUtils.loadProperties(resource); for (Map.Entry<?, ?> entry : properties.entrySet()) { String factoryClassName = ((String) entry.getKey()).trim(); for (String factoryName : StringUtils.commaDelimitedListToStringArray((String) entry.getValue())) { result.add(factoryClassName, factoryName.trim()); } } } cache.put(classLoader, result); return result; } catch (IOException ex) { throw new IllegalArgumentException("Unable to load factories from location [" + FACTORIES_RESOURCE_LOCATION + "]", ex); } }
以下就是 spring-boot-autoconfigure 工程中所使用的 spring.factories 配置文件片段,可以看到 EnableAutoConfiguration 项中包含了各式各样的配置项,这些配置项在 Spring Boot 启动过程中都能够通过 SpringFactoriesLoader 加载到运行时环境,从而实现自动化配置:
1
2
3
4
5
6
7
8
9
10
11
12
13
14
15
16
17
18
19
20
21
22
23
24
25
26
27
28
29
30
31
32
33
34
35
36
37
38
39
40
41
42
43
44
45
46
47
48
49
# Auto Configure org.springframework.boot.autoconfigure.EnableAutoConfiguration=\ org.springframework.boot.autoconfigure.admin.SpringApplicationAdminJmxAutoConfiguration,\ org.springframework.boot.autoconfigure.aop.AopAutoConfiguration,\ org.springframework.boot.autoconfigure.amqp.RabbitAutoConfiguration,\ org.springframework.boot.autoconfigure.MessageSourceAutoConfiguration,\ org.springframework.boot.autoconfigure.PropertyPlaceholderAutoConfiguration,\ org.springframework.boot.autoconfigure.batch.BatchAutoConfiguration,\ org.springframework.boot.autoconfigure.cache.CacheAutoConfiguration,\ org.springframework.boot.autoconfigure.cassandra.CassandraAutoConfiguration,\ org.springframework.boot.autoconfigure.cloud.CloudAutoConfiguration,\ org.springframework.boot.autoconfigure.context.ConfigurationPropertiesAutoConfiguration,\ …
以上就是 Spring Boot 中基于 @SpringBootApplication 注解实现自动配置的基本过程和原理。当然,@SpringBootApplication 注解也可以基于外部配置文件加载配置信息。基于约定优于配置思想,Spring Boot 在加载外部配置文件的过程中大量使用了默认配置。
@ConditionalOn 系列条件注解 Spring Boot 默认提供了 100 多个 AutoConfiguration 类,显然我们不可能会全部引入。所以在自动装配时,系统会去类路径下寻找是否有对应的配置类。如果有对应的配置类,则按条件进行判断,决定是否需要装配。这里就引出了在阅读 Spring Boot 代码时经常会碰到的另一批注解,即 @ConditionalOn 系列条件注解。
@ConditionalOn 系列条件注解的示例 我们先通过一个简单的示例来了解 @ConditionalOn 系列条件注解的使用方式,例如以下代码就是这类注解的一种典型应用,该代码位于 Spring Cloud Config 的客户端代码工程 spring-cloud-config-client 中:
1
2
3
4
5
6
7
8
9
10
11
12
13
14
15
16
17
18
19
20
21
22
23
24
25
@Bean @ConditionalOnMissingBean(ConfigServicePropertySourceLocator.class) @ConditionalOnProperty(value = "spring.cloud.config.enabled", matchIfMissing = true) public ConfigServicePropertySourceLocator configServicePropertySource(ConfigClientProperties properties) { ConfigServicePropertySourceLocator locator = new ConfigServicePropertySourceLocator( properties); return locator; }
可以看到,这里运用了两个 @ConditionalOn 注解,一个是 @ConditionalOnMissingBean,一个是 @ConditionalOnProperty。再比如在 Spring Cloud Config 的服务器端代码工程 spring-cloud-config-server 中,存在如下 ConfigServerAutoConfiguration 自动配置类:
1
2
3
4
5
6
7
8
9
10
11
12
13
14
15
16
17
18
19
20
21
22
23
24
25
@Configuration @ConditionalOnBean(ConfigServerConfiguration.Marker.class) @EnableConfigurationProperties(ConfigServerProperties.class) @Import({ EnvironmentRepositoryConfiguration.class, CompositeConfiguration.class, ResourceRepositoryConfiguration.class, ConfigServerEncryptionConfiguration.class, ConfigServerMvcConfiguration.class }) public class ConfigServerAutoConfiguration { }
这里我们运用了 @ConditionalOnBean 注解。实际上,Spring Boot 中提供了一系列的条件注解,常见的包括:
@ConditionalOnProperty:只有当所提供的属性属于 true 时才会实例化 Bean @ConditionalOnBean:只有在当前上下文中存在某个对象时才会实例化 Bean @ConditionalOnClass:只有当某个 Class 位于类路径上时才会实例化 Bean @ConditionalOnExpression:只有当表达式为 true 的时候才会实例化 Bean @ConditionalOnMissingBean:只有在当前上下文中不存在某个对象时才会实例化 Bean @ConditionalOnMissingClass:只有当某个 Class 在类路径上不存在的时候才会实例化 Bean @ConditionalOnNotWebApplication:只有当不是 Web 应用时才会实例化 Bean 当然 Spring Boot 还提供了一些不大常用的 @ConditionalOnXXX 注解,这些注解都定义在 org.springframework.boot.autoconfigure.condition 包中。
显然上述 ConfigServicePropertySourceLocator 类中只有在 “spring.cloud.config.enabled” 属性为 true(通过 matchIfMissing 配置项表示默认即为 true)以及类路径上不存在 ConfigServicePropertySourceLocator 时才会进行实例化。而 ConfigServerAutoConfiguration 只有在类路径上存在 ConfigServerConfiguration.Marker 类时才会进行实例化,这是一种常用的自动配置控制技巧。
@ConditionalOn 系列条件注解的实现原理 @ConditionalOn 系列条件注解非常多,我们无意对所有这些组件进行展开。事实上这些注解的实现原理也大致相同,我们只需要深入了解其中一个就能做到触类旁通。这里我们挑选 @ConditionalOnClass 注解进行展开,该注解定义如下:
1
2
3
4
5
6
7
8
9
10
11
12
13
14
15
16
17
18
19
20
21
22
23
24
25
26
27
28
29
@Target({ ElementType.TYPE, ElementType.METHOD }) @Retention(RetentionPolicy.RUNTIME) @Documented @Conditional(OnClassCondition.class) public @interface ConditionalOnClass { Class<?>[] value() default {}; String[] name() default {}; }
可以看到, @ConditionalOnClass 注解本身带有两个属性,一个 Class 类型的 value,一个 String 类型的 name,所以我们可以采用这两种方式中的任意一种来使用该注解。同时 ConditionalOnClass 注解本身还带了一个 @Conditional(OnClassCondition.class) 注解。所以, ConditionalOnClass 注解的判断条件其实就包含在 OnClassCondition 这个类中。
OnClassCondition 是 SpringBootCondition 的子类,而 SpringBootCondition 又实现了Condition 接口。Condition 接口只有一个 matches 方法,如下所示:
1
2
3
4
5
6
7
8
9
public interface Condition { boolean matches(ConditionContext context, AnnotatedTypeMetadata metadata); }
SpringBootCondition 中的 matches 方法实现如下:
1
2
3
4
5
6
7
8
9
10
11
12
13
14
15
16
17
18
19
20
21
22
23
24
25
26
27
28
29
30
31
32
33
34
35
36
37
38
39
40
41
42
43
44
45
@Override public final boolean matches(ConditionContext context, AnnotatedTypeMetadata metadata) { String classOrMethodName = getClassOrMethodName(metadata); try { ConditionOutcome outcome = getMatchOutcome(context, metadata); logOutcome(classOrMethodName, outcome); recordEvaluation(context, classOrMethodName, outcome); return outcome.isMatch(); } //省略其他方法 }
这里的 getClassOrMethodName 方法获取被添加了@ConditionalOnClass 注解的类或者方法的名称,而 getMatchOutcome 方法用于获取匹配的输出。我们看到 getMatchOutcome 方法实际上是一个抽象方法,需要交由 SpringBootCondition 的各个子类完成实现,这里的子类就是 OnClassCondition 类。在理解 OnClassCondition 时,我们需要明白在 Spring Boot 中,@ConditionalOnClass 或者 @ConditionalOnMissingClass 注解对应的条件类都是 OnClassCondition,所以在 OnClassCondition 的 getMatchOutcome 中会同时处理两种情况。这里我们挑选处理 @ConditionalOnClass 注解的代码,核心逻辑如下所示:
1
2
3
4
5
6
7
8
9
10
11
12
13
14
15
16
17
18
19
20
21
22
23
24
25
26
27
28
29
30
31
32
33
34
35
36
37
38
39
40
41
42
43
44
45
46
47
48
49
50
51
52
53
ClassLoader classLoader = context.getClassLoader(); ConditionMessage matchMessage = ConditionMessage.empty(); List<String> onClasses = getCandidates(metadata, ConditionalOnClass.class); if (onClasses != null) { List<String> missing = getMatches(onClasses, MatchType.MISSING, classLoader); if (!missing.isEmpty()) { return ConditionOutcome .noMatch(ConditionMessage.forCondition(ConditionalOnClass.class) .didNotFind("required class", "required classes") .items(Style.QUOTE, missing)); } matchMessage = matchMessage.andCondition(ConditionalOnClass.class) .found("required class", "required classes").items(Style.QUOTE, getMatches(onClasses, MatchType.PRESENT, classLoader)); }
这里有两个方法值得注意,一个是 getCandidates 方法,一个是 getMatches 方法。首先通过 getCandidates 方法获取了 ConditionalOnClass 的 name 属性和 value 属性。然后通过 getMatches 方法将这些属性值进行比对,得到这些属性所指定的但在类加载器中不存在的类。如果发现类加载器中应该存在但事实上又不存在的类,则返回一个匹配失败的 Condition;反之,如果类加载器中存在对应类的话,则把匹配信息进行记录并返回一个 ConditionOutcome。
从源码解析到日常开发 在今天的内容中,我们接触到了 Spring Boot 开发过程中非常核心的话题,即自动配置。自动配置是理解 Spring Boot 应用程序构建和运行的关键要素。当我们尝试去理解一个基于 Spring Boot 开发的工具或框架时,今天的内容能帮助你快速切入该工具或框架的实现原理。同时,在日常开发过程中,诸如 SPI 机制和 @ConditionalOn 系列条件注解也都可以直接应用到我们自身的系统设计和开发中,从而提供高扩展性的架构实现方案。
小结与预告 可以说,自动配置是 Spring Boot 最核心和最基本的功能,而 @SpringBootApplication 注解又是 Spring Boot 应用程序的入口。本课时从 @SpringBootApplication 注解入手,详细分析了自动配置机制的实现过程。涉及的知识点比较多,包含 JDK 中的 SPI 机制,以及 @ConditionalOn 系列条件注解,需要你进行分析和掌握。