11 服务发布:如何构建一个 RESTful 风格的 Web 服务?
通过前面课程的学习,我们已经掌握了构建一个 Spring Boot 应用程序的数据访问层组件实现方法。接下来的几讲,我们将讨论另一层组件,即 Web 服务层的构建方式。
服务与服务之间的交互是系统设计和发展的必然需求,其涉及 Web 服务的发布及消费,今天我们先讨论如何在 Spring Boot 应用程序中发布 Web 服务。
SpringCSS 系统中的服务交互
在具体的技术体系介绍之前,我们先来梳理 SpringCSS 案例中服务交互之间的应用场景。
对于客服系统而言,其核心业务流程是生成客服工单,而工单的生成通常需要使用用户账户信息和所关联的订单信息。
在 SpringCSS 案例中,前面几讲我们已经构建了一个用于管理订单的 order-service,接下来我们将分别构建管理用户账户的 account-service 及核心的客服服务 customer-service。
关于三个服务之间的交互方式,我们先通过一张图了解下,如下图所示:
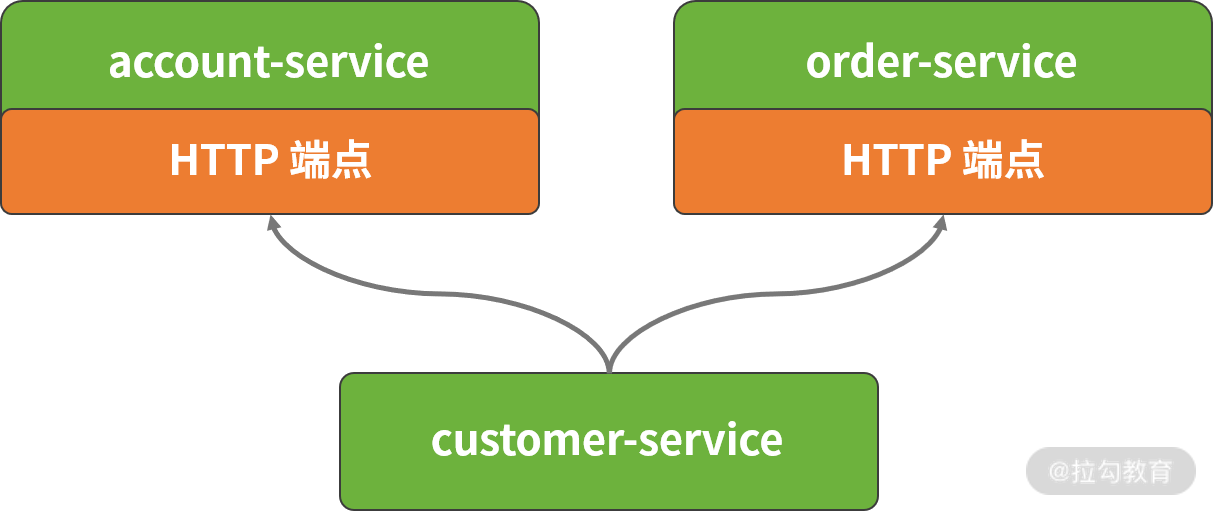
SpringCSS 案例系统中三个服务的交互方式图
实际上,通过上图我们已经可以梳理工单生成 generateCustomerTicket 核心方法的执行流程,这里我们先给出代码的框架,如下代码所示:
1
2
3
4
5
6
7
8
9
10
11
12
13
14
15
16
17
18
19
20
21
22
23
24
25
26
27
28
29
30
31
32
33
34
35
36
37
38
39
40
41
42
43
44
45
46
47
48
49
50
51
52
53
54
55
56
57
58
59
60
61
| public CustomerTicket generateCustomerTicket(Long accountId, String orderNumber) {
// 创建客服工单对象
CustomerTicket customerTicket = new CustomerTicket();
// 从远程 account-service 中获取 Account 对象
Account account = getRemoteAccountById(accountId);
// 从远程 order-service 中获取 Order 读写
Order order = getRemoteOrderByOrderNumber(orderNumber);
// 设置 CustomerTicket 对象并保存
customerTicket.setAccountId(accountId);
customerTicket.setOrderNumber(order.getOrderNumber());
customerTicketRepository.save(customerTicket);
return customerTicket;
}
|
因 getRemoteAccountById 与 getRemoteOrderByOrderNumber 方法都涉及远程 Web 服务的调用,因此首先我们需要创建 Web 服务。
而 Spring Boot 为我们创建 Web 服务提供了非常强大的组件化支持,简单而方便,我们一起来看一下。
创建 RESTful 服务
在当下的分布式系统及微服务架构中,RESTful 风格是一种主流的 Web 服务表现方式。
在接下来的内容中,我们将演示如何使用 Spring Boot 创建 RESTful 服务。但在此之前,我们先来理解什么是 RESTful 服务。
理解 RESTful 架构风格
你可能听说过 REST 这个名称,但并不清楚它的含义。
REST(Representational State Transfer,表述性状态转移)本质上只是一种架构风格而不是一种规范,这种架构风格把位于服务器端的访问入口看作一个资源,每个资源都使用 URI(Universal Resource Identifier,统一资源标识符) 得到一个唯一的地址,且在传输协议上使用标准的 HTTP 方法,比如最常见的 GET、PUT、POST 和 DELETE。
下表展示了 RESTful 风格的一些具体示例:
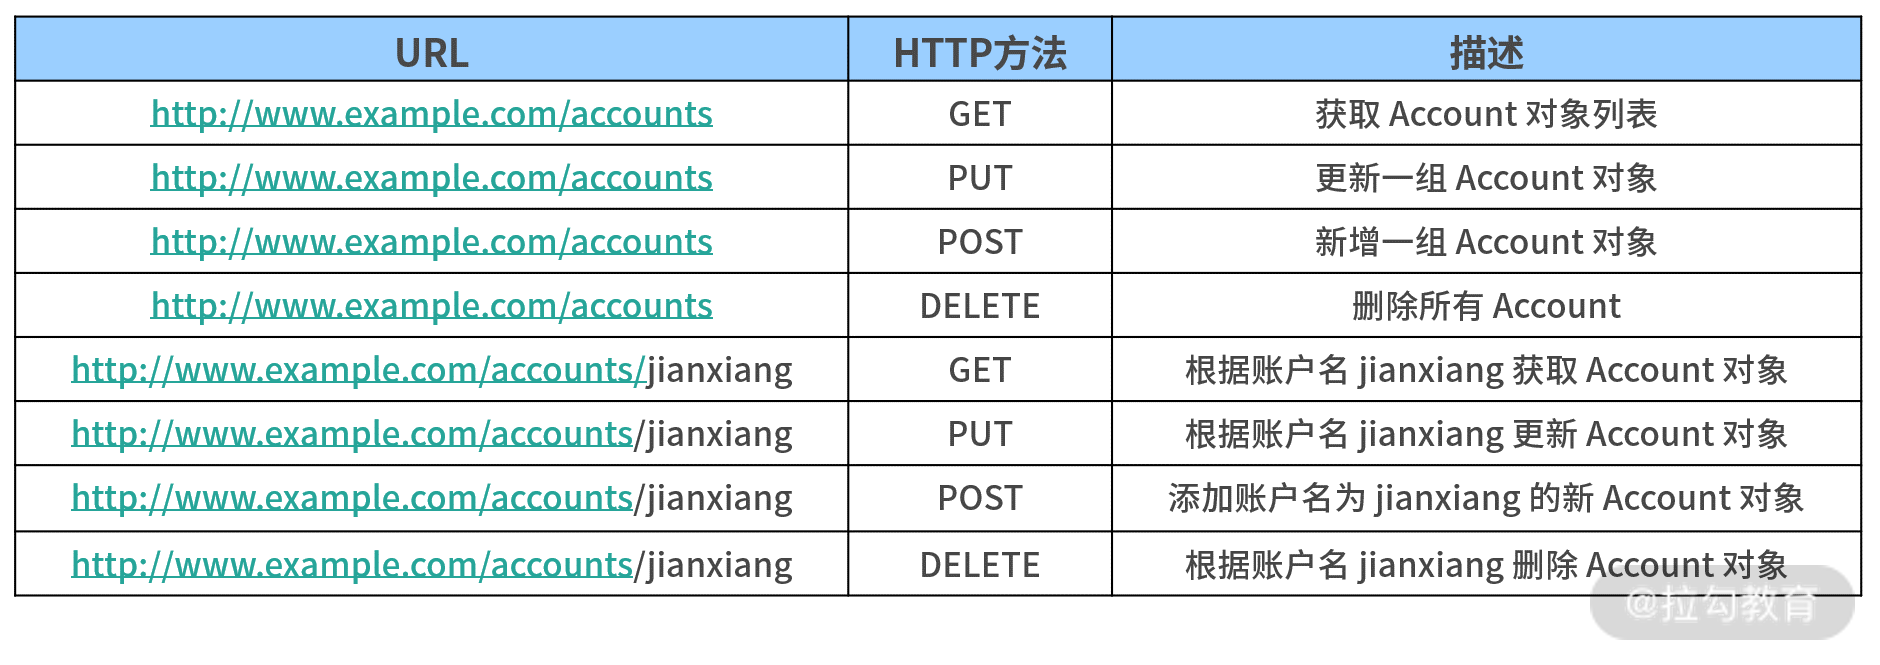
RESTful 风格示例
另一方面,客户端与服务器端的数据交互涉及序列化问题。关于序列化完成业务对象在网络环境上的传输的实现方式有很多,常见的有文本和二进制两大类。
目前 JSON 是一种被广泛采用的序列化方式,本课程中所有的代码实例我们都将 JSON 作为默认的序列化方式。
使用基础注解
在原有 Spring Boot 应用程序的基础上,我们可以通过构建一系列的 Controller 类暴露 RESTful 风格的 HTTP 端点。这里的 Controller 与 Spring MVC 中的 Controller 概念上一致,最简单的 Controller 类如下代码所示:
1
2
3
4
5
6
7
8
9
10
11
12
13
14
15
16
17
18
19
20
21
22
23
24
25
26
27
28
29
| @RestController
public class HelloController {
@GetMapping("/")
public String index() {
return "Hello World!";
}
}
|
从以上代码中可以看到,这里包含了 @RestController 和 @GetMapping 这两个注解。
其中,@RestController 注解继承自 Spring MVC 中的 @Controller 注解,顾名思义就是一个基于 RESTful 风格的 HTTP 端点,并且会自动使用 JSON 实现 HTTP 请求和响应的序列化/反序列化方式。
通过这个特性,在构建 RESTful 服务时,我们可以使用 @RestController 注解代替 @Controller 注解以简化开发。
另外一个 @GetMapping 注解也与 Spring MVC 中的 @RequestMapping 注解类似。我们先来看看 @RequestMapping 注解的定义,该注解所提供的属性都比较容易理解,如下代码所示:
1
2
3
4
5
6
7
8
9
10
11
12
13
14
15
16
17
18
19
20
21
22
23
24
25
26
27
28
29
30
31
32
33
34
35
36
37
38
39
40
41
42
43
44
45
46
47
48
49
50
51
52
53
54
55
56
57
58
59
60
61
62
63
64
65
66
67
68
69
70
71
72
73
74
75
76
77
78
79
80
81
82
83
84
85
| @Target({ElementType.METHOD, ElementType.TYPE})
@Retention(RetentionPolicy.RUNTIME)
@Documented
@Mapping
public @interface RequestMapping {
String name() default "";
@AliasFor("path")
String[] value() default {};
@AliasFor("value")
String[] path() default {};
RequestMethod[] method() default {};
String[] params() default {};
String[] headers() default {};
String[] consumes() default {};
String[] produces() default {};
}
|
而 @GetMapping 的注解的定义与 @RequestMapping 非常类似,只是默认使用了 RequestMethod.GET 指定 HTTP 方法,如下代码所示:
1
2
3
4
5
6
7
8
9
10
11
12
13
14
15
16
17
| @Target(ElementType.METHOD)
@Retention(RetentionPolicy.RUNTIME)
@Documented
@RequestMapping(method = RequestMethod.GET)
public @interface GetMapping {
|
Spring Boot 2 中引入的一批新注解中,除了 @GetMapping ,还有 @PutMapping、@PostMapping、@DeleteMapping 等注解,这些注解极大方便了开发人员显式指定 HTTP 的请求方法。当然,你也可以继续使用原先的 @RequestMapping 实现同样的效果。
我们再看一个更加具体的示例,以下代码展示了 account-service 中的 AccountController。
1
2
3
4
5
6
7
8
9
10
11
12
13
14
15
16
17
18
19
20
21
22
23
24
25
26
27
28
29
30
31
32
33
34
35
36
37
38
39
40
41
42
43
44
45
46
47
48
49
| @RestController
@RequestMapping(value = "accounts")
public class AccountController {
@GetMapping(value = "/{accountId}")
public Account getAccountById(@PathVariable("accountId") Long accountId) {
Account account = new Account();
account.setId(1L);
account.setAccountCode("DemoCode");
account.setAccountName("DemoName");
return account;
}
}
|
在该 Controller 中,通过静态的业务代码我们完成了根据账号编号(accountId)获取用户账户信息的业务流程。
这里用到了两层 Mapping,第一层的 @RequestMapping 注解在服务层级定义了服务的根路径“/accounts”,第二层的 @GetMapping 注解则在操作级别定义了 HTTP 请求方法的具体路径及参数信息。
到这里,一个典型的 RESTful 服务已经开发完成了,现在我们可以通过 java –jar 命令直接运行 Spring Boot 应用程序了。
在启动日志中,我们发现了以下输出内容(为了显示效果,部分内容做了调整),可以看到自定义的这个 AccountController 已经成功启动并准备接收响应。
1
| RequestMappingHandlerMapping : Mapped "{[/accounts/{accountId}], methods=[GET]}" onto public com.springcss.account.domain.Account com.springcss.account.controller.AccountController.getAccountById (java.lang.Long)
|
在本课程中,我们将引入 Postman 来演示如何通过 HTTP 协议暴露的端点进行远程服务访问。
Postman 为我们完成 HTTP 请求和响应过程提供了可视化界面,你可以尝试编写一个 AccountController,并通过 Postman 访问“http://localhost:8082/accounts/1”端点以得到响应结果。
在前面的 AccountController 中,我们还看到了一个新的注解 @PathVariable,该注解作用于输入的参数,下面我们就来看看如何通过这些注解控制请求的输入。
控制请求输入和输出
Spring Boot 提供了一系列简单有用的注解来简化对请求输入的控制过程,常用的包括 @PathVariable、@RequestParam 和 @RequestBody。
其中 @PathVariable 注解用于获取路径参数,即从类似 url/{id} 这种形式的路径中获取 {id} 参数的值。该注解的定义如下代码所示:
1
2
3
4
5
6
7
8
9
10
11
12
13
14
15
16
17
18
19
20
21
22
23
24
25
26
27
28
29
30
31
32
33
34
35
36
37
38
39
40
41
42
43
44
45
| @Target(ElementType.PARAMETER)
@Retention(RetentionPolicy.RUNTIME)
@Documented
public @interface PathVariable {
@AliasFor("name")
String value() default "";
@AliasFor("value")
String name() default "";
boolean required() default true;
}
|
通常,使用 @PathVariable 注解时,我们只需要指定一个参数的名称即可。我们可以再看一个示例,如下代码所示:
1
2
3
4
5
6
7
8
9
10
11
12
13
14
15
16
17
18
19
20
21
| @GetMapping(value = "/{accountName}")
public Account getAccountByAccountName(@PathVariable("accountName") String accountName) {
Account account = accountService.getAccountByAccountName(accountName);
return account;
}
|
@RequestParam 注解的作用与 @PathVariable 注解类似,也是用于获取请求中的参数,但是它面向类似 url?id=XXX 这种路径形式。
该注解的定义如下代码所示,相较 @PathVariable 注解,它只是多了一个设置默认值的 defaultValue 属性。
1
2
3
4
5
6
7
8
9
10
11
12
13
14
15
16
17
18
19
20
21
22
23
24
25
26
27
28
29
30
31
32
33
34
35
36
37
38
39
40
41
42
43
44
45
46
47
48
49
50
51
52
53
| @Target(ElementType.PARAMETER)
@Retention(RetentionPolicy.RUNTIME)
@Documented
public @interface RequestParam {
@AliasFor("name")
String value() default "";
@AliasFor("value")
String name() default "";
boolean required() default true;
String defaultValue() default ValueConstants.DEFAULT_NONE;
}
|
在 HTTP 协议中,content-type 属性用来指定所传输的内容类型,我们可以通过 @RequestMapping 注解中的 produces 属性来设置这个属性。
在设置这个属性时,我们通常会将其设置为“application/json”,如下代码所示:
1
2
3
4
5
6
7
8
9
| @RestController
@RequestMapping(value = "accounts", produces="application/json")
public class AccountController {
|
@RequestBody 注解用来处理 content-type 为 application/json 类型时的编码内容,通过 @RequestBody 注解可以将请求体中的 JSON 字符串绑定到相应的 JavaBean 上。
如下代码所示就是一个使用 @RequestBody 注解来控制输入的场景。
1
2
3
4
5
| @PutMapping(value = "/")
public void updateAccount(@RequestBody Account account) {
|
如果使用 @RequestBody 注解,我们可以在 Postman 中输入一个 JSON 字符串来构建输入对象,如下代码所示:
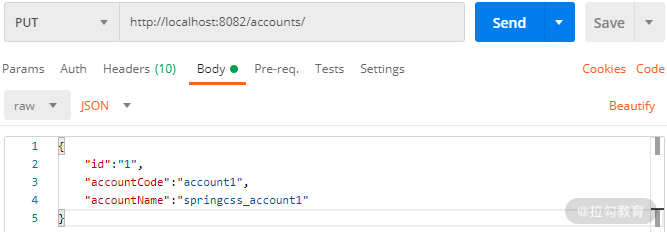
使用 Postman 输入 JSON 字符串发起 HTTP 请求示例图
通过以上内容的讲解,我们发现使用注解的操作很简单,接下来我们有必要探讨下控制请求输入的规则。
关于控制请求输入的规则,关键在于按照 RESTful 风格的设计原则设计 HTTP 端点,对于这点业界也存在一些约定。
- 以 Account 这个领域实体为例,如果我们把它视为一种资源,那么 HTTP 端点的根节点命名上通常采用复数形式,即“/accounts”,正如前面的示例代码所示。
- 在设计 RESTful API 时,我们需要基于 HTTP 语义设计对外暴露的端点的详细路径。针对常见的 CRUD 操作,我们展示了 RESTful API 与非 RESTful API 的一些区别。
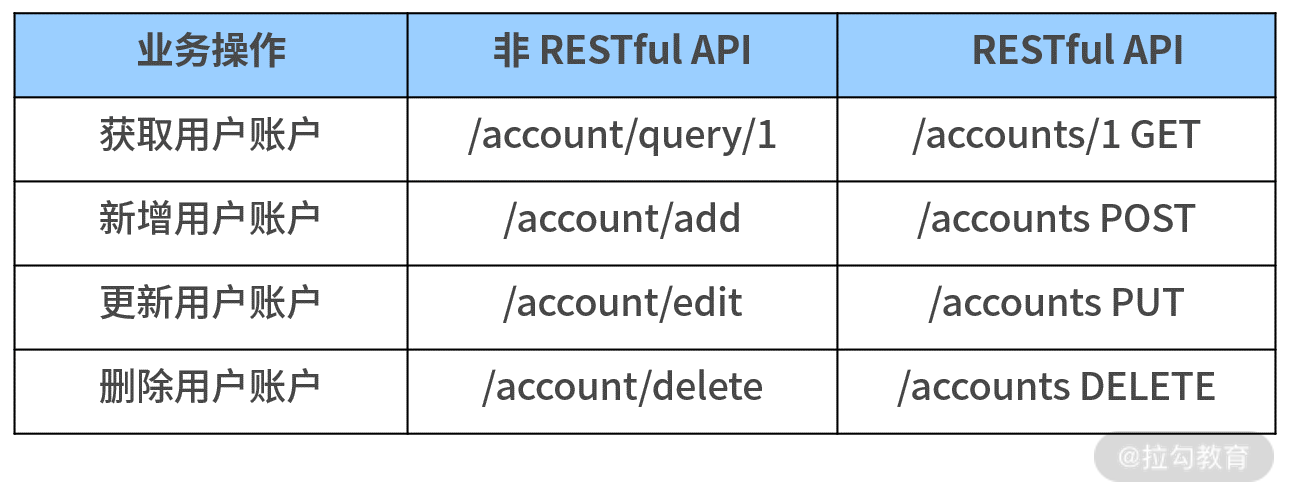
RESTful 风格对比示例
基于以上介绍的控制请求输入的实现方法,我们可以给出 account-service 中 AccountController 类的完整实现过程,如下代码所示:
1
2
3
4
5
6
7
8
9
10
11
12
13
14
15
16
17
18
19
20
21
22
23
24
25
26
27
28
29
30
31
32
33
34
35
36
37
38
39
40
41
42
43
44
45
46
47
48
49
50
51
52
53
54
55
56
57
58
59
60
61
62
63
64
65
66
67
68
69
70
71
72
73
74
75
76
77
78
79
80
81
82
83
84
85
86
87
88
89
90
91
92
93
94
95
96
97
98
99
100
101
102
103
104
105
106
107
108
109
110
111
112
113
114
115
116
117
118
119
120
121
122
123
124
125
126
127
128
129
130
131
132
133
| @RestController
@RequestMapping(value = "accounts", produces="application/json")
public class AccountController {
@Autowired
private AccountService accountService;
@GetMapping(value = "/{accountId}")
public Account getAccountById(@PathVariable("accountId") Long accountId) {
Account account = accountService.getAccountById(accountId);
return account;
}
@GetMapping(value = "accountname/{accountName}")
public Account getAccountByAccountName(@PathVariable("accountName") String accountName) {
Account account = accountService.getAccountByAccountName(accountName);
return account;
}
@PostMapping(value = "/")
public void addAccount(@RequestBody Account account) {
accountService.addAccount(account);
}
@PutMapping(value = "/")


public void updateAccount(@RequestBody Account account) {
accountService.updateAccount(account);
}
@DeleteMapping(value = "/")
public void deleteAccount(@RequestBody Account account) {
accountService.deleteAccount(account);
}
}
|
介绍完对请求输入的控制,我们再来讨论如何控制请求的输出。
相较输入控制,输出控制就要简单很多,因为 Spring Boot 所提供的 @RestController 注解已经屏蔽了底层实现的复杂性,我们只需要返回一个普通的业务对象即可。@RestController 注解相当于是 Spring MVC 中 @Controller 和 @ResponseBody 这两个注解的组合,它们会自动返回 JSON 数据。
这里我们也给出了 order-service 中的 OrderController 实现过程,如下代码所示:
1
2
3
4
5
6
7
8
9
10
11
12
13
14
15
16
17
18
19
20
21
22
23
24
25
26
27
28
29
30
31
32
33
34
35
36
37
38
39
40
41
42
43
44
45
46
47
48
49
50
51
52
53
54
55
56
57
58
59
60
61
62
63
64
65
66
67
68
69
70
71
72
73
74
75
76
77
78
79
80
81
82
83
84
85
86
87
88
89
| @RestController
@RequestMapping(value="orders/jpa")
public class JpaOrderController {
@Autowired
JpaOrderService jpaOrderService;
@GetMapping(value = "/{orderId}")
public JpaOrder getOrderById(@PathVariable Long orderId) {
JpaOrder order = jpaOrderService.getOrderById(orderId);
return order;
}
@GetMapping(value = "orderNumber/{orderNumber}")
public JpaOrder getOrderByOrderNumber(@PathVariable String orderNumber) {
JpaOrder order = jpaOrderService.getOrderByOrderNumber(orderNumber);
// JpaOrder order = jpaOrderService.getOrderByOrderNumberByExample(orderNumber);
// JpaOrder order = jpaOrderService.getOrderByOrderNumberBySpecification(orderNumber);
return order;
}
@PostMapping(value = "")
public JpaOrder addOrder(@RequestBody JpaOrder order) {
JpaOrder result = jpaOrderService.addOrder(order);
return result;
}
}
|
从上面示例可以看到,我们使用了 09 讲中介绍的 Spring Data JPA 完成实体对象及数据访问功能。
小结与预告
构建 Web 服务是开发 Web 应用程序的基本需求,而设计并实现 RESTful 风格的 Web 服务是开发人员必须具备的开发技能。
基于 Spring Boot 框架,开发人员只需要使用几个注解就能实现复杂的 HTTP 端点,并暴露给其他服务进行使用,工作都变得非常简单。