关于
极客时间
DDD实战课
- 00 开篇词学好了DDD,你能做什么?
- 01 领域驱动设计:微服务设计为什么要选择DDD
- 02 领域、子域、核心域、通用域和支撑域:傻傻分不清?
- 04 实体和值对象:从领域模型的基础单元看系统设计
- 05 聚合和聚合根:怎样设计聚合?
- 06 领域事件:解耦微服务的关键
- 07 DDD分层架构:有效降低层与层之间的依赖
- 08 微服务架构模型:几种常见模型的对比和分析
- 09 中台:数字转型后到底应该共享什么?
- 10 DDD、中台和微服务:它们是如何协作的?
- 11 DDD实践:如何用DDD重构中台业务模型?
- 12 领域建模:如何用事件风暴构建领域模型?
- 13 代码模型(上):如何使用DDD设计微服务代码模型?
- 14 代码模型(下):如何保证领域模型与代码模型的一致性?
- 15 边界:微服务的各种边界在架构演进中的作用?
- 16 视图:如何实现服务和数据在微服务各层的协作?
- 17 从后端到前端:微服务后,前端如何设计?
- 18 知识点串讲:基于DDD的微服务设计实例
- 19 总结(一):微服务设计和拆分要坚持哪些原则?
- 20 总结(二):分布式架构关键设计10问
Java并发编程实战
- 00 开篇词你为什么需要学习并发编程?
- 01 如何制定性能调优标准?
- 02 如何制定性能调优策略?
- 03 字符串性能优化不容小觑,百M内存轻松存储几十G数据
- 04 慎重使用正则表达式
- 05 ArrayList还是LinkedList?使用不当性能差千倍
- 06 Stream如何提高遍历集合效率?
- 07 深入浅出HashMap的设计与优化
- 08 网络通信优化之IO模型:如何解决高并发下IO瓶颈?
- 09 网络通信优化之序列化:避免使用Java序列化
- 10 网络通信优化之通信协议:如何优化RPC网络通信?
- 11 答疑课堂:深入了解NIO的优化实现原理
- 12 多线程之锁优化(上):深入了解Synchronized同步锁的优化方法
- 13 多线程之锁优化(中):深入了解Lock同步锁的优化方法
- 14 多线程之锁优化(下):使用乐观锁优化并行操作
- 15 多线程调优(上):哪些操作导致了上下文切换?
- 16 多线程调优(下):如何优化多线程上下文切换?
- 17 并发容器的使用:识别不同场景下最优容器
- 18 如何设置线程池大小?
- 19 如何用协程来优化多线程业务?
- 20 磨刀不误砍柴工:欲知JVM调优先了解JVM内存模型
- 21 深入JVM即时编译器JIT,优化Java编译
- 22 如何优化垃圾回收机制?
- 23 如何优化JVM内存分配?
- 24 内存持续上升,我该如何排查问题?
- 25 答疑课堂:模块四热点问题解答
- 26 单例模式:如何创建单一对象优化系统性能?
- 27 原型模式与享元模式:提升系统性能的利器
- 28 如何使用设计模式优化并发编程?
- 29 生产者消费者模式:电商库存设计优化
- 30 装饰器模式:如何优化电商系统中复杂的商品价格策略?
- 31 答疑课堂:模块五思考题集锦
- 32 MySQL调优之SQL语句:如何写出高性能SQL语句?
- 33 MySQL调优之事务:高并发场景下的数据库事务调优
- 34 MySQL调优之索引:索引的失效与优化
- 35 记一次线上SQL死锁事故:如何避免死锁?
- 36 什么时候需要分表分库?
- 37 电商系统表设计优化案例分析
- 38 数据库参数设置优化,失之毫厘差之千里
- 39 答疑课堂:MySQL中InnoDB的知识点串讲
MySQL实战45讲
- 00 开篇词这一次,让我们一起来搞懂MySQL
- 01 基础架构:一条SQL查询语句是如何执行的?
- 02 日志系统:一条SQL更新语句是如何执行的?
- 03 事务隔离:为什么你改了我还看不见?
- 04 深入浅出索引(上)
- 05 深入浅出索引(下)
- 06 全局锁和表锁:给表加个字段怎么有这么多阻碍?
- 07 行锁功过:怎么减少行锁对性能的影响?
- 08 事务到底是隔离的还是不隔离的?
- 09 普通索引和唯一索引,应该怎么选择?
- 10 MySQL为什么有时候会选错索引?
- 11 怎么给字符串字段加索引?
- 12 为什么我的MySQL会“抖”一下?
- 13 为什么表数据删掉一半,表文件大小不变?
- 14 count()这么慢,我该怎么办?
- 15 答疑文章(一):日志和索引相关问题
- 16 “orderby”是怎么工作的?
- 17 如何正确地显示随机消息?
- 18 为什么这些SQL语句逻辑相同,性能却差异巨大?
- 19 为什么我只查一行的语句,也执行这么慢?
- 20 幻读是什么,幻读有什么问题?
- 21 为什么我只改一行的语句,锁这么多?
- 22 MySQL有哪些“饮鸩止渴”提高性能的方法?
- 23 MySQL是怎么保证数据不丢的?
- 24 MySQL是怎么保证主备一致的?
- 25 MySQL是怎么保证高可用的?
- 26 备库为什么会延迟好几个小时?
- 27 主库出问题了,从库怎么办?
- 28 读写分离有哪些坑?
- 29 如何判断一个数据库是不是出问题了?
- 30 答疑文章(二):用动态的观点看加锁
- 31 误删数据后除了跑路,还能怎么办?
- 32 为什么还有kill不掉的语句?
- 33 我查这么多数据,会不会把数据库内存打爆?
- 34 到底可不可以使用join?
- 35 join语句怎么优化?
- 36 为什么临时表可以重名?
- 37 什么时候会使用内部临时表?
- 38 都说InnoDB好,那还要不要使用Memory引擎?
- 39 自增主键为什么不是连续的?
- 40 insert语句的锁为什么这么多?
- 41 怎么最快地复制一张表?
- 42 grant之后要跟着flushprivileges吗?
- 43 要不要使用分区表?
- 44 答疑文章(三):说一说这些好问题
- 45 自增id用完怎么办?
高并发系统设计40问
- 00 开篇词为什么你要学习高并发系统设计?
- 01 高并发系统:它的通用设计方法是什么?
- 02 架构分层:我们为什么一定要这么做?
- 03 系统设计目标(一):如何提升系统性能?
- 04 系统设计目标(二):系统怎样做到高可用?
- 05 系统设计目标(三):如何让系统易于扩展?
- 06 面试现场第一期:当问到组件实现原理时,面试官是在刁难你吗?
- 07 池化技术:如何减少频繁创建数据库连接的性能损耗?
- 08 数据库优化方案(一):查询请求增加时,如何做主从分离?
- 09 数据库优化方案(二):写入数据量增加时,如何实现分库分表?
- 10 发号器:如何保证分库分表后ID的全局唯一性?
- 11 NoSQL:在高并发场景下,数据库和NoSQL如何做到互补?
- 12 缓存:数据库成为瓶颈后,动态数据的查询要如何加速?
- 13 缓存的使用姿势(一):如何选择缓存的读写策略?
- 14 缓存的使用姿势(二):缓存如何做到高可用?
- 15 缓存的使用姿势(三):缓存穿透了怎么办?
- 16 CDN:静态资源如何加速?
- 17 消息队列:秒杀时如何处理每秒上万次的下单请求?
- 18 消息投递:如何保证消息仅仅被消费一次?
- 19 消息队列:如何降低消息队列系统中消息的延迟?
- 20 面试现场第二期:当问到项目经历时,面试官究竟想要了解什么?
- 21 系统架构:每秒1万次请求的系统要做服务化拆分吗?
- 22 微服务架构:微服务化后,系统架构要如何改造?
- 23 RPC框架:10万QPS下如何实现毫秒级的服务调用?
- 24 注册中心:分布式系统如何寻址?
- 25 分布式Trace:横跨几十个分布式组件的慢请求要如何排查?
- 26 负载均衡:怎样提升系统的横向扩展能力?
- 27 API网关:系统的门面要如何做呢?
- 28 多机房部署:跨地域的分布式系统如何做?
- 29 ServiceMesh:如何屏蔽服务化系统的服务治理细节?
- 30 给系统加上眼睛:服务端监控要怎么做?
- 31 应用性能管理:用户的使用体验应该如何监控?
- 32 压力测试:怎样设计全链路压力测试平台?
- 33 配置管理:成千上万的配置项要如何管理?
- 34 降级熔断:如何屏蔽非核心系统故障的影响?
- 35 流量控制:高并发系统中我们如何操纵流量?
- 36 面试现场第三期:你要如何准备一场技术面试呢?
- 37 计数系统设计(一):面对海量数据的计数器要如何做?
- 38 计数系统设计(二):50万QPS下如何设计未读数系统?
- 39 信息流设计(一):通用信息流系统的推模式要如何做?
- 40 信息流设计(二):通用信息流系统的拉模式要如何做?
软件工程之美
- 00 开篇词你为什么应该学好软件工程?
- 01 到底应该怎样理解软件工程?
- 02 工程思维:把每件事都当作一个项目来推进
- 03 瀑布模型:像工厂流水线一样把软件开发分层化
- 04 瀑布模型之外,还有哪些开发模型?
- 05 敏捷开发到底是想解决什么问题?
- 06 大厂都在用哪些敏捷方法?(上)
- 07 大厂都在用哪些敏捷方法?(下)
- 08 怎样平衡软件质量与时间成本范围的关系?
- 09 为什么软件工程项目普遍不重视可行性分析?
- 10 如果你想技术转管理,先来试试管好一个项目
- 11 项目计划:代码未动,计划先行
- 12 流程和规范:红绿灯不是约束,而是用来提高效率
- 13 白天开会,加班写代码的节奏怎么破?
- 14 项目管理工具:一切管理问题,都应思考能否通过工具解决
- 15 风险管理:不能盲目乐观,凡事都应该有B计划
- 16 怎样才能写好项目文档?
- 17 需求分析到底要分析什么?怎么分析?
- 18 原型设计:如何用最小的代价完成产品特性?
- 19 作为程序员,你应该有产品意识
- 20 如何应对让人头疼的需求变更问题?
- 21 架构设计:普通程序员也能实现复杂系统?
- 22 如何为项目做好技术选型?
- 23 架构师:不想当架构师的程序员不是好程序员
- 24 技术债务:是继续修修补补凑合着用,还是推翻重来?
- 25 有哪些方法可以提高开发效率?
- 26 持续交付:如何做到随时发布新版本到生产环境?
- 27 软件工程师的核心竞争力是什么?(上)
- 28 软件工程师的核心竞争力是什么?(下)
- 29 自动化测试:如何把Bug杀死在摇篮里?
- 30 用好源代码管理工具,让你的协作更高效
- 31 软件测试要为产品质量负责吗?
- 32 软件测试:什么样的公司需要专职测试?
- 33 测试工具:为什么不应该通过QQ微信邮件报Bug?
- 34 账号密码泄露成灾,应该怎样预防?
- 35 版本发布:软件上线只是新的开始
- 36 DevOps工程师到底要做什么事情?
- 37 遇到线上故障,你和高手的差距在哪里?
- 38 日志管理:如何借助工具快速发现和定位产品问题?
- 39 项目总结:做好项目复盘,把经验变成能力
- 40 最佳实践:小团队如何应用软件工程?
- 41 为什么程序员的业余项目大多都死了?
- 42 反面案例:盘点那些失败的软件项目
- 43 以VSCode为例,看大型开源项目是如何应用软件工程的?
- 44 微软、谷歌、阿里巴巴等大厂是怎样应用软件工程的?
- 45 从软件工程的角度看微服务、云计算、人工智能这些新技术
SpringCloud微服务实战
- 00 开篇导读
- 01 以真实“商场停车”业务切入——需求分析
- 02 具象业务需求再抽象分解——系统设计
- 03 第一个SpringBoot子服务——会员服务
- 04 如何维护接口文档供外部调用——在线接口文档管理
- 05 认识SpringCloud与SpringCloudAlibaba项目
- 06 服务多不易管理如何破——服务注册与发现
- 07 如何调用本业务模块外的服务——服务调用
- 08 服务响应慢或服务不可用怎么办——快速失败与服务降级
- 09 热更新一样更新服务的参数配置——分布式配置中心
- 10 如何高效读取计费规则等热数据——分布式缓存
- 11 多实例下的定时任务如何避免重复执行——分布式定时任务
- 12 同一套服务如何应对不同终端的需求——服务适配
- 13 采用消息驱动方式处理扣费通知——集成消息中间件
- 14 SpringCloud与Dubbo冲突吗——强强联合
- 15 破解服务中共性问题的繁琐处理方式——接入API网关
- 16 服务压力大系统响应慢如何破——网关流量控制
- 17 集成网关后怎么做安全验证——统一鉴权
- 18 多模块下的接口API如何统一管理——聚合API
- 19 数据分库后如何确保数据完整性——分布式事务
- 20 优惠券如何避免超兑——引入分布式锁
- 21 如何查看各服务的健康状况——系统应用监控
- 22 如何确定一次完整的请求过程——服务链路跟踪
- 23 结束语
深入浅出计算机组成原理
- 00 开篇词为什么你需要学习计算机组成原理?
- 01 冯·诺依曼体系结构:计算机组成的金字塔
- 02 给你一张知识地图,计算机组成原理应该这么学
- 03 通过你的CPU主频,我们来谈谈“性能”究竟是什么?
- 04 穿越功耗墙,我们该从哪些方面提升“性能”?
- 05 计算机指令:让我们试试用纸带编程
- 06 指令跳转:原来if…else就是goto
- 07 函数调用:为什么会发生stackoverflow?
- 08 ELF和静态链接:为什么程序无法同时在Linux和Windows下运行?
- 09 程序装载:“640K内存”真的不够用么?
- 10 动态链接:程序内部的“共享单车”
- 11 二进制编码:“手持两把锟斤拷,口中疾呼烫烫烫”?
- 12 理解电路:从电报机到门电路,我们如何做到“千里传信”?
- 13 加法器:如何像搭乐高一样搭电路(上)?
- 14 乘法器:如何像搭乐高一样搭电路(下)?
- 15 浮点数和定点数(上):怎么用有限的Bit表示尽可能多的信息?
- 16 浮点数和定点数(下):深入理解浮点数到底有什么用?
- 17 建立数据通路(上):指令加运算=CPU
- 18 建立数据通路(中):指令加运算=CPU
- 19 建立数据通路(下):指令加运算=CPU
- 20 面向流水线的指令设计(上):一心多用的现代CPU
- 21 面向流水线的指令设计(下):奔腾4是怎么失败的?
- 22 冒险和预测(一):hazard是“危”也是“机”
- 23 冒险和预测(二):流水线里的接力赛
- 24 冒险和预测(三):CPU里的“线程池”
- 25 冒险和预测(四):今天下雨了,明天还会下雨么?
- 26 Superscalar和VLIW:如何让CPU的吞吐率超过1?
- 27 SIMD:如何加速矩阵乘法?
- 28 异常和中断:程序出错了怎么办?
- 29 CISC和RISC:为什么手机芯片都是ARM?
- 30 GPU(上):为什么玩游戏需要使用GPU?
- 31 GPU(下):为什么深度学习需要使用GPU?
- 32 FPGA、ASIC和TPU(上):计算机体系结构的黄金时代
- 33 解读TPU:设计和拆解一块ASIC芯片
- 34 理解虚拟机:你在云上拿到的计算机是什么样的?
- 35 存储器层次结构全景:数据存储的大金字塔长什么样?
- 36 局部性原理:数据库性能跟不上,加个缓存就好了?
- 37 理解CPUCache(上):“4毫秒”究竟值多少钱?
- 38 高速缓存(下):你确定你的数据更新了么?
- 39 MESI协议:如何让多核CPU的高速缓存保持一致?
- 40 理解内存(上):虚拟内存和内存保护是什么?
- 41 理解内存(下):解析TLB和内存保护
- 42 总线:计算机内部的高速公路
- 43 输入输出设备:我们并不是只能用灯泡显示“0”和“1”
- 44 理解IO_WAIT:IO性能到底是怎么回事儿?
- 45 机械硬盘:Google早期用过的“黑科技”
- 46 SSD硬盘(上):如何完成性能优化的KPI?
- 47 SSD硬盘(下):如何完成性能优化的KPI?
- 48 DMA:为什么Kafka这么快?
- 49 数据完整性(上):硬件坏了怎么办?
- 50 数据完整性(下):如何还原犯罪现场?
- 51 分布式计算:如果所有人的大脑都联网会怎样?
- 52 设计大型DMP系统(上):MongoDB并不是什么灵丹妙药
- 53 设计大型DMP系统(下):SSD拯救了所有的DBA
- 54 理解Disruptor(上):带你体会CPU高速缓存的风驰电掣
- 55 理解Disruptor(下):不需要换挡和踩刹车的CPU,有多快?
消息队列高手课
- 00 开篇词优秀的程序员,你的技术栈中不能只有“增删改查”
- 01 为什么需要消息队列?
- 02 该如何选择消息队列?
- 03 消息模型:主题和队列有什么区别?
- 04 如何利用事务消息实现分布式事务?
- 05 如何确保消息不会丢失
- 06 如何处理消费过程中的重复消息?
- 07 消息积压了该如何处理?
- 08 答疑解惑(一)网关如何接收服务端的秒杀结果?
- 09 学习开源代码该如何入手?
- 10 如何使用异步设计提升系统性能?
- 11 如何实现高性能的异步网络传输?
- 12 序列化与反序列化:如何通过网络传输结构化的数据?
- 13 传输协议:应用程序之间对话的语言
- 14 内存管理:如何避免内存溢出和频繁的垃圾回收?
- 15 Kafka如何实现高性能IO?
- 16 缓存策略:如何使用缓存来减少磁盘IO?
- 17 如何正确使用锁保护共享数据,协调异步线程?
- 18 如何用硬件同步原语(CAS)替代锁?
- 19 数据压缩:时间换空间的游戏
- 20 RocketMQProducer源码分析:消息生产的实现过程
- 21 KafkaConsumer源码分析:消息消费的实现过程
- 22 Kafka和RocketMQ的消息复制实现的差异点在哪?
- 23 RocketMQ客户端如何在集群中找到正确的节点?
- 24 Kafka的协调服务ZooKeeper:实现分布式系统的“瑞士军刀”
- 25 RocketMQ与Kafka中如何实现事务?
- 26 MQTT协议:如何支持海量的在线IoT设备
- 27 Pulsar的存储计算分离设计:全新的消息队列设计思路
- 28 答疑解惑(二):我的100元哪儿去了?
- 29 流计算与消息(一):通过Flink理解流计算的原理
- 30 流计算与消息(二):在流计算中使用Kafka链接计算任务
- 31 动手实现一个简单的RPC框架(一):原理和程序的结构
- 32 动手实现一个简单的RPC框架(二):通信与序列化
- 33 动手实现一个简单的RPC框架(三):客户端
- 34 动手实现一个简单的RPC框架(四):服务端
- 35 答疑解惑(三):主流消息队列都是如何存储消息的?
深入拆解Java虚拟机
- 00 开篇词为什么我们要学习Java虚拟机?
- 01 Java代码是怎么运行的?
- 02 Java的基本类型
- 03 Java虚拟机是如何加载Java类的
- 04 JVM是如何执行方法调用的?(上)
- 05 JVM是如何执行方法调用的?(下)
- 06 JVM是如何处理异常的?
- 07 JVM是如何实现反射的?
- 08 JVM是怎么实现invokedynamic的?(上)
- 09 JVM是怎么实现invokedynamic的?(下)
- 10 Java对象的内存布局
- 11 垃圾回收(上)
- 12 垃圾回收(下)
- 13 Java内存模型
- 14 Java虚拟机是怎么实现synchronized的?
- 15 Java语法糖与Java编译器
- 16 即时编译(上)
- 17 即时编译(下)
- 18 即时编译器的中间表达形式
- 19 Java字节码(基础篇)
- 20 方法内联(上)
- 21 方法内联(下)
- 22 HotSpot虚拟机的intrinsic
- 23 逃逸分析
- 24 字段访问相关优化
- 25 循环优化
- 26 向量化
- 27 注解处理器
- 28 基准测试框架JMH(上)
- 29 基准测试框架JMH(下)
- 30 Java虚拟机的监控及诊断工具(命令行篇)
- 31 Java虚拟机的监控及诊断工具(GUI篇)
- 32 JNI的运行机制
- 33 JavaAgent与字节码注入
- 34 Graal:用Java编译Java
- 35 Truffle:语言实现框架
- 36 SubstrateVM:AOT编译框架
Kafka核心技术与实战
- 00 开篇词为什么要学习Kafka?
- 01 消息引擎系统ABC
- 02 一篇文章带你快速搞定Kafka术语
- 03 Kafka只是消息引擎系统吗?
- 04 我应该选择哪种Kafka?
- 05 聊聊Kafka的版本号
- 06 Kafka线上集群部署方案怎么做?
- 07 最最最重要的集群参数配置(上)
- 08 最最最重要的集群参数配置(下)
- 09 生产者消息分区机制原理剖析
- 10 生产者压缩算法面面观
- 11 无消息丢失配置怎么实现?
- 12 客户端都有哪些不常见但是很高级的功能?
- 13 Java生产者是如何管理TCP连接的?
- 14 幂等生产者和事务生产者是一回事吗?
- 15 消费者组到底是什么?
- 16 揭开神秘的“位移主题”面纱
- 17 消费者组重平衡能避免吗?
- 18 Kafka中位移提交那些事儿
- 19 CommitFailedException异常怎么处理?
- 20 多线程开发消费者实例
- 21 Java消费者是如何管理TCP连接的
- 22 消费者组消费进度监控都怎么实现?
- 23 Kafka副本机制详解
- 24 请求是怎么被处理的?
- 25 消费者组重平衡全流程解析
- 26 你一定不能错过的Kafka控制器
- 27 关于高水位和LeaderEpoch的讨论
- 28 主题管理知多少
- 29 Kafka动态配置了解下?
- 30 怎么重设消费者组位移?
- 31 常见工具脚本大汇总
- 32 KafkaAdminClient:Kafka的运维利器
- 33 Kafka认证机制用哪家?
- 34 云环境下的授权该怎么做?
- 35 跨集群备份解决方案MirrorMaker
- 36 你应该怎么监控Kafka?
- 37 主流的Kafka监控框架
- 38 调优Kafka,你做到了吗?
- 39 从0搭建基于Kafka的企业级实时日志流处理平台
- 40 KafkaStreams与其他流处理平台的差异在哪里?
- 41 KafkaStreamsDSL开发实例
- 42 KafkaStreams在金融领域的应用
透视HTTP协议
- 00 开篇词|ToBeaHTTPHero
- 01 时势与英雄:HTTP的前世今生
- 02 HTTP是什么?HTTP又不是什么?
- 03 HTTP世界全览(上):与HTTP相关的各种概念
- 04 HTTP世界全览(下):与HTTP相关的各种协议
- 05 常说的“四层”和“七层”到底是什么?“五层”“六层”哪去了?
- 06 域名里有哪些门道?
- 07 自己动手,搭建HTTP实验环境
- 08 键入网址再按下回车,后面究竟发生了什么?
- 09 HTTP报文是什么样子的?
- 10 应该如何理解请求方法?
- 11 你能写出正确的网址吗?
- 12 响应状态码该怎么用?
- 13 HTTP有哪些特点?
- 14 HTTP有哪些优点?又有哪些缺点?
- 15 海纳百川:HTTP的实体数据
- 16 把大象装进冰箱:HTTP传输大文件的方法
- 17 排队也要讲效率:HTTP的连接管理
- 18 四通八达:HTTP的重定向和跳转
- 19 让我知道你是谁:HTTP的Cookie机制
- 20 生鲜速递:HTTP的缓存控制
- 21 良心中间商:HTTP的代理服务
- 22 冷链周转:HTTP的缓存代理
- 23 HTTPS是什么?SSLTLS又是什么?
- 24 固若金汤的根本(上):对称加密与非对称加密
- 25 固若金汤的根本(下):数字签名与证书
- 26 信任始于握手:TLS1.2连接过程解析
- 27 更好更快的握手:TLS1.3特性解析
- 28 连接太慢该怎么办:HTTPS的优化
- 29 我应该迁移到HTTPS吗?
- 30 时代之风(上):HTTP2特性概览
- 31 时代之风(下):HTTP2内核剖析
- 32 未来之路:HTTP3展望
- 33 我应该迁移到HTTP2吗?
- 34 Nginx:高性能的Web服务器
- 35 OpenResty:更灵活的Web服务器
- 36 WAF:保护我们的网络服务
- 37 CDN:加速我们的网络服务
- 38 WebSocket:沙盒里的TCP
- 39 HTTP性能优化面面观(上)
- 40 HTTP性能优化面面观(下)
容器实战高手课
- 00 开篇词一个态度两个步骤,成为容器实战高手
- 01 认识容器:容器的基本操作和实现原理
- 02 理解进程(1):为什么我在容器中不能kill1号进程?
- 03 理解进程(2):为什么我的容器里有这么多僵尸进程?
- 04 理解进程(3):为什么我在容器中的进程被强制杀死了?
- 05 容器CPU(1):怎么限制容器的CPU使用?
- 06 容器CPU(2):如何正确地拿到容器CPU的开销?
- 07 LoadAverage:加了CPUCgroup限制,为什么我的容器还是很慢?
- 08 容器内存:我的容器为什么被杀了?
- 09 PageCache:为什么我的容器内存使用量总是在临界点
- 10 Swap:容器可以使用Swap空间吗?
- 11 容器文件系统:我在容器中读写文件怎么变慢了
- 12 容器文件Quota:容器为什么把宿主机的磁盘写满了?
- 13 容器磁盘限速:我的容器里磁盘读写为什么不稳定
- 14 容器中的内存与IO:容器写文件的延时为什么波动很大?
- 15 容器网络:我修改了procsysnet下的参数,为什么在容器中不起效?
- 16 容器网络配置(1):容器网络不通了要怎么调试
- 17 容器网络配置(2):容器网络延时要比宿主机上的高吗
- 18 容器网络配置(3):容器中的网络乱序包怎么这么高?
- 19 容器安全(1):我的容器真的需要privileged权限吗
- 20 容器安全(2):在容器中,我不以root用户来运行程序可以吗?
Java业务开发常见错误100例
- 00 开篇词业务代码真的会有这么多坑?
- 01 使用了并发工具类库,线程安全就高枕无忧了吗?
- 02 代码加锁:不要让“锁”事成为烦心事
- 03 线程池:业务代码最常用也最容易犯错的组件
- 04 连接池:别让连接池帮了倒忙
- 05 HTTP调用:你考虑到超时、重试、并发了吗?
- 06 2成的业务代码的Spring声明式事务,可能都没处理正确
- 07 数据库索引:索引并不是万能药
- 08 判等问题:程序里如何确定你就是你?
- 09 数值计算:注意精度、舍入和溢出问题
- 10 集合类:坑满地的List列表操作
- 11 空值处理:分不清楚的null和恼人的空指针
- 12 异常处理:别让自己在出问题的时候变为瞎子
- 13 日志:日志记录真没你想象的那么简单
- 14 文件IO:实现高效正确的文件读写并非易事
- 15 序列化:一来一回你还是原来的你吗?
- 16 用好Java8的日期时间类,少踩一些“老三样”的坑
- 17 别以为“自动挡”就不可能出现OOM
- 18 当反射、注解和泛型遇到OOP时,会有哪些坑?
- 19 Spring框架:IoC和AOP是扩展的核心
- 20 Spring框架:框架帮我们做了很多工作也带来了复杂度
- 21 代码重复:搞定代码重复的三个绝招
- 22 接口设计:系统间对话的语言,一定要统一
- 23 缓存设计:缓存可以锦上添花也可以落井下石
- 24 业务代码写完,就意味着生产就绪了?
- 25 异步处理好用,但非常容易用错
- 26 数据存储:NoSQL与RDBMS如何取长补短、相辅相成?
- 27 数据源头:任何客户端的东西都不可信任
- 28 安全兜底:涉及钱时,必须考虑防刷、限量和防重
- 29 数据和代码:数据就是数据,代码就是代码
- 30 如何正确保存和传输敏感数据?
- 31 加餐1:带你吃透课程中Java8的那些重要知识点(一)
- 32 加餐2:带你吃透课程中Java8的那些重要知识点(二)
- 33 加餐3:定位应用问题,排错套路很重要
- 34 加餐4:分析定位Java问题,一定要用好这些工具(一)
- 35 加餐5:分析定位Java问题,一定要用好这些工具(二)
- 36 加餐6:这15年来,我是如何在工作中学习技术和英语的?
- 37 加餐7:程序员成长28计
- 38 加餐8:Java程序从虚拟机迁移到Kubernetes的一些坑
左耳听风
- 00 0开篇词洞悉技术的本质,享受科技的乐趣
- 00 1程序员如何用技术变现(上)
- 00 2程序员如何用技术变现(下)
- 00 3Equifax信息泄露始末
- 00 4从Equifax信息泄露看数据安全
- 00 5何为技术领导力
- 00 6如何拥有技术领导力
- 00 7推荐阅读:每个程序员都该知道的事
- 00 8Go语言,Docker和新技术
- 00 9答疑解惑:渴望、热情和选择
- 01 0如何成为一个大家愿意追随的Leader?
- 01 1程序中的错误处理:错误返回码和异常捕捉
- 01 2程序中的错误处理:异步编程和最佳实践
- 01 3魔数0x5f3759df
- 01 4推荐阅读:机器学习101
- 01 5时间管理:同扭曲时间的事儿抗争
- 01 6时间管理:投资赚取时间
- 01 7故障处理最佳实践:应对故障
- 01 8故障处理最佳实践:故障改进
- 01 9答疑解惑:我们应该能够识别的表象和本质
- 02 0分布式系统架构的冰与火
- 02 1从亚马逊的实践,谈分布式系统的难点
- 02 2分布式系统的技术栈
- 02 3分布式系统关键技术:全栈监控
- 02 4分布式系统关键技术:服务调度
- 02 5分布式系统关键技术:流量与数据调度
- 02 6洞悉PaaS平台的本质
- 02 7推荐阅读:分布式系统架构经典资料
- 02 8编程范式游记(1)-起源
- 02 9编程范式游记(2)-泛型编程
- 03 0编程范式游记(3)-类型系统和泛型的本质
- 03 1Git协同工作流,你该怎样选
- 03 2推荐阅读:分布式数据调度相关论文
- 03 3编程范式游记(4)-函数式编程
- 03 4编程范式游记(5)-修饰器模式
- 03 5编程范式游记(6)-面向对象编程
- 03 6编程范式游记(7)-基于原型的编程范式
- 03 7编程范式游记(8)-Go语言的委托模式
- 03 8编程范式游记(9)-编程的本质
- 03 9编程范式游记(10)-逻辑编程范式
- 04 0编程范式游记(11)-程序世界里的编程范式
- 04 1弹力设计篇之“认识故障和弹力设计”
- 04 2弹力设计篇之“隔离设计”
- 04 3弹力设计篇之“异步通讯设计”
- 04 4弹力设计篇之“幂等性设计”
- 04 5弹力设计篇之“服务的状态”
- 04 6弹力设计篇之“补偿事务”
- 04 7弹力设计篇之“重试设计”
- 04 8弹力设计篇之“熔断设计”
- 04 9弹力设计篇之“限流设计”
- 05 0弹力设计篇之“降级设计”
- 05 1弹力设计篇之“弹力设计总结”
- 05 2区块链技术-区块链的革命性及技术概要
- 05 3区块链技术-区块链技术细节-哈希算法
- 05 4区块链技术-区块链技术细节-加密和挖矿
- 05 5区块链技术-去中心化的共识机制
- 05 6区块链技术-智能合约
- 05 7区块链技术-传统金融和虚拟货币
- 05 8管理设计篇之分布式锁
- 05 9管理设计篇之配置中心
- 06 0管理设计篇之边车模式
- 06 1管理设计篇之服务网格
- 06 2管理设计篇之网关模式
- 06 3管理设计篇之部署升级策略
- 06 4性能设计篇之缓存
- 06 5性能设计篇之异步处理
- 06 6性能设计篇之数据库扩展
- 06 7性能设计篇之秒杀
- 06 8性能设计篇之边缘计算
- 06 9程序员练级攻略(2018):开篇词
- 07 0程序员练级攻略(2018):零基础启蒙
- 07 1程序员练级攻略(2018):正式入门
- 07 2程序员练级攻略(2018):程序员修养
- 07 3程序员练级攻略(2018):编程语言
- 07 4程序员练级攻略:理论学科
- 07 5程序员练级攻略(2018):系统知识
- 07 6程序员练级攻略(2018):软件设计
- 07 7程序员练级攻略(2018):Linux系统、内存和网络
- 07 8程序员练级攻略(2018):异步IO模型和Lock-Free编程
- 07 9程序员练级攻略(2018):Java底层知识
- 08 0程序员练级攻略(2018):数据库
- 08 1程序员练级攻略(2018):分布式架构入门
- 08 2程序员练级攻略(2018):分布式架构经典图书和论文
- 08 3程序员练级攻略(2018):分布式架构工程设计
- 08 4程序员练级攻略(2018):微服务
- 08 5程序员练级攻略(2018):容器化和自动化运维
- 08 6程序员练级攻略(2018):机器学习和人工智能
- 08 7程序员练级攻略(2018):前端基础和底层原理
- 08 8程序员练级攻略(2018):前端性能优化和框架
- 08 9程序员练级攻略(2018):UIUX设计
- 09 0程序员练级攻略(2018):技术资源集散地
- 09 1程序员面试攻略:面试前的准备
- 09 2程序员面试攻略:面试中的技巧
- 09 3程序员面试攻略:面试风格
- 09 4程序员面试攻略:实力才是王中王
- 09 5高效学习:端正学习态度
- 09 6高效学习:源头、原理和知识地图
- 09 7高效学习:深度,归纳和坚持实践
- 09 8高效学习:如何学习和阅读代码
- 09 9高效学习:面对枯燥和量大的知识
- 10 0高效沟通:Talk和Code同等重要
- 10 1高效沟通:沟通阻碍和应对方法
- 10 2高效沟通:沟通方式及技巧
- 10 3高效沟通:沟通技术
- 10 4高效沟通:好老板要善于提问
- 10 5高效沟通:好好说话的艺术
- 10 6加餐谈谈我的“三观”
- 10 7结束语业精于勤,行成于思
拉勾教育
24讲吃透分布式数据库
- 00 开篇词吃透分布式数据库,提升职场竞争力
- 01 导论:什么是分布式数据库?聊聊它的前世今生
- 02 SQLvsNoSQL:一次搞清楚五花八门的“SQL”
- 03 数据分片:如何存储超大规模的数据?
- 04 数据复制:如何保证数据在分布式场景下的高可用?
- 05 一致性与CAP模型:为什么需要分布式一致性?
- 06 实践:设计一个最简单的分布式数据库
- 07 概要:什么是存储引擎,为什么需要了解它?
- 08 分布式索引:如何在集群中快速定位数据?
- 09 日志型存储:为什么选择它作为底层存储?
- 10 事务处理与恢复(上):数据库崩溃后如何保证数据不丢失?
- 11 事务处理与恢复(下):如何控制并发事务?
- 12 引擎拓展:解读当前流行的分布式存储引擎
- 13 概要:分布式系统都要解决哪些问题?
- 14 错误侦测:如何保证分布式系统稳定?
- 15 领导选举:如何在分布式系统内安全地协调操作?
- 16 再谈一致性:除了CAP之外的一致性模型还有哪些?
- 17 数据可靠传播:反熵理论如何帮助数据库可靠工作?
- 18 分布式事务(上):除了XA,还有哪些原子提交算法吗?
- 19 分布式事务(下):Spanner与Calvin的巅峰对决
- 20 共识算法:一次性说清楚Paxos、Raft等算法的区别
- 21 知识串讲:如何取得性能和可扩展性的平衡?
- 22 发展与局限:传统数据库在分布式领域的探索
- 23 数据库中间件:传统数据库向分布式数据库的过渡
- 24 现状解读:分布式数据库的最新发展情况
深入浅出Java虚拟机
- 00 开篇词:JVM,一块难啃的骨头
- 01 一探究竟:为什么需要JVM?它处在什么位置?
- 02 大厂面试题:你不得不掌握的JVM内存管理
- 03 大厂面试题:从覆盖JDK的类开始掌握类的加载机制
- 04 动手实践:从栈帧看字节码是如何在JVM中进行流转的
- 05 大厂面试题:得心应手应对OOM的疑难杂症
- 06 深入剖析:垃圾回收你真的了解吗?(上)
- 07 深入剖析:垃圾回收你真的了解吗?(下)
- 08 大厂面试题:有了G1还需要其他垃圾回收器吗?
- 09 案例实战:亿级流量高并发下如何进行估算和调优
- 10 第09讲:案例实战:面对突如其来的GC问题如何下手解决
- 11 第10讲:动手实践:自己模拟JVM内存溢出场景
- 12 第11讲:动手实践:遇到问题不要慌,轻松搞定内存泄漏
- 13 工具进阶:如何利用MAT找到问题发生的根本原因
- 14 动手实践:让面试官刮目相看的堆外内存排查
- 15 预警与解决:深入浅出GC监控与调优
- 16 案例分析:一个高死亡率的报表系统的优化之路
- 17 案例分析:分库分表后,我的应用崩溃了
- 18 动手实践:从字节码看方法调用的底层实现
- 19 大厂面试题:不要搞混JMM与JVM
- 20 动手实践:从字节码看并发编程的底层实现
- 21 动手实践:不为人熟知的字节码指令
- 22 深入剖析:如何使用JavaAgent技术对字节码进行修改
- 23 动手实践:JIT参数配置如何影响程序运行?
- 24 案例分析:大型项目如何进行性能瓶颈调优?
- 25 未来:JVM的历史与展望
- 26 福利:常见JVM面试题补充
分布式技术原理与实战45讲
- 00 开篇词:搭建分布式知识体系,挑战高薪Offer
- 01 如何证明分布式系统的CAP理论?
- 02 不同数据一致性模型有哪些应用?
- 03 如何透彻理解Paxos算法?
- 04 ZooKeeper如何保证数据一致性?
- 05 共识问题:区块链如何确认记账权?
- 06 如何准备一线互联网公司面试?
- 07 分布式事务有哪些解决方案?
- 08 对比两阶段提交,三阶段协议有哪些改进?
- 09 MySQL数据库如何实现XA规范?
- 10 如何在业务中体现TCC事务模型?
- 11 分布式锁有哪些应用场景和实现?
- 12 如何使用Redis快速实现分布式锁?
22讲通关Go语言
- 00 开篇词Go为开发者的需求设计,带你实现高效工作
- 01 基础入门:编写你的第一个Go语言程序
- 02 数据类型:你必须掌握的数据类型有哪些?
- 03 控制结构:if、for、switch逻辑语句的那些事儿
- 04 集合类型:如何正确使用array、slice和map?
- 05 函数和方法:Go语言中的函数和方法到底有什么不同?
- 06 struct和interface:结构体与接口都实现了哪些功能?
- 07 错误处理:如何通过error、deferred、panic等处理错误?
- 08 并发基础:Goroutines和Channels的声明与使用
- 09 同步原语:sync包让你对并发控制得心应手
- 10 Context:你必须掌握的多线程并发控制神器
- 11 并发模式:Go语言中即学即用的高效并发模式
- 12 指针详解:在什么情况下应该使用指针?
- 13 参数传递:值、引用及指针之间的区别?
- 14 内存分配:new还是make?什么情况下该用谁?
- 15 运行时反射:字符串和结构体之间如何转换?
- 16 非类型安全:让你既爱又恨的unsafe
- 17 SliceHeader:slice如何高效处理数据?
- 18 质量保证:Go语言如何通过测试保证质量?
- 19 性能优化:Go语言如何进行代码检查和优化?
- 20 协作开发:模块化管理为什么能够提升研发效能?
- 21 网络编程:Go语言如何玩转RESTfulAPI服务?
- 22 网络编程:Go语言如何通过RPC实现跨平台服务?
- 23 结束语你的Go语言成长之路
ZooKeeper源码分析与实战
- 00 开篇词:选择ZooKeeper,一步到位掌握分布式开发
- 01 ZooKeeper数据模型:节点的特性与应用
- 02 发布订阅模式:如何使用Watch机制实现分布式通知
- 03 ACL权限控制:如何避免未经授权的访问?
- 04 ZooKeeper如何进行序列化?
- 05 深入分析Jute的底层实现原理
- 06 ZooKeeper的网络通信协议详解
- 07 单机模式:服务器如何从初始化到对外提供服务?
- 08 集群模式:服务器如何从初始化到对外提供服务?
- 09 创建会话:避开日常开发的那些“坑”
- 10 ClientCnxn:客户端核心工作类工作原理解析
- 11 分桶策略:如何实现高效的会话管理?
- 12 服务端是如何处理一次会话请求的?
- 13 Curator:如何降低ZooKeeper使用的复杂性?
- 14 Leader选举:如何保证分布式数据的一致性?
- 15 ZooKeeper究竟是怎么选中Leader的?
- 16 ZooKeeper集群中Leader与Follower的数据同步策略
- 17 集群中Leader的作用:事务的请求处理与调度分析
- 18 集群中Follow的作用:非事务请求的处理与Leader的选举分析
- 19 Observer的作用与Follow有哪些不同?
- 20 一个运行中的ZooKeeper服务会产生哪些数据和文件?
- 21 ZooKeeper分布式锁:实现和原理解析
- 22 基于ZooKeeper命名服务的应用:分布式ID生成器
- 23 使用ZooKeeper实现负载均衡服务器功能
- 24 ZooKeeper在Kafka和Dubbo中的工业级实现案例分析
- 25 如何搭建一个高可用的ZooKeeper生产环境?
- 26 JConsole与四字母命令:如何监控服务器上ZooKeeper的运行状态?
- 27 crontab与PurgeTxnLog:线上系统日志清理的最佳时间和方式
- 28 彻底掌握二阶段提交三阶段提交算法原理
- 29 ZAB协议算法:崩溃恢复和消息广播
- 30 ZAB与Paxos算法的联系与区别
- 31 ZooKeeper中二阶段提交算法的实现分析
- 32 ZooKeeper数据存储底层实现解析
- 33 结束语分布技术发展与ZooKeeper应用前景
Java性能优化实战
- 00 Java性能优化,是进阶高级架构师的炼金石
- 01 理论分析:性能优化,有哪些衡量指标?需要注意什么?
- 02 理论分析:性能优化有章可循,谈谈常用的切入点
- 03 深入剖析:哪些资源,容易成为瓶颈?
- 04 工具实践:如何获取代码性能数据?
- 05 工具实践:基准测试JMH,精确测量方法性能
- 06 案例分析:缓冲区如何让代码加速
- 07 案例分析:无处不在的缓存,高并发系统的法宝
- 08 案例分析:Redis如何助力秒杀业务
- 09 案例分析:池化对象的应用场景
- 10 案例分析:大对象复用的目标和注意点
- 11 案例分析:如何用设计模式优化性能
- 12 案例分析:并行计算让代码“飞”起来
- 13 案例分析:多线程锁的优化
- 14 案例分析:乐观锁和无锁
- 15 案例分析:从BIO到NIO,再到AIO
- 16 案例分析:常见Java代码优化法则
- 17 高级进阶:JVM如何完成垃圾回收?
- 18 高级进阶:JIT如何影响JVM的性能?
- 19 高级进阶:JVM常见优化参数
- 20 SpringBoot服务性能优化
- 21 性能优化的过程方法与求职面经总结
- 22 结束语实践出真知
前端工程化精讲
- 00 开篇词建立上帝视角,全面系统掌握前端效率工程化
- 01 项目基石:前端脚手架工具探秘
- 02 界面调试:热更新技术如何开着飞机修引擎?
- 03 构建提速:如何正确使用SourceMap?
- 04 接口调试:Mock工具如何快速进行接口调试?
- 05 编码效率:如何提高编写代码的效率?
- 06 团队工具:如何利用云开发提升团队开发效率?
- 07 低代码工具:如何用更少的代码实现更灵活的需求
- 08 无代码工具:如何做到不写代码就能高效交付?
- 09 构建总览:前端构建工具的演进
- 10 流程分解:Webpack的完整构建流程
- 11 编译提效:如何为Webpack编译阶段提速?
- 12 打包提效:如何为Webpack打包阶段提速?
- 13 缓存优化:那些基于缓存的优化方案
- 14 增量构建:Webpack中的增量构建
- 15 版本特性:Webpack5中的优化细节
- 16 无包构建:盘点那些No-bundle的构建方案
- 17 部署初探:为什么一般不在开发环境下部署代码?
- 18 工具盘点:掌握那些流行的代码部署工具
- 19 安装提效:部署流程中的依赖安装效率优化
- 20 流程优化:部署流程中的构建流程策略优化
- 21 容器方案:从构建到部署,容器化方案的优势有哪些?
- 22 案例分析:搭建基本的前端高效部署系统
- 23 结束语前端效率工程化的未来展望
MySQL实战宝典
- 00 开篇词从业务出发,开启海量MySQL架构设计
- 01 数字类型:避免自增踩坑
- 02 字符串类型:不能忽略的COLLATION
- 03 日期类型:TIMESTAMP可能是巨坑
- 04 非结构存储:用好JSON这张牌
- 05 表结构设计:忘记范式准则
- 06 表压缩:不仅仅是空间压缩
- 07 表的访问设计:你该选择SQL还是NoSQL?
- 08 索引:排序的艺术
- 09 索引组织表:万物皆索引
- 10 组合索引:用好,性能提升10倍!
- 11 索引出错:请理解CBO的工作原理
- 12 JOIN连接:到底能不能写JOIN?
- 13 子查询:放心地使用子查询功能吧!
- 14 分区表:哪些场景我不建议用分区表?
- 15 MySQL复制:最简单也最容易配置出错
- 16 读写分离设计:复制延迟?其实是你用错了
- 17 高可用设计:你怎么活用三大架构方案?
- 18 金融级高可用架构:必不可少的数据核对
- 19 高可用套件:选择这么多,你该如何选?
- 20 InnoDBCluster:改变历史的新产品
- 21 数据库备份:备份文件也要检查!
- 22 分布式数据库架构:彻底理解什么叫分布式数据库
- 23 分布式数据库表结构设计:如何正确地将数据分片?
- 24 分布式数据库索引设计:二级索引、全局索引的最佳设计实践
- 25 分布式数据库架构选型:分库分表or中间件?
- 26 分布式设计之禅:全链路的条带化设计
- 27 分布式事务:我们到底要不要使用2PC?
SpringSecurity详解与实操
- 00 开篇词SpringSecurity,为你的应用安全与职业之路保驾护航
- 01 顶级框架:SpringSecurity是一款什么样的安全性框架?
- 02 用户认证:如何使用SpringSecurity构建用户认证体系?
- 03 认证体系:如何深入理解SpringSecurity用户认证机制?
- 04 密码安全:SpringSecurity中包含哪些加解密技术?
- 05 访问授权:如何对请求的安全访问过程进行有效配置?
- 06 权限管理:如何剖析SpringSecurity的授权原理?
- 07 案例实战:使用SpringSecurity基础功能保护Web应用
- 08 管道过滤:如何基于SpringSecurity过滤器扩展安全性?
- 09 攻击应对:如何实现CSRF保护和跨域CORS?
- 10 全局方法:如何确保方法级别的安全访问?
- 11 案例实战:使用SpringSecurity高级主题保护Web应用
- 12 开放协议:OAuth2协议解决的是什么问题?
- 13 授权体系:如何构建OAuth2授权服务器?
- 14 资源保护:如何基于OAuth2协议配置授权过程?
- 15 令牌扩展:如何使用JWT实现定制化Token?
- 16 案例实战:基于SpringSecurity和SpringCloud构建微服务安全架构
- 17 案例实战:基于SpringSecurity和OAuth2实现单点登录
- 18 技术趋势:如何为SpringSecurity添加响应式编程特性?
- 19 测试驱动:如何基于SpringSecurity测试系统安全性?
- 20 结束语以终为始,SpringSecurity的学习总结
分布式链路追踪实战
- 00 分布式链路追踪实战
- 01 数据观测:数据追踪的基石从哪里来?
- 02 系统日志:何以成为保障稳定性的关键?
- 03 日志编写:怎样才能编写“可观测”的系统日志?
- 04 统计指标:“五个九”对系统稳定的真正意义
- 05 监控指标:如何通过分析数据快速定位系统隐患?(上)
- 06 监控指标:如何通过分析数据快速定位系统隐患?(下)
- 07 指标编写:如何编写出更加了解系统的指标?
- 08 链路监控:为什么对于系统而言必不可少?
- 09 性能剖析:如何补足分布式追踪短板?
- 10 链路分析:除了观测链路,还能做什么?
- 11 黑白盒监控:系统功能与结构稳定的根基
- 12 系统告警:快速感知业务隐藏问题
- 13 告警质量:如何更好地创建告警规则和质量?
- 14 告警处理:怎样才能更好地解决问题?
- 15 日志收集:ELK如何更高效地收集日志?
- 16 指标体系:Prometheus如何更完美地显示指标体系?
- 17 链路追踪:Zipkin如何进行分布式追踪?
- 18 观测分析:SkyWalking如何把观测和分析结合起来?
- 19 云端观测:ARMS如何进行云观测?
- 20 运维集成:内部的OSS系统如何与观测相结合?
- 21 结束语未来的监控是什么样子?
由浅入深吃透Docker
- 00 溯本求源,吃透Docker!
- 01 Docker安装:入门案例带你了解容器技术原理
- 02 核心概念:镜像、容器、仓库,彻底掌握Docker架构核心设计理念
- 03 镜像使用:Docker环境下如何配置你的镜像?
- 04 容器操作:得心应手掌握Docker容器基本操作
- 05 仓库访问:怎样搭建属于你的私有仓库?
- 06 最佳实践:如何在生产中编写最优Dockerfile?
- 07 Docker安全:基于内核的弱隔离系统如何保障安全性?
- 08 容器监控:容器监控原理及cAdvisor的安装与使用
- 09 资源隔离:为什么构建容器需要Namespace?
- 10 资源限制:如何通过Cgroups机制实现资源限制?
- 11 组件组成:剖析Docker组件作用及其底层工作原理
- 12 网络模型:剖析Docker网络实现及Libnetwork底层原理
- 13 数据存储:剖析Docker卷与持久化数据存储的底层原理
- 14 文件存储驱动:AUFS文件系统原理及生产环境的最佳配置
- 15 文件存储驱动:Devicemapper文件系统原理及生产环境的最佳配置
- 16 文件存储驱动:OverlayFS文件系统原理及生产环境的最佳配置
- 17 原理实践:自己动手使用Golang开发Docker(上)
- 18 原理实践:自己动手使用Golang开发Docker(下)
- 19 如何使用DockerCompose解决开发环境的依赖?
- 20 如何在生产环境中使用DockerSwarm调度容器?
- 21 如何使Docker和Kubernetes结合发挥容器的最大价值?
- 22 多阶级构建:Docker下如何实现镜像多阶级构建?
- 23 DevOps:容器化后如何通过DevOps提高协作效能?
- 24 CICD:容器化后如何实现持续集成与交付?(上)
- 25 CICD:容器化后如何实现持续集成与交付?(下)
- 26 结束语展望未来:Docker的称霸之路
程序员的数学课
- 00 开篇词数学,编程能力的营养根基
- 01 从计数开始,程序员必知必会的数制转换法
- 02 逻辑与沟通,怎样才能讲出有逻辑的话?
- 03 用数学决策,如何规划好投入、转化和产出?
- 04 万物可数学,经典公式是如何在生活中应用的?
- 05 求极值:如何找到复杂业务的最优解?
- 06 向量及其导数:计算机如何完成对海量高维度数据计算?
- 07 线性回归:如何在离散点中寻找数据规律?
- 08 加乘法则:如何计算复杂事件发生的概率?
- 09 似然估计:如何利用MLE对参数进行估计?
- 10 信息熵:事件的不确定性如何计算?
- 11 灰度实验:如何设计灰度实验并计算实验的收益?
- 12 统计学方法:如何证明灰度实验效果不是偶然得到的?
- 13 复杂度:如何利用数学推导对程序进行优化?
- 14 程序的循环:如何利用数学归纳法进行程序开发?
- 15 递归:如何计算汉诺塔问题的移动步数?
- 16 二分法:如何利用指数爆炸优化程序?
- 17 动态规划:如何利用最优子结构解决问题?
- 18 AI入门:利用3个公式搭建最简AI框架
- 19 逻辑回归:如何让计算机做出二值化决策?
- 20 决策树:如何对NP难复杂问题进行启发式求解?
- 21 神经网络与深度学习:计算机是如何理解图像、文本和语音的?
- 22 面试中那些坑了无数人的算法题
- 23 站在生活的十字路口,如何用数学抉择?
- 24 结束语数学底子好,学啥都快
Dubbo源码解读与实战
- 00 开篇词深入掌握Dubbo原理与实现,提升你的职场竞争力
- 01 Dubbo源码环境搭建:千里之行,始于足下
- 02 Dubbo的配置总线:抓住URL,就理解了半个Dubbo
- 03 DubboSPI精析,接口实现两极反转(上)
- 04 DubboSPI精析,接口实现两极反转(下)
- 05 海量定时任务,一个时间轮搞定
- 06 ZooKeeper与Curator,求你别用ZkClient了(上)
- 07 ZooKeeper与Curator,求你别用ZkClient了(下)
- 08 代理模式与常见实现
- 09 Netty入门,用它做网络编程都说好(上)
- 10 Netty入门,用它做网络编程都说好(下)
- 11 简易版RPC框架实现(上)
- 12 简易版RPC框架实现(下)
- 13 本地缓存:降低ZooKeeper压力的一个常用手段
- 14 重试机制是网络操作的基本保证
- 15 ZooKeeper注册中心实现,官方推荐注册中心实践
- 16 DubboSerialize层:多种序列化算法,总有一款适合你
- 17 DubboRemoting层核心接口分析:这居然是一套兼容所有NIO框架的设计?
- 18 Buffer缓冲区:我们不生产数据,我们只是数据的搬运工
- 19 Transporter层核心实现:编解码与线程模型一文打尽(上)
- 20 Transporter层核心实现:编解码与线程模型一文打尽(下)
- 21 Exchange层剖析:彻底搞懂Request-Response模型(上)
- 22 Exchange层剖析:彻底搞懂Request-Response模型(下)
- 23 核心接口介绍,RPC层骨架梳理
- 24 从Protocol起手,看服务暴露和服务引用的全流程(上)
- 25 从Protocol起手,看服务暴露和服务引用的全流程(下)
- 26 加餐:直击Dubbo“心脏”,带你一起探秘Invoker(上)
- 27 加餐:直击Dubbo“心脏”,带你一起探秘Invoker(下)
- 28 复杂问题简单化,代理帮你隐藏了多少底层细节?
- 29 加餐:HTTP协议+JSON-RPC,Dubbo跨语言就是如此简单
- 30 Filter接口,扩展Dubbo框架的常用手段指北
- 31 加餐:深潜Directory实现,探秘服务目录玄机
- 32 路由机制:请求到底怎么走,它说了算(上)
- 33 路由机制:请求到底怎么走,它说了算(下)
- 34 加餐:初探Dubbo动态配置的那些事儿
- 35 负载均衡:公平公正物尽其用的负载均衡策略,这里都有(上)
- 36 负载均衡:公平公正物尽其用的负载均衡策略,这里都有(下)
- 37 集群容错:一个好汉三个帮(上)
- 38 集群容错:一个好汉三个帮(下)
- 39 加餐:多个返回值不用怕,Merger合并器来帮忙
- 40 加餐:模拟远程调用,Mock机制帮你搞定
- 41 加餐:一键通关服务发布全流程
- 42 加餐:服务引用流程全解析
- 43 服务自省设计方案:新版本新方案
- 44 元数据方案深度剖析,如何避免注册中心数据量膨胀?
- 45 加餐:深入服务自省方案中的服务发布订阅(上)
- 46 加餐:深入服务自省方案中的服务发布订阅(下)
- 47 配置中心设计与实现:集中化配置and本地化配置,我都要(上)
- 48 配置中心设计与实现:集中化配置and本地化配置,我都要(下)
- 49 结束语认真学习,缩小差距
DDD微服务落地实战
- 00 开篇词让我们把DDD的思想真正落地
- 01 DDD:杜绝软件退化的利器
- 02 以电商支付功能为例演练DDD
- 03 DDD是如何落地到数据库设计的?
- 04 领域模型是如何指导程序设计的?
- 05 聚合、仓库与工厂:傻傻分不清楚
- 06 限界上下文:冲破微服务设计困局的利器
- 07 在线订餐场景中是如何开事件风暴会议的?
- 08 DDD是如何解决微服务拆分难题的?
- 09 DDD是如何落地微服务设计实现的?
- 10 微服务落地的技术实践
- 11 解决技术改造困局的钥匙:整洁架构
- 12 如何设计支持快速交付的技术中台战略?
- 13 如何实现支持快速交付的技术中台设计?
- 14 如何设计支持DDD的技术中台?
- 15 如何设计支持微服务的技术中台?
- 16 基于DDD的代码设计演示(含DDD的技术中台设计)
- 17 基于DDD的微服务设计演示(含支持微服务的DDD技术中台设计)
- 18 基于事件溯源的设计开发
300分钟吃透分布式缓存
- 00 开篇寄语:缓存,你真的用对了吗?
- 01 业务数据访问性能太低怎么办?
- 02 如何根据业务来选择缓存模式和组件?
- 03 设计缓存架构时需要考量哪些因素?
- 04 缓存失效、穿透和雪崩问题怎么处理?
- 05 缓存数据不一致和并发竞争怎么处理?
- 06 HotKey和BigKey引发的问题怎么应对?
- 07 MC为何是应用最广泛的缓存组件?
- 08 MC系统架构是如何布局的?
- 09 MC是如何使用多线程和状态机来处理请求命令的?
- 10 MC是怎么定位key的
- 11 MC如何淘汰冷key和失效key
- 12 为何MC能长期维持高性能读写?
- 13 如何完整学习MC协议及优化client访问?
- 14 大数据时代,MC如何应对新的常见问题?
- 15 如何深入理解、应用及扩展Twemproxy?
- 16 常用的缓存组件Redis是如何运行的?
- 17 如何理解、选择并使用Redis的核心数据类型?
- 18 Redis协议的请求和响应有哪些“套路”可循?
- 19 Redis系统架构中各个处理模块是干什么的?
- 20 Redis如何处理文件事件和时间事件?
- 21 Redis读取请求数据后,如何进行协议解析和处理
- 22 怎么认识和应用Redis内部数据结构?
- 23 Redis是如何淘汰key的?
- 24 Redis崩溃后,如何进行数据恢复的?
- 25 Redis是如何处理容易超时的系统调用的?
- 26 如何大幅成倍提升Redis处理性能?
- 27 Redis是如何进行主从复制的?
- 28 如何构建一个高性能、易扩展的Redis集群?
- 29 从容应对亿级QPS访问,Redis还缺少什么?
- 30 面对海量数据,为什么无法设计出完美的分布式缓存体系?
- 31 如何设计足够可靠的分布式缓存体系,以满足大中型移动互联网系统的需要?
- 32 一个典型的分布式缓存系统是什么样的?
- 33 如何为秒杀系统设计缓存体系?
- 34 如何为海量计数场景设计缓存体系?
- 35 如何为社交feed场景设计缓存体系?
微服务质量保障20讲
- 00 开篇词既往不恋,当下不杂,未来不迎
- 01 微服务架构有哪些特点?
- 02 微服务架构下的质量挑战
- 03 微服务架构下的测试策略
- 04 单元测试:怎样提升最小可测试单元的质量?
- 05 集成测试:如何进行微服务的集成测试?
- 06 组件测试:如何保证单服务的质量?
- 07 契约测试:如何进行消费者驱动的契约测试?
- 08 端到端测试:站在用户视角验证整个系统
- 09 微服务架构下的质量保障体系全景概览
- 10 流程规范篇:高速迭代的研发过程需要怎样的规范?
- 11 测试技术篇:测试技术这么多,我该如何选型?
- 12 测试技术篇:如何提升测试效率?
- 13 测试技术篇:专项测试技术解决了哪些专项问题?
- 14 CICD篇:如何更好地利用多个“测试”环境?
- 15 CICD篇:如何构建持续交付工具链?
- 16 度量与运营篇:如何做好质量和效率的度量与运营?
- 17 度量与运营篇:如何度量与运营效率和价值?
- 18 组织保障篇:质量是设计出来的
- 19 软件测试新趋势探讨
- 20 结束语QA如何打造自身的核心竞争力?
说透性能测试
- 00 开篇词为什么每个测试人都要学好性能测试?
- 01 JMeter的核心概念
- 02 JMeter参数化策略
- 03 构建并执行JMeter脚本的正确姿势
- 04 JMeter二次开发其实并不难
- 05 如何基于JMeterAPI开发性能测试平台?
- 06 Nginx在系统架构中的作用
- 07 你真的知道如何制定性能测试的目标吗?
- 08 性能测试场景的分类和意义
- 09 如何制定一份有效的性能测试方案?
- 10 命令行监控Linux服务器的要点
- 11 分布式服务链路监控以及报警方案
- 12 如何把可视化监控也做得酷炫?
- 13 Docker的制作、运行以及监控
- 14 如何从CPU飙升定位到热点方法?
- 15 如何基于JVM分析内存使用对象?
- 16 如何通过Arthas定位代码链路问题?
- 17 如何应对Redis缓存穿透、击穿和雪崩?
- 18 如何才能优化MySQL性能?
- 19 如何根治慢SQL?
- 20 结束语线上全链路性能测试实践总结
12步通关求职面试
- 00 开篇词:了解面试“潜规则”,从海选中脱颖而出
- 01 设计一份吸引面试官的简历
- 02 读懂职位JD,精准投递简历
- 03 把握投递简历的黄金时间段
- 04 做好充分的准备去面试
- 05 把握面试时的关键点
- 06 捕捉HR微表情,做出应对策略
- 07 巧妙推销自己的3个技巧
- 08 认清自身实力,明确求职方向
- 09 判断公司背景,做出合理选择
- 10 了解行业薪资,清晰找准定位
- 11 目标明确,阐明沟通
- 12 工作交接流程福利衔接
深入剖析MyBatis核心原理
- 00 开篇词领略MyBatis设计思维,突破持久化技术瓶颈
- 01 常见持久层框架赏析,到底是什么让你选择MyBatis?
- 02 订单系统持久层示例分析,20分钟带你快速上手MyBatis
- 03 MyBatis源码环境搭建及整体架构解析
- 04 MyBatis反射工具箱:带你领略不一样的反射设计思路
- 05 数据库类型体系与Java类型体系之间的“爱恨情仇”
- 06 日志框架千千万,MyBatis都能兼容的秘密是什么?
- 07 深入数据源和事务,把握持久化框架的两个关键命脉
- 08 Mapper文件与Java接口的优雅映射之道
- 09 基于MyBatis缓存分析装饰器模式的最佳实践
- 10 鸟瞰MyBatis初始化,把握MyBatis启动流程脉络(上)
- 11 鸟瞰MyBatis初始化,把握MyBatis启动流程脉络(下)
- 12 深入分析动态SQL语句解析全流程(上)
- 13 深入分析动态SQL语句解析全流程(下)
- 14 探究MyBatis结果集映射机制背后的秘密(上)
- 15 探究MyBatis结果集映射机制背后的秘密(下)
- 16 StatementHandler:参数绑定、SQL执行和结果映射的奠基者
- 17 Executor才是执行SQL语句的幕后推手(上)
- 18 Executor才是执行SQL语句的幕后推手(下)
- 19 深入MyBatis内核与业务逻辑的桥梁——接口层
- 20 插件体系让MyBatis世界更加精彩
- 21 深挖MyBatis与Spring集成底层原理
- 22 基于MyBatis的衍生框架一览
- 23 结束语会使用只能默默“搬砖”,懂原理才能快速晋升
重学操作系统
- 00 开篇词为什么大厂面试必考操作系统?
- 01 计算机是什么:“如何把程序写好”这个问题是可计算的吗?
- 02 程序的执行:相比32位,64位的优势是什么?(上)
- 03 程序的执行:相比32位,64位的优势是什么?(下)
- 04 构造复杂的程序:将一个递归函数转成非递归函数的通用方法
- 05 存储器分级:L1Cache比内存和SSD快多少倍?
- 06 目录结构和文件管理指令:rm-rf指令的作用是?
- 07 进程、重定向和管道指令:xargs指令的作用是?
- 08 用户和权限管理指令:请简述Linux权限划分的原则?
- 09 Linux中的网络指令:如何查看一个域名有哪些NS记录?
- 10 软件的安装:编译安装和包管理器安装有什么优势和劣势?
- 11 高级技巧之日志分析:利用Linux指令分析Web日志
- 12 高级技巧之集群部署:利用Linux指令同时在多台机器部署程序
- 13 操作系统内核:Linux内核和Windows内核有什么区别?
- 14 用户态和内核态:用户态线程和内核态线程有什么区别?
- 15 中断和中断向量:Javajs等语言为什么可以捕获到键盘输入?
- 16 WinMacUnixLinux的区别和联系:为什么Debian漏洞排名第一还这么多人用?
- 17 进程和线程:进程的开销比线程大在了哪里?
- 18 锁、信号量和分布式锁:如何控制同一时间只有2个线程运行?
- 19 乐观锁、区块链:除了上锁还有哪些并发控制方法?
- 20 线程的调度:线程调度都有哪些方法?
- 21 哲学家就餐问题:什么情况下会触发饥饿和死锁?
- 22 进程间通信:进程间通信都有哪些方法?
- 23 (1)加餐练习题详解(四)
- 24 虚拟内存:一个程序最多能使用多少内存?
- 25 内存管理单元:什么情况下使用大内存分页?
- 26 缓存置换算法:LRU用什么数据结构实现更合理?
- 27 内存回收上篇:如何解决内存的循环引用问题?
- 28 内存回收下篇:三色标记-清除算法是怎么回事?
- 29 Linux下的各个目录有什么作用?
- 30 文件系统的底层实现:FAT、NTFS和Ext3有什么区别?
ShardingSphere核心原理精讲
- 00 如何正确学习一款分库分表开源框架?
- 01 从理论到实践:如何让分库分表真正落地?
- 02 顶级项目:ShardingSphere是一款什么样的Apache开源软件?
- 03 规范兼容:JDBC规范与ShardingSphere是什么关系?
- 04 应用集成:在业务系统中使用ShardingSphere的方式有哪些?
- 05 配置驱动:ShardingSphere中的配置体系是如何设计的?
- 09 分布式事务:如何使用强一致性事务与柔性事务?
- 10 数据脱敏:如何确保敏感数据的安全访问?
- 11 编排治理:如何实现分布式环境下的动态配置管理?
- 12 从应用到原理:如何高效阅读ShardingSphere源码?
- 13 微内核架构:ShardingSphere如何实现系统的扩展性?
- 14 分布式主键:ShardingSphere中有哪些分布式主键实现方式?
- 15 解析引擎:SQL解析流程应该包括哪些核心阶段?(上)
- 16 解析引擎:SQL解析流程应该包括哪些核心阶段?(下)
- 17 路由引擎:如何理解分片路由核心类ShardingRouter的运作机制?
- 18 路由引擎:如何实现数据访问的分片路由和广播路由?
- 19 路由引擎:如何在路由过程中集成多种路由策略和路由算法?
- 20 改写引擎:如何理解装饰器模式下的SQL改写实现机制?
- 21 执行引擎:分片环境下SQL执行的整体流程应该如何进行抽象?
- 22 执行引擎:如何把握ShardingSphere中的Executor执行模型?(上)
- 23 执行引擎:如何把握ShardingSphere中的Executor执行模型?(下)
- 24 归并引擎:如何理解数据归并的类型以及简单归并策略的实现过程?
- 25 归并引擎:如何理解流式归并和内存归并在复杂归并场景下的应用方式?
- 26 读写分离:普通主从架构和分片主从架构分别是如何实现的?
- 27 分布式事务:如何理解ShardingSphere中对分布式事务的抽象过程?
- 28 分布式事务:ShardingSphere中如何集成强一致性事务和柔性事务支持?(上)
- 29 分布式事务:ShardingSphere中如何集成强一致性事务和柔性事务支持?(下)
- 30 数据脱敏:如何基于改写引擎实现低侵入性数据脱敏方案?
- 31 配置中心:如何基于配置中心实现配置信息的动态化管理?
- 32 注册中心:如何基于注册中心实现数据库访问熔断机制?
- 33 链路跟踪:如何基于Hook机制以及OpenTracing协议实现数据访问链路跟踪?
重学数据结构与算法
- 00 数据结构与算法,应该这样学!
- 01 复杂度:如何衡量程序运行的效率?
- 02 数据结构:将“昂贵”的时间复杂度转换成“廉价”的空间复杂度
- 03 增删查:掌握数据处理的基本操作,以不变应万变
- 04 如何完成线性表结构下的增删查?
- 05 栈:后进先出的线性表,如何实现增删查?
- 06 队列:先进先出的线性表,如何实现增删查?
- 07 数组:如何实现基于索引的查找?
- 08 字符串:如何正确回答面试中高频考察的字符串匹配算法?
- 09 树和二叉树:分支关系与层次结构下,如何有效实现增删查?
- 10 哈希表:如何利用好高效率查找的“利器”?
- 11 递归:如何利用递归求解汉诺塔问题?
- 12 分治:如何利用分治法完成数据查找?
- 13 排序:经典排序算法原理解析与优劣对比
- 14 动态规划:如何通过最优子结构,完成复杂问题求解?
- 15 定位问题才能更好地解决问题:开发前的复杂度分析与技术选型
- 16 真题案例(一):算法思维训练
- 17 真题案例(二):数据结构训练
- 18 真题案例(三):力扣真题训练
- 19 真题案例(四):大厂真题实战演练
- 20 代码之外,技术面试中你应该具备哪些软素质?
- 21 面试中如何建立全局观,快速完成优质的手写代码?
OKR组织敏捷目标和绩效管理
- 00 OKR工作法:组织目标管理的神器
- 01 目标管理发展:OKR之前,大家都在用什么管理组织目标?
- 02 OKR价值:为什么互联网公司都在用OKR?
- 03 OKR与战略:OKR如何解决组织增长问题?
- 04 OKR生成:各层级的OKR要遵循什么规律?
- 05 O:什么样的O得领导赏识?
- 06 KR:写好KR的万能公式
- 07 案例实战:教你写出高质量的OKR
- 08 流程:你应该这样制定、管理OKR!
- 09 OKR与KPI的区别和联系
- 10 激励:如何用OKR激活你的团队?
- 11 文化:OKR文化的塑造和沉淀
- 12 变革:OKR转型难点及解决方案
- 13 加餐OKR填写模板及案例
架构设计面试精讲
- 00 开篇词中高级研发面试,逃不开架构设计这一环
- 01 研发工程师想提升面试竞争力,该具备这三个技术认知
- 02 研发工程师如何用架构师视角回答架构设计方案?
- 03 面试官如何考察与CAP有关的分布式理论?
- 04 亿级商品存储下,如何深度回答分布式系统的原理性问题?
- 05 海量并发场景下,如何回答分布式事务一致性问题?
- 06 分布式系统中,如何回答锁的实现原理?
- 07 RPC:如何在面试中展现出“造轮子”的能力?
- 08 MQ:如何回答消息队列的丢失、重复与积压问题
- 09 如何回答MySQL的索引原理与优化问题?
- 10 如何回答MySQL的事务隔离级别和锁的机制?
- 11 读多写少:MySQL如何优化数据查询方案?
- 12 写多读少:MySQL如何优化数据存储方案?
- 13 缓存原理:应对面试你要掌握Redis哪些原理?
- 14 缓存策略:面试中如何回答缓存穿透、雪崩等问题?
- 15 如何向面试官证明你做的系统是高可用的?
- 16 如何从架构师角度回答系统容错、降级等高可用问题?
- 17 如何向面试官证明你做的系统是高性能的?
- 18 如何从架构师角度回答怎么应对千万级流量的问题?
- 19 彩蛋互联网架构设计面试,你需要掌握的知识体系
SpringBoot实战开发
- 00 开篇词从零开始:为什么要学习SpringBoot?
- 01 家族生态:如何正确理解Spring家族的技术体系?
- 02 案例驱动:如何剖析一个SpringWeb应用程序?
- 03 多维配置:如何使用SpringBoot中的配置体系?
- 04 定制配置:如何创建和管理自定义的配置信息?
- 05 自动配置:如何正确理解SpringBoot自动配置实现原理?
- 06 基础规范:如何理解JDBC关系型数据库访问规范?
- 07 数据访问:如何使用JdbcTemplate访问关系型数据库?
- 08 数据访问:如何剖析JdbcTemplate数据访问实现原理?
- 09 数据抽象:SpringData如何对数据访问过程进行统一抽象?
- 10 ORM集成:如何使用SpringDataJPA访问关系型数据库?
- 11 服务发布:如何构建一个RESTful风格的Web服务?
- 12 服务调用:如何使用RestTemplate消费RESTful服务?
- 13 服务调用:如何正确理解RestTemplate远程调用实现原理?
- 14 消息驱动:如何使用KafkaTemplate集成Kafka?
- 15 消息驱动:如何使用JmsTemplate集成ActiveMQ?
- 16 消息驱动:如何使用RabbitTemplate集成RabbitMQ?
- 17 安全架构:如何理解Spring安全体系的整体架构?
- 18 用户认证:如何基于SpringSecurity构建用户认证体系?
- 19 服务授权:如何基于SpringSecurity确保请求安全访问?
- 20 服务监控:如何使用Actuator组件实现系统监控?
- 21 指标定制:如何实现自定义度量指标和Actuator端点?
- 22 运行管理:如何使用AdminServer管理Spring应用程序?
- 23 数据测试:如何使用Spring测试数据访问层组件?
- 24 服务测试:如何使用Spring测试Web服务层组件?
Java并发编程78讲
- 00 由点及面,搭建你的Java并发知识网
- 01 为何说只有1种实现线程的方法?
- 02 如何正确停止线程?为什么volatile标记位的停止方法是错误的?
- 03 线程是如何在6种状态之间转换的?
- 04 waitnotifynotifyAll方法的使用注意事项?
- 05 有哪几种实现生产者消费者模式的方法?
- 06 一共有哪3类线程安全问题?
- 07 哪些场景需要额外注意线程安全问题?
- 08 为什么多线程会带来性能问题?
- 09 使用线程池比手动创建线程好在哪里?
- 10 线程池的各个参数的含义?
- 11 线程池有哪4种拒绝策略?
- 12 有哪6种常见的线程池?什么是Java8的ForkJoinPool?
- 13 线程池常用的阻塞队列有哪些?
- 14 为什么不应该自动创建线程池?
- 15 合适的线程数量是多少?CPU核心数和线程数的关系?
- 16 如何根据实际需要,定制自己的线程池?
- 17 如何正确关闭线程池?shutdown和shutdownNow的区别?
- 18 线程池实现“线程复用”的原理?
- 19 你知道哪几种锁?分别有什么特点?
- 20 悲观锁和乐观锁的本质是什么?
- 21 如何看到synchronized背后的“monitor锁”?
- 22 synchronized和Lock孰优孰劣,如何选择?
- 23 Lock有哪几个常用方法?分别有什么用?
- 24 讲一讲公平锁和非公平锁,为什么要“非公平”?
- 25 读写锁ReadWriteLock获取锁有哪些规则?
- 26 读锁应该插队吗?什么是读写锁的升降级?
- 27 什么是自旋锁?自旋的好处和后果是什么呢?
- 28 JVM对锁进行了哪些优化?
- 29 HashMap为什么是线程不安全的?
- 30 ConcurrentHashMap在Java7和8有何不同?
- 31 为什么Map桶中超过8个才转为红黑树?
- 32 同样是线程安全,ConcurrentHashMap和Hashtable的区别
- 33 CopyOnWriteArrayList有什么特点?
- 34 什么是阻塞队列?
- 35 阻塞队列包含哪些常用的方法?add、offer、put等方法的区别?
- 36 有哪几种常见的阻塞队列?
- 37 阻塞和非阻塞队列的并发安全原理是什么?
- 38 如何选择适合自己的阻塞队列?
- 39 原子类是如何利用CAS保证线程安全的?
- 40 AtomicInteger在高并发下性能不好,如何解决?为什么?
- 41 原子类和volatile有什么异同?
- 42 AtomicInteger和synchronized的异同点?
- 43 Java8中Adder和Accumulator有什么区别?
- 44 ThreadLocal适合用在哪些实际生产的场景中?
- 45 ThreadLocal是用来解决共享资源的多线程访问的问题吗?
- 46 多个ThreadLocal在Thread中的threadlocals里是怎么存储的?
- 47 内存泄漏——为何每次用完ThreadLocal都要调用remove()?
- 48 Callable和Runnable的不同?
- 49 Future的主要功能是什么?
- 50 使用Future有哪些注意点?Future产生新的线程了吗?
- 51 如何利用CompletableFuture实现“旅游平台”问题?
- 52 信号量能被FixedThreadPool替代吗?
- 53 CountDownLatch是如何安排线程执行顺序的?
- 54 CyclicBarrier和CountdownLatch有什么异同?
- 55 Condition、object.wait()和notify()的关系?
- 56 讲一讲什么是Java内存模型?
- 57 什么是指令重排序?为什么要重排序?
- 58 Java中的原子操作有哪些注意事项?
- 59 什么是“内存可见性”问题?
- 60 主内存和工作内存的关系?
- 61 什么是happens-before规则?
- 62 volatile的作用是什么?与synchronized有什么异同?
- 63 单例模式的双重检查锁模式为什么必须加volatile?
- 64 你知道什么是CAS吗?
- 65 CAS和乐观锁的关系,什么时候会用到CAS?
- 66 CAS有什么缺点?
- 67 如何写一个必然死锁的例子?
- 68 发生死锁必须满足哪4个条件?
- 69 如何用命令行和代码定位死锁?
- 70 有哪些解决死锁问题的策略?
- 71 讲一讲经典的哲学家就餐问题
- 72 final的三种用法是什么?
- 73 为什么加了final却依然无法拥有“不变性”?
- 74 为什么String被设计为是不可变的?
- 75 为什么需要AQS?AQS的作用和重要性是什么?
- 76 AQS的内部原理是什么样的?
- 77 AQS在CountDownLatch等类中的应用原理是什么?
- 78 一份独家的Java并发工具图谱
Netty核心原理剖析与RPC实践
- 00 学好Netty,是你修炼Java内功的必经之路
- 01 初识Netty:为什么Netty这么流行?
- 02 纵览全局:把握Netty整体架构脉络
- 03 引导器作用:客户端和服务端启动都要做些什么?
- 04 事件调度层:为什么EventLoop是Netty的精髓?
- 05 服务编排层:Pipeline如何协调各类Handler?
- 06 粘包拆包问题:如何获取一个完整的网络包?
- 07 接头暗语:如何利用Netty实现自定义协议通信?
- 08 开箱即用:Netty支持哪些常用的解码器?
- 09 数据传输:writeAndFlush处理流程剖析
- 10 双刃剑:合理管理Netty堆外内存
- 11 另起炉灶:Netty数据传输载体ByteBuf详解
- 12 他山之石:高性能内存分配器jemalloc基本原理
- 13 举一反三:Netty高性能内存管理设计(上)
- 14 举一反三:Netty高性能内存管理设计(下)
- 15 轻量级对象回收站:Recycler对象池技术解析
- 16 IO加速:与众不同的Netty零拷贝技术
- 17 源码篇:从Linux出发深入剖析服务端启动流程
- 18 源码篇:解密NettyReactor线程模型
- 19 源码篇:一个网络请求在Netty中的旅程
- 20 技巧篇:Netty的FastThreadLocal究竟比ThreadLocal快在哪儿?
- 21 技巧篇:延迟任务处理神器之时间轮HashedWheelTimer
- 22 技巧篇:高性能无锁队列MpscQueue
- 23 架构设计:如何实现一个高性能分布式RPC框架
- 24 服务发布与订阅:搭建生产者和消费者的基础框架
- 25 远程通信:通信协议设计以及编解码的实现
- 26 服务治理:服务发现与负载均衡机制的实现
- 27 动态代理:为用户屏蔽RPC调用的底层细节
- 28 实战总结:RPC实战总结与进阶延伸
- 29 编程思想:Netty中应用了哪些设计模式?
- 30 实践总结:Netty在项目开发中的一些最佳实践
- 31 结束语技术成长之路:如何打造自己的技术体系
GitChat
白话设计模式28讲
- 00 生活中的设计模式:启程之前,请不要错过我
- 01 监听模式:坑爹的热水器
- 02 适配模式:身高不够鞋来凑
- 03 状态模式:人与水的三态
- 04 单例模式:你是我生命的唯一
- 05 职责模式:我的假条去哪了
- 06 中介模式:找房子问中介
- 07 代理模式:帮我拿一下快递
- 08 装饰模式:你想怎么穿就怎么穿
- 09 工厂模式:你要拿铁还是摩卡
- 10 迭代模式:下一个就是你了
- 11 组合模式:自己组装电脑
- 12 构建模式:想要车还是庄园
- 13 克隆模式:给你一个分身术
- 14 策略模式:怎么来不重要,人到就行
- 15 命令模式:大闸蟹,走起!
- 16 备忘模式:好记性不如烂笔头
- 17 享元模式:颜料很贵必须充分利用
- 18 外观模式:学妹别慌,学长帮你
- 19 访问模式:一千个读者一千个哈姆雷特
- 20 生活中的设计模式:与经典设计模式的不解渊源
- 21 生活中的设计模式:那些未完待续的设计模式
- 22 深入解读过滤器模式:制作一杯鲜纯细腻的豆浆
- 23 深入解读对象池技术:共享让生活更便捷
- 24 深入解读回调机制:把你技能亮出来
- 25 谈谈我对设计模式的理解
- 26 谈谈我对设计原则的思考
- 27 谈谈我对项目重构的看法
全解网络协议
分布式中间件实践之路
- 01 开篇词:从中间件开始学习分布式
- 02 走进分布式中间件(课前必读)
- 03 主流分布式缓存方案的解读及比较
- 04 分布式一致性协议Gossip和Redis集群原理解析
- 05 基于Redis的分布式缓存实现及加固策略
- 06 Redis实际应用中的异常场景及其根因分析和解决方案
- 07 Redis-Cluster故障倒换调优原理分析
- 08 基于Redis的分布式锁实现及其踩坑案例
- 09 分布式一致性算法Raft和Etcd原理解析
- 10 基于Etcd的分布式锁实现原理及方案
- 11 主流的分布式消息队列方案解读及比较
- 12 搭建基于Kafka和ZooKeeper的分布式消息队列
- 13 深入解读基于Kafka和ZooKeeper的分布式消息队列原理
- 14 深入浅出解读Kafka的可靠性机制
RocketMQ实战与进阶
- 01 搭建学习环境准备篇
- 02 RocketMQ核心概念扫盲篇
- 03 消息发送API详解与版本变迁说明
- 04 结合实际应用场景谈消息发送
- 05 消息发送核心参数与工作原理详解
- 06 消息发送常见错误与解决方案
- 07 事务消息使用及方案选型思考
- 08 消息消费API与版本变迁说明
- 09 DefaultMQPushConsumer核心参数与工作原理
- 10 DefaultMQPushConsumer使用示例与注意事项
- 11 DefaultLitePullConsumer核心参数与实战
- 12 结合实际场景再聊DefaultLitePullConsumer的使用
- 13 结合实际场景顺序消费、消息过滤实战
- 14 消息消费积压问题排查实战
- 15 RocketMQ常用命令实战
- 16 RocketMQ集群性能摸高
- 17 RocketMQ集群性能调优
- 18 RocketMQ集群平滑运维
- 19 RocketMQ集群监控(一)
- 20 RocketMQ集群监控(二)
- 21 RocketMQ集群告警
- 22 RocketMQ集群踩坑记
- 23 消息轨迹、ACL与多副本搭建
- 24 RocketMQ-Console常用页面指标获取逻辑
- 25 RocketMQNameserver背后的设计理念
- 26 Java并发编程实战
- 27 从RocketMQ学基于文件的编程模式(一)
- 28 从RocketMQ学基于文件的编程模式(二)
- 29 从RocketMQ学Netty网络编程技巧
- 30 RocketMQ学习方法之我见
Redis核心原理与实战
- 01 Redis是如何执行的
- 02 Redis快速搭建与使用
- 03 Redis持久化——RDB
- 04 Redis持久化——AOF
- 05 Redis持久化——混合持久化
- 06 字符串使用与内部实现原理
- 07 附录:更多字符串操作命令
- 08 字典使用与内部实现原理
- 09 附录:更多字典操作命令
- 10 列表使用与内部实现原理
- 11 附录:更多列表操作命令
- 12 集合使用与内部实现原理
- 13 附录:更多集合操作命令
- 14 有序集合使用与内部实现原理
- 15 附录:更多有序集合操作命令
- 16 Redis事务深入解析
- 17 Redis键值过期操作
- 18 Redis过期策略与源码分析
- 19 Redis管道技术——Pipeline
- 20 查询附近的人——GEO
- 21 游标迭代器(过滤器)——Scan
- 22 优秀的基数统计算法——HyperLogLog
- 23 内存淘汰机制与算法
- 24 消息队列——发布订阅模式
- 25 消息队列的其他实现方式
- 26 消息队列终极解决方案——Stream(上)
- 27 消息队列终极解决方案——Stream(下)
- 28 实战:分布式锁详解与代码
- 29 实战:布隆过滤器安装与使用及原理分析
- 30 完整案例:实现延迟队列的两种方法
- 31 实战:定时任务案例
- 32 实战:RediSearch高性能的全文搜索引擎
- 33 实战:Redis性能测试
- 34 实战:Redis慢查询
- 35 实战:Redis性能优化方案
- 36 实战:Redis主从同步
- 37 实战:Redis哨兵模式(上)
- 38 实战:Redis哨兵模式(下)
- 39 实战:Redis集群模式(上)
- 40 实战:Redis集群模式(下)
- 41 案例:Redis问题汇总和相关解决方案
- 42 技能学习指南
- 43 加餐:Redis的可视化管理工具
JVM核心技术32讲
- 01 阅读此专栏的正确姿势
- 02 环境准备:千里之行,始于足下
- 03 常用性能指标:没有量化,就没有改进
- 04 JVM基础知识:不积跬步,无以至千里
- 05 Java字节码技术:不积细流,无以成江河
- 06 Java类加载器:山不辞土,故能成其高
- 07 Java内存模型:海不辞水,故能成其深
- 08 JVM启动参数详解:博观而约取、厚积而薄发
- 09 JDK内置命令行工具:工欲善其事,必先利其器
- 10 JDK内置图形界面工具:海阔凭鱼跃,天高任鸟飞
- 11 JDWP简介:十步杀一人,千里不留行
- 12 JMX与相关工具:山高月小,水落石出
- 13 常见的GC算法(GC的背景与原理)
- 14 常见的GC算法(ParallelCMSG1)
- 15 Java11ZGC和Java12Shenandoah介绍:苟日新、日日新、又日新
- 16 OracleGraalVM介绍:会当凌绝顶、一览众山小
- 17 GC日志解读与分析(基础配置)
- 18 GC日志解读与分析(实例分析上篇)
- 19 GC日志解读与分析(实例分析中篇)
- 20 GC日志解读与分析(实例分析下篇)
- 21 GC日志解读与分析(番外篇可视化工具)
- 22 JVM的线程堆栈等数据分析:操千曲而后晓声、观千剑而后识器
- 23 内存分析与相关工具上篇(内存布局与分析工具)
- 24 内存分析与相关工具下篇(常见问题分析)
- 25 FastThread相关的工具介绍:欲穷千里目,更上一层楼
- 26 面临复杂问题时的几个高级工具:它山之石,可以攻玉
- 27 JVM问题排查分析上篇(调优经验)
- 28 JVM问题排查分析下篇(案例实战)
- 29 GC疑难情况问题排查与分析(上篇)
- 30 GC疑难情况问题排查与分析(下篇)
- 31 JVM相关的常见面试问题汇总:运筹策帷帐之中,决胜于千里之外
- 32 应对容器时代面临的挑战:长风破浪会有时、直挂云帆济沧海
领域驱动设计实践
- 00 1「战略篇」访谈DDD和微服务是什么关系?
- 00 2「战略篇」开篇词:领域驱动设计,重焕青春的设计经典
- 00 3领域驱动设计概览
- 00 4深入分析软件的复杂度
- 00 5控制软件复杂度的原则
- 00 6领域驱动设计对软件复杂度的应对(上)
- 00 7领域驱动设计对软件复杂度的应对(下)
- 00 8软件开发团队的沟通与协作
- 00 9运用领域场景分析提炼领域知识(上)
- 01 0运用领域场景分析提炼领域知识(下)
- 01 1建立统一语言
- 01 2理解限界上下文
- 01 3限界上下文的控制力(上)
- 01 4限界上下文的控制力(下)
- 01 5识别限界上下文(上)
- 01 6识别限界上下文(下)
- 01 7理解上下文映射
- 01 8上下文映射的团队协作模式
- 01 9上下文映射的通信集成模式
- 02 0辨别限界上下文的协作关系(上)
- 02 1辨别限界上下文的协作关系(下)
- 02 2认识分层架构
- 02 3分层架构的演化
- 02 4领域驱动架构的演进
- 02 5案例层次的职责与协作关系(图文篇)
- 02 6限界上下文与架构
- 02 7限界上下文对架构的影响
- 02 8领域驱动设计的代码模型
- 02 9代码模型的架构决策
- 03 0实践先启阶段的需求分析
- 03 1实践先启阶段的领域场景分析(上)
- 03 2实践先启阶段的领域场景分析(下)
- 03 3实践识别限界上下文
- 03 4实践确定限界上下文的协作关系
- 03 5实践EAS的整体架构
- 03 6「战术篇」访谈:DDD能帮开发团队提高设计水平吗?
- 03 7「战术篇」开篇词:领域驱动设计的不确定性
- 03 8什么是模型
- 03 9数据分析模型
- 04 0数据设计模型
- 04 1数据模型与对象模型
- 04 2数据实现模型
- 04 3案例培训管理系统
- 04 4服务资源模型
- 04 5服务行为模型
- 04 6服务设计模型
- 04 7领域模型驱动设计
- 04 8领域实现模型
- 04 9理解领域模型
- 05 0领域模型与结构范式
- 05 1领域模型与对象范式(上)
- 05 2领域模型与对象范式(中)
- 05 3领域模型与对象范式(下)
- 05 4领域模型与函数范式
- 05 5领域驱动分层架构与对象模型
- 05 6统一语言与领域分析模型
- 05 7精炼领域分析模型
- 05 8彩色UML与彩色建模
- 05 9四色建模法
- 06 0案例订单核心流程的四色建模
- 06 1事件风暴与业务全景探索
- 06 2事件风暴与领域分析建模
- 06 3案例订单核心流程的事件风暴
- 06 4表达领域设计模型
- 06 5实体
- 06 6值对象
- 06 7对象图与聚合
- 06 8聚合设计原则
- 06 9聚合之间的关系
- 07 0聚合的设计过程
- 07 1案例培训领域模型的聚合设计
- 07 2领域模型对象的生命周期-工厂
- 07 3领域模型对象的生命周期-资源库
- 07 4领域服务
- 07 5案例领域设计模型的价值
- 07 6应用服务
- 07 7场景的设计驱动力
- 07 8案例薪资管理系统的场景驱动设计
- 07 9场景驱动设计与DCI模式
- 08 0领域事件
- 08 1发布者—订阅者模式
- 08 2事件溯源模式
- 08 3测试优先的领域实现建模
- 08 4深入理解简单设计
- 08 5案例薪资管理系统的测试驱动开发(上)
- 08 6案例薪资管理系统的测试驱动开发(下)
- 08 7对象关系映射(上)
- 08 8对象关系映射(下)
- 08 9领域模型与数据模型
- 09 0领域驱动设计对持久化的影响
- 09 1领域驱动设计体系
- 09 2子领域与限界上下文
- 09 3限界上下文的边界与协作
- 09 4限界上下文之间的分布式通信
- 09 5命令查询职责分离
- 09 6分布式柔性事务
- 09 7设计概念的统一语言
- 09 8模型对象
- 09 9领域驱动设计参考过程模型
- 10 0领域驱动设计的精髓
- 10 1实践员工上下文的领域建模
- 10 2实践考勤上下文的领域建模
- 10 3实践项目上下文的领域建模
- 10 4实践培训上下文的业务需求
- 10 5实践培训上下文的领域分析建模
- 10 6实践培训上下文的领域设计建模
- 10 7实践培训上下文的领域实现建模
- 10 8实践EAS系统的代码模型
- 10 9后记:如何学习领域驱动设计
深入理解Sentinel
- 01 开篇词:一次服务雪崩问题排查经历
- 02 为什么需要服务降级以及常见的几种降级方式
- 03 为什么选择Sentinel,Sentinel与Hystrix的对比
- 04 Sentinel基于滑动窗口的实时指标数据统计
- 05 Sentinel的一些概念与核心类介绍
- 06 Sentinel中的责任链模式与Sentinel的整体工作流程
- 07 JavaSPI及SPI在Sentinel中的应用
- 08 资源指标数据统计的实现全解析(上)
- 09 资源指标数据统计的实现全解析(下)
- 10 限流降级与流量效果控制器(上)
- 11 限流降级与流量效果控制器(中)
- 12 限流降级与流量效果控制器(下)
- 13 熔断降级与系统自适应限流
- 14 黑白名单限流与热点参数限流
- 15 自定义ProcessorSlot实现开关降级
- 16 Sentinel动态数据源:规则动态配置
- 17 Sentinel主流框架适配
- 18 Sentinel集群限流的实现(上)
- 19 Sentinel集群限流的实现(下)
- 20 结束语:Sentinel对应用的性能影响如何?
- 21 番外篇:Sentinel1.8.0熔断降级新特性解读
Kubernetes实践入门指南
- 00 为什么我们要学习Kubernetes技术
- 01 重新认识Kubernetes的核心组件
- 02 深入理解Kubernets的编排对象
- 03 DevOps场景下落地K8s的困难分析
- 04 微服务应用场景下落地K8s的困难分析
- 05 解决K8s落地难题的方法论提炼
- 06 练习篇:K8s核心实践知识掌握
- 07 容器引擎containerd落地实践
- 08 K8s集群安装工具kubeadm的落地实践
- 09 南北向流量组件IPVS的落地实践
- 10 东西向流量组件Calico的落地实践
- 11 服务发现DNS的落地实践
- 12 练习篇:K8s集群配置测验
- 13 理解对方暴露服务的对象Ingress和Service
- 14 应用网关OpenResty对接K8s实践
- 15 Service层引流技术实践
- 16 Cilium容器网络的落地实践
- 17 应用流量的优雅无损切换实践
- 18 练习篇:应用流量无损切换技术测验
- 19 使用Rook构建生产可用存储环境实践
- 20 有状态应用的默认特性落地分析
- 21 案例:分布式MySQL集群工具Vitess实践分析
- 22 存储对象PV、PVC、StorageClasses的管理落地实践
- 23 K8s集群中存储对象灾备的落地实践
- 24 练习篇:K8s集群配置测验
案例上手SpringBootWebFlux
- 01 导读:课程概要
- 02 WebFlux快速入门实践
- 03 WebFluxWebCRUD实践
- 04 WebFlux整合MongoDB
- 05 WebFlux整合Thymeleaf
- 06 WebFlux中Thymeleaf和MongoDB实践
- 07 WebFlux整合Redis
- 08 WebFlux中Redis实现缓存
- 09 WebFlux中WebSocket实现通信
- 10 WebFlux集成测试及部署
- 11 WebFlux实战图书管理系统
深入浅出Docker技术栈实践课
- 01 导读:Docker核心技术预览
- 02 Docker命令行实践
- 03 基于Docker的DevOps实践
- 04 容器云平台的构建实践
- 05 容器网络机制和多主机网络实践
- 06 Docker日志机制与监控实践
- 07 自动化部署分布式容器云平台实践
掘金小册
Kubernetes从上手到实践
- 01 开篇:Kubernetes是什么以及为什么需要它
- 02 初步认识:Kubernetes基础概念
- 03 宏观认识:整体架构
- 04 搭建Kubernetes集群-本地快速搭建
- 05 动手实践:搭建一个Kubernetes集群-生产可用
- 06 集群管理:初识kubectl
- 07 集群管理:以Redis为例-部署及访问
- 08 安全重点认证和授权
- 09 应用发布:部署实际项目
- 10 应用管理:初识Helm
- 11 部署实践:以Helm部署项目
- 12 庖丁解牛:kube-apiserver
- 13 庖丁解牛:etcd
- 14 庖丁解牛:controller-manager
- 15 庖丁解牛:kube-scheduler
- 16 庖丁解牛:kubelet
- 17 庖丁解牛:kube-proxy
- 18 庖丁解牛:ContainerRuntime(Docker)
- 19 Troubleshoot
- 20 扩展增强:Dashboard
- 21 扩展增强:CoreDNS
- 22 服务增强:Ingress
- 23 监控实践:对K8S集群进行监控
- 24 总结
其它
互联网消费金融高并发领域设计
- 01 互联网消费金融高并发架构设计体系的设计原则
- 02 打造互联网消金高并发架构八大中间件运用
- 03 互联网金融高并发架构微服务治理方案实践
- 04 构建高并发互联网消费金融体系的领域规划设计
- 05 互联网消费金融高并发场景下监控体系建设
Serverless技术公开课
- 01 架构的演进
- 02 Serverless的价值
- 03 常见Serverless架构模式
- 04 Serverless技术选型
- 05 函数计算简介
- 06 函数计算是如何工作的?
- 07 函数粘合云服务提供端到端解决方案
- 08 函数计算的开发与配置
- 09 函数的调试与部署
- 10 自动化CI&CD与灰度发布
- 11 函数计算的可观测性
- 12 典型案例1:函数计算在音视频场景实践
- 13 典型案例3:十分钟搭建弹性可扩展的WebAPI
- 14 ServerlessKubernetes容器服务介绍
- 15 ServerlessKubernetes应用部署及扩缩容
- 16 使用Spot低成本运行Job任务
- 17 低成本运行Spark数据计算
- 18 GPU机器学习开箱即用
- 19 基于Knative低成本部署在线应用,灵活自动伸缩
- 20 快速构建JenkinsGitlab持续集成环境
- 21 在线应用的Serverless实践
- 22 通过IDEMaven部署Serverless应用实践
- 23 企业级CICD工具部署Serverless应用的落地实践
- 24 Serverless应用如何管理日志&持久化数据
- 25 Serverless应用引擎产品的流量负载均衡和路由策略配置实践
- 26 SpringCloudDubbo应用无缝迁移到Serverless架构
- 27 SAE应用分批发布与无损下线的最佳实践
CNCFX阿里巴巴云原生技术公开课
- 01 第一堂“云原生”课
- 02 容器基本概念
- 03 Kubernetes核心概念
- 04 理解Pod和容器设计模式
- 05 应用编排与管理:核心原理
- 06 应用编排与管理
- 07 应用编排与管理:Job&DaemonSet
- 08 应用配置管理
- 09 应用存储和持久化数据卷:核心知识
- 10 应用存储和持久化数据卷:存储快照与拓扑调度(至天)
- 11 可观测性:你的应用健康吗?(莫源)
- 12 可观测性-监控与日志(莫源)
- 13 Kubernetes网络概念及策略控制(叶磊)
- 14 KubernetesService(溪恒)
- 15 从0开始创作云原生应用(殷达)
- 16 深入解析Linux容器(华敏)
ElasticSearch知识体系详解
- 01 认知:ElasticSearch基础概念
- 02 认知:ElasticStack生态和场景方案
- 03 安装:ElasticSearch和Kibana安装
- 04 入门:查询和聚合的基础使用
- 05 索引:索引管理详解
- 06 索引:索引模板(IndexTemplate)详解
- 07 查询:DSL查询之复合查询详解
- 08 查询:DSL查询之全文搜索详解
- 09 查询:DSL查询之Term详解
- 10 聚合:聚合查询之Bucket聚合详解
- 11 聚合:聚合查询之Metric聚合详解
- 12 聚合:聚合查询之Pipline聚合详解
- 13 原理:从图解构筑对ES原理的初步认知
- 14 原理:ES原理知识点补充和整体结构
- 15 原理:ES原理之索引文档流程详解
- 16 原理:ES原理之读取文档流程详解
- 17 优化:ElasticSearch性能优化详解
- 18 大厂实践:腾讯万亿级Elasticsearch技术实践
- 19 资料:AwesomeElasticsearch
- 20 WrapperQuery
- 21 备份和迁移
10 WebFlux 集成测试及部署
前言
在日常工作中,免不了自测 UT,因为覆盖率不达标,是不允许提交测试,那怎么进行 WebFlux 项目的测试呢。@WebFluxTest 是 WebFlux 测试的重要注解。
结构
回到这个工程中,使用 springboot-webflux-3-mongodb 工程,工程如图:
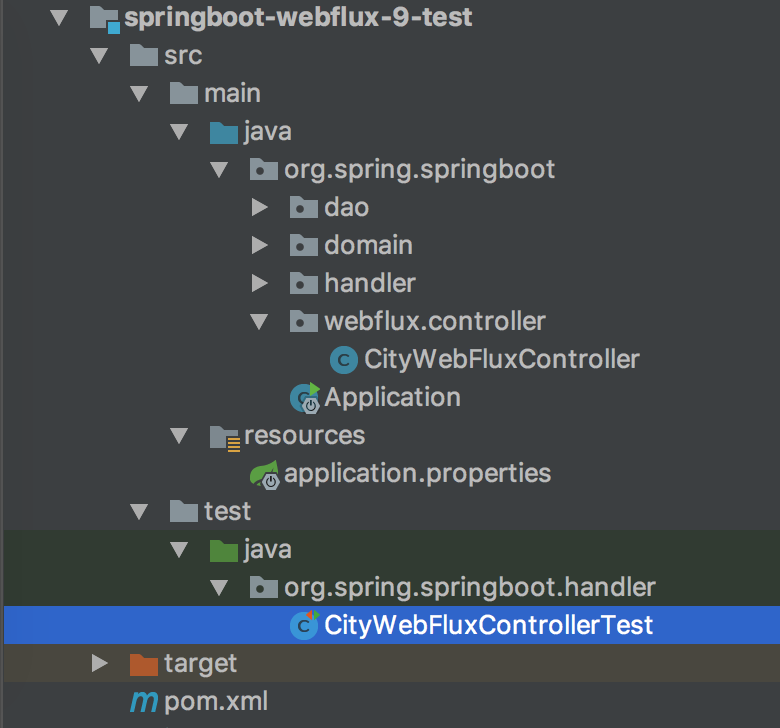
目录核心如下:
- pom.xml 添加 Test 相关依赖;
- test / CityWebFluxControllerTest WebFlux API 测试类;
POM 依赖
pom.xml 添加对应的测试依赖:
1 | <!-- Spring Boot Test 依赖 --> |
CityWebFluxControllerTest WebFlux API 测试类
@WebFluxTest 用于测试 Spring WebFlux 控制器,支持自动配置 Spring WebFlux 基础组件,可以限制扫描范围等。
代码如下:
1 | @RunWith(SpringRunner.class) |
代码详解:
- @WebFluxTest 注入了 WebTestClient 对象,用于测试 WebFlux 控制器,好处是快速,并无需启动完整 HTTP 容器。
- WebTestClient.post() 方法构造了 POST 测试请求,并使用 uri 指定路由。
- expectStatus() 用于验证返回状态是否为 ok(),即 200 返回码。
- expectBody(City.class) 用于验证返回对象体是为 City 对象,并利用 returnResult 获取对象。
- Assert 是以前我们常用的断言方法验证测试结果。
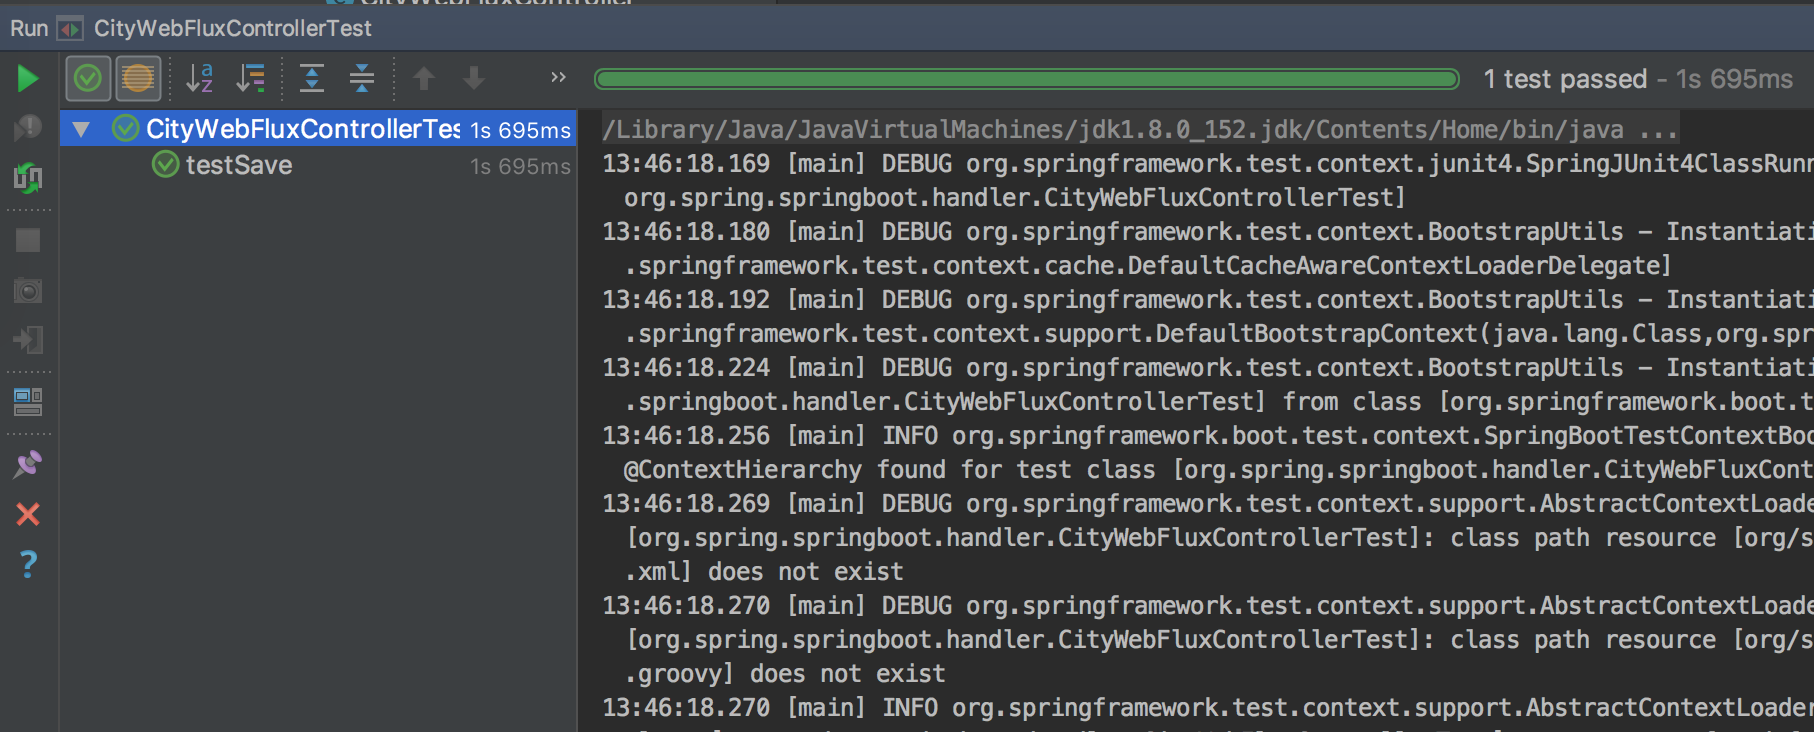
运行 Test,得到如图验证结果:
工程运行方式
了解工程服务器部署,先了解工程如何运行。
上面使用应用启动类运行工程,这是其中一种工程运行方式。Spring Boot 应用的运行方式很简单,下面介绍下这三种运行方式。
1. 使用应用启动类
在 IDEA 中直接执行应用启动类,来运行 Spring Boot 应用,日常开发中,会经常使用这种方式启动应用。常用的会有 Debug 启动模式,方便在开发中进行代码调试和 bug 处理。自然,Debug 启动模式会比正常模式稍微慢一些。
2. 使用 Maven 运行
通过 Maven 运行,需要配置 Spring Boot Maven 插件,在 pom.xml 配置文件中,新增 build 节点并配置插件 spring-boot-maven-plugin,代码如下:
1 | <build> |
在工程根目录中,运行如下 Maven 命令来运行 Spring Boot 应用:
1 | mvn spring-boot:run |
实际调用的是 pom.xml 配置的 Spring Boot Maven 插件 spring-boot-maven-plugin,上面执行了插件提供的 run 指令。也可以在 IDEA 右侧工具栏的 Maven Project Tab 中,找到 Maven 插件的 spring-boot-maven-plugin,执行相应的指令。所有指令如下:
1 | # 生成构建信息文件 |
3. 使用 Java 命令运行
使用 Maven 或者 Gradle 安装工程,生成可执行的工程 jar 后,运行如下 Java 命令来运行 Spring Boot 应用:
1 | java -jar target/xxx.jar |
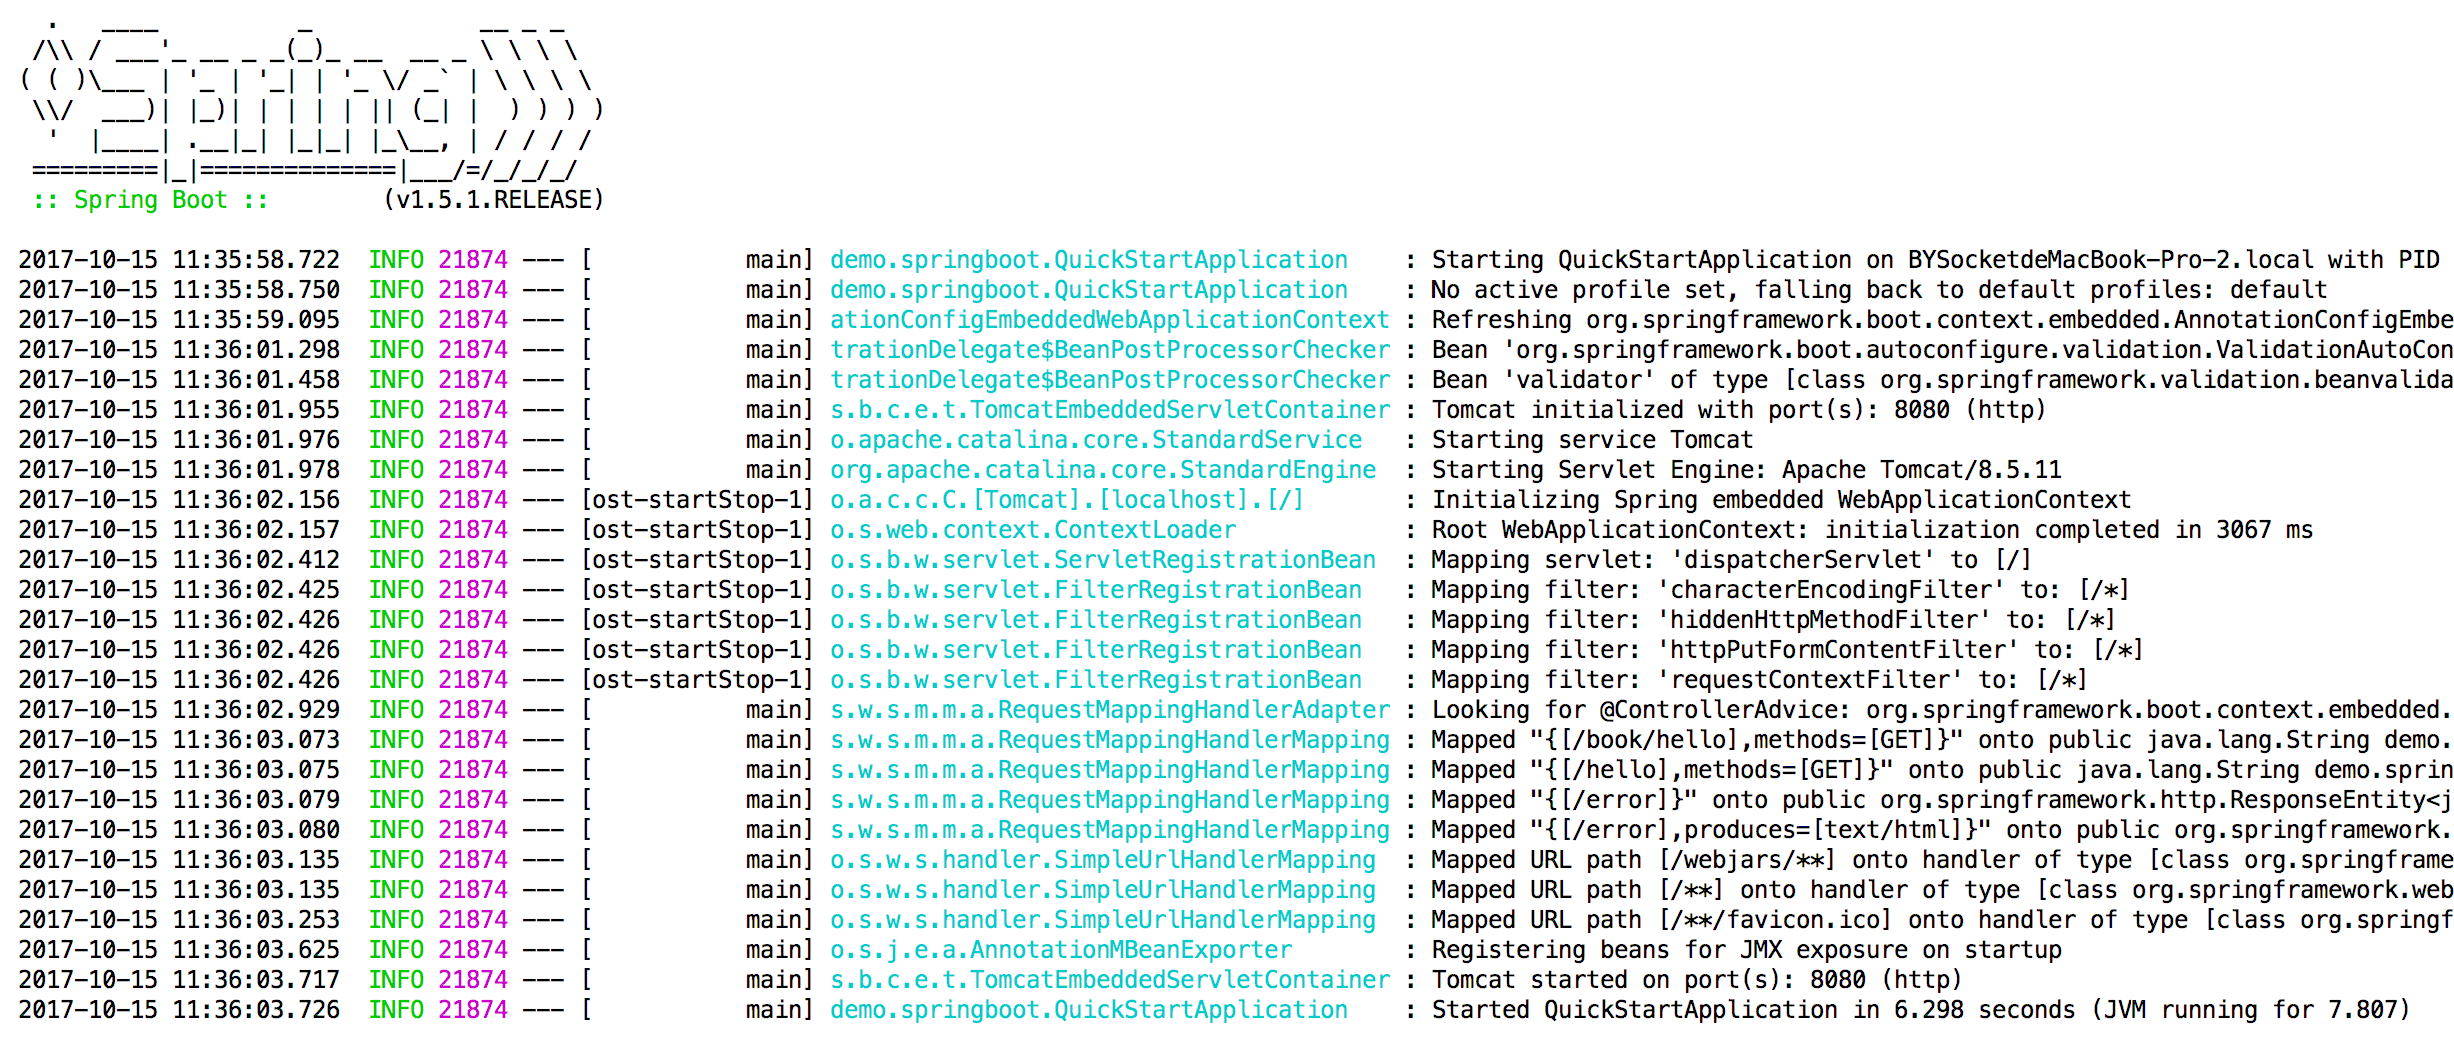
这里运行了 spring-boot-maven-plugin 插件编译出来的可执行 jar 文件。通过上述三种方式都可以成功运行 Spring Boot 工程,成功运行输出的控制台信息如图 1-10 所示。
工程服务器部署
基础环境安装如上面说的,需要 JDK 环境、Maven 环境等。
Win 服务器
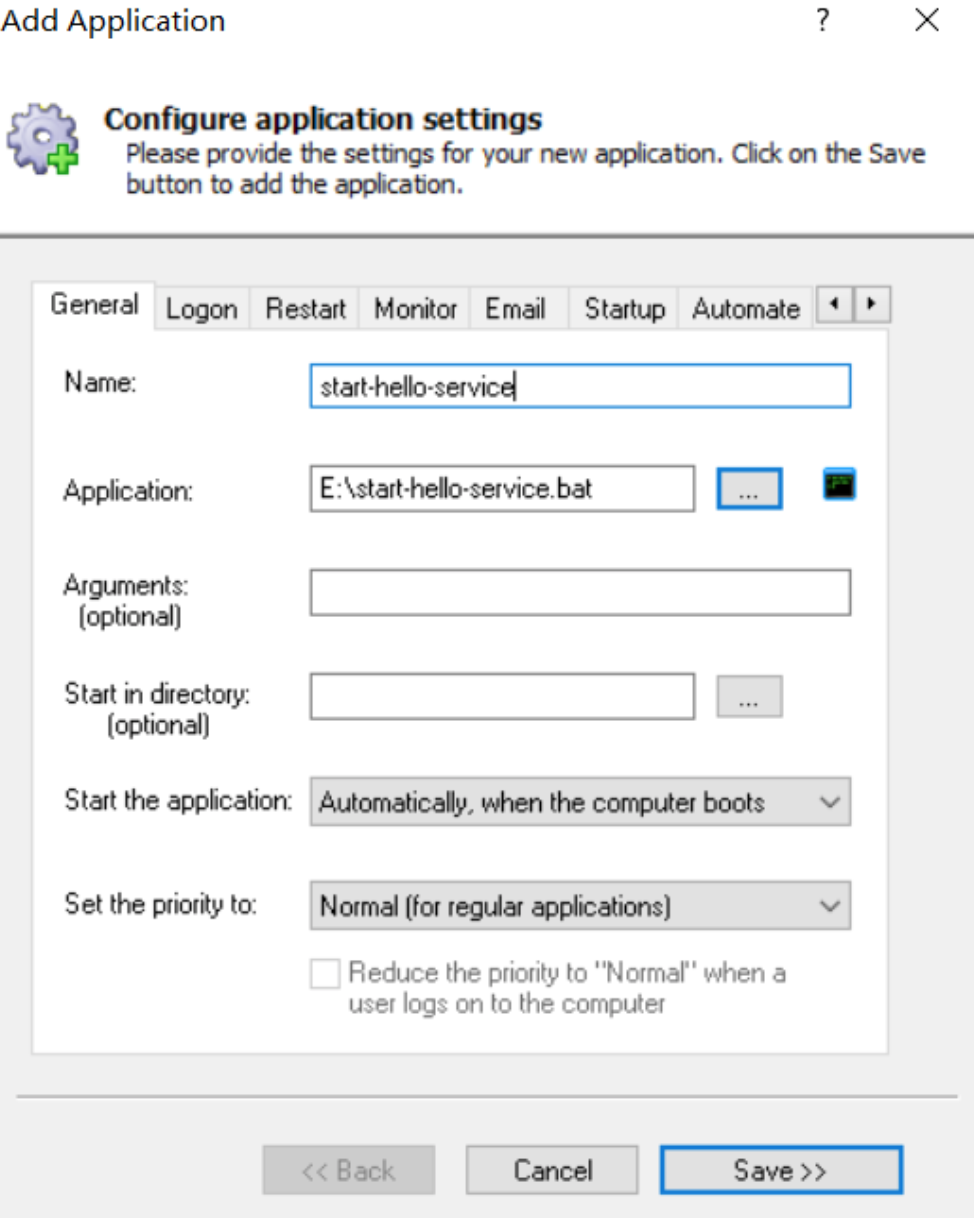
推荐使用 AlwaysUp:
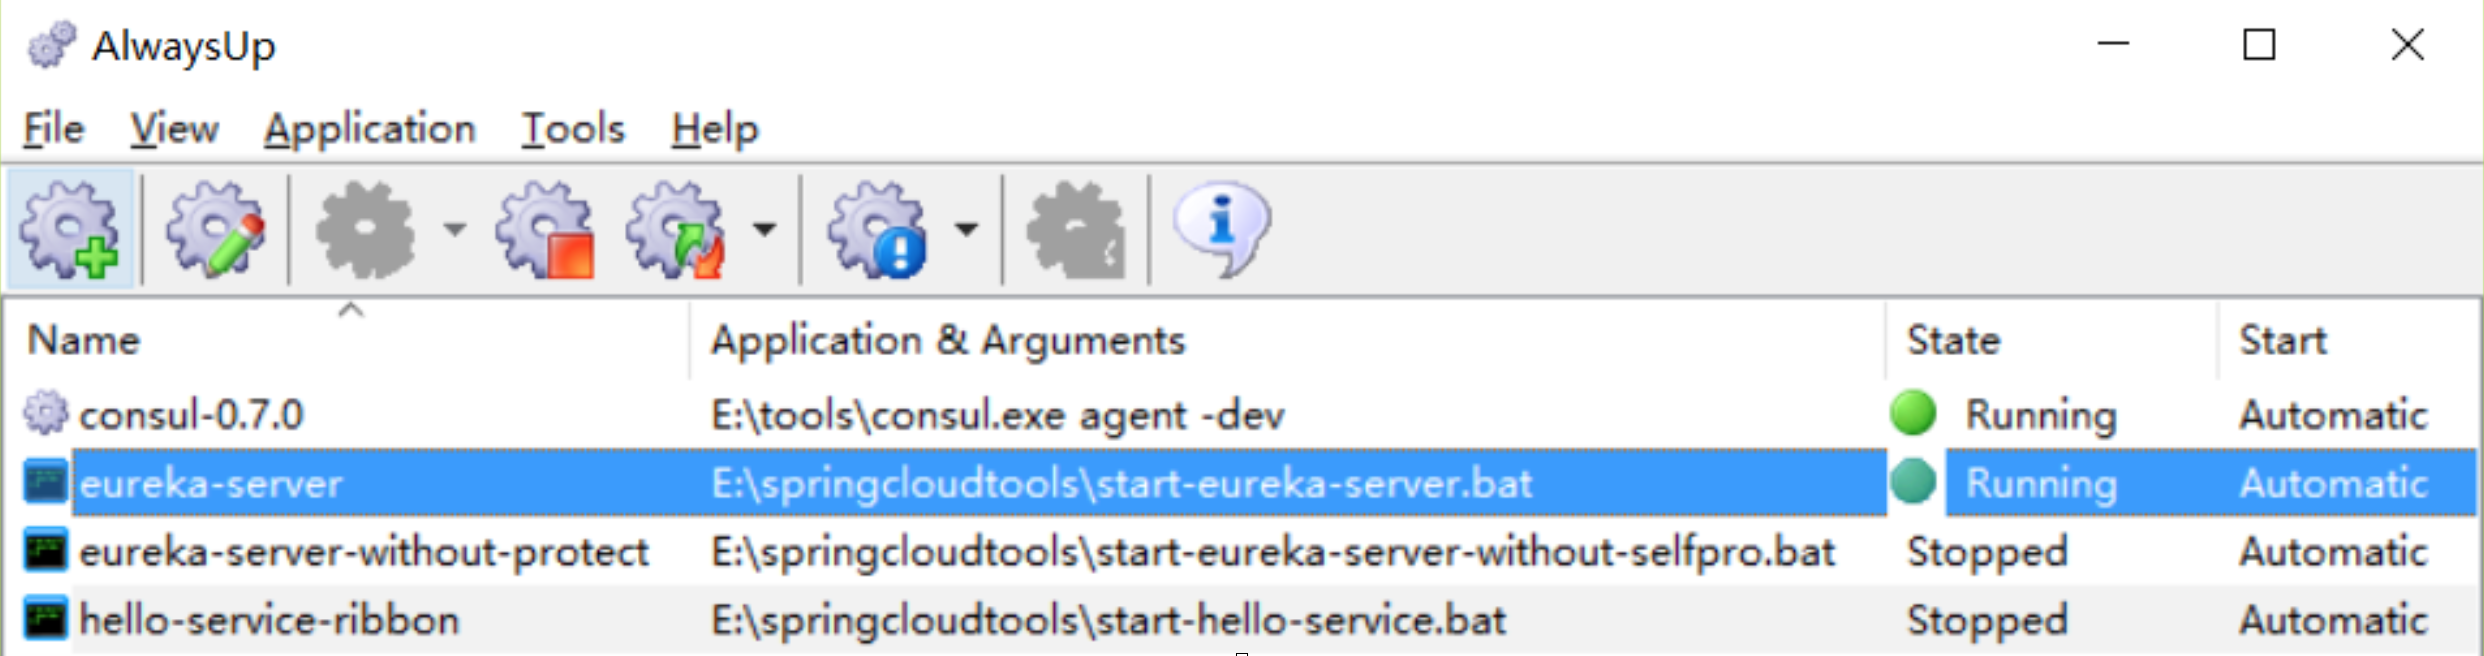
使用方式也很简单:
Linux 服务器
推荐 yum 安装基础环境,比如安装 JDK:
1 | yum -y list java* |
安装 Maven:
1 | yum -y list apache-maven |
Linux 使用 nohup 命令进行对后台程序的启动关闭。
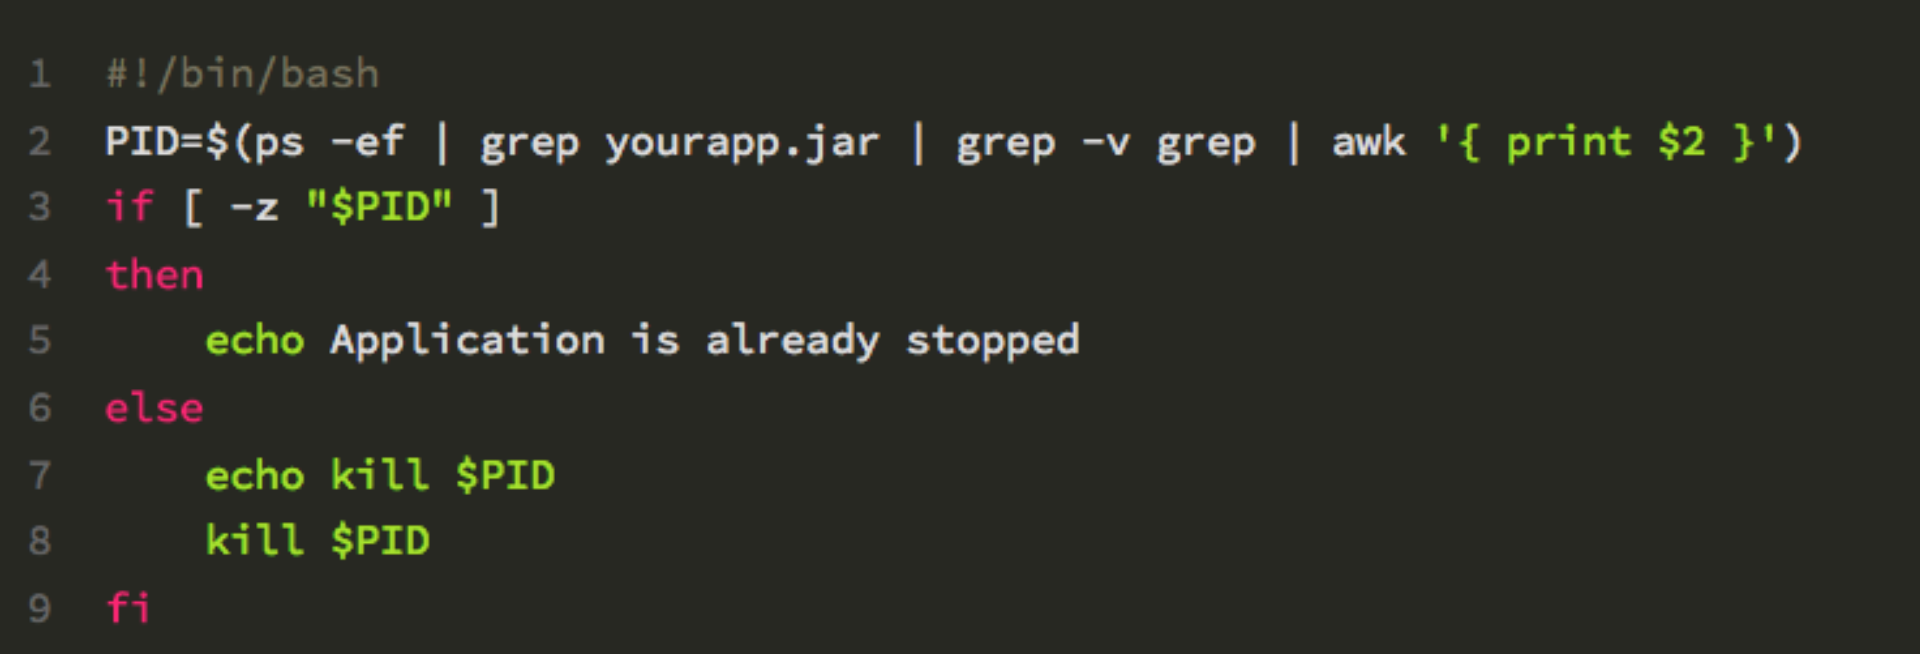
关闭应用的脚本:stop.sh
启动应用的脚本:start.sh

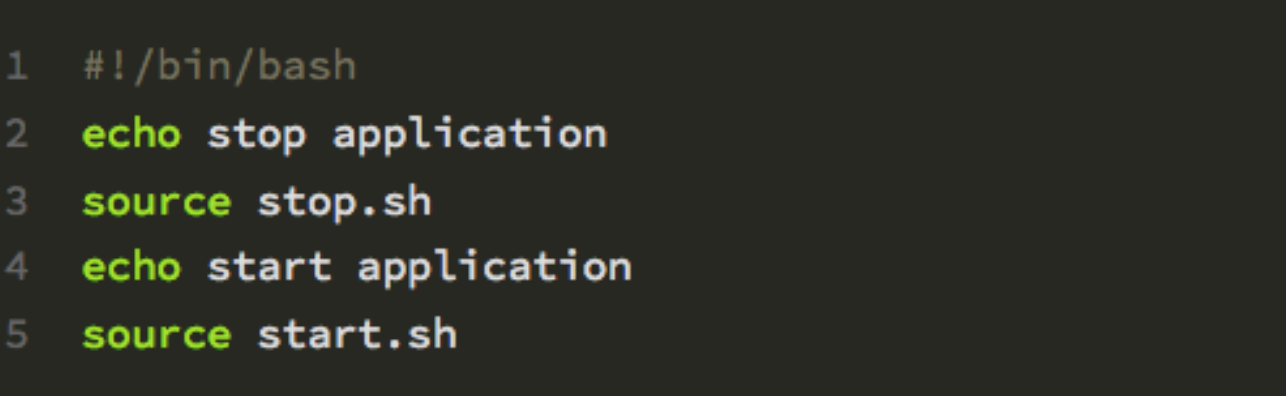
重启应用的脚本:stop.sh
总结
这一篇主要一起实践了简单的 WebFlux API 控制层的测试,Service 测试 Mock 和以前一样,以及工程运行、服务器部署的操作。
工程:springboot-webflux-9-test。