47 配置中心设计与实现:集中化配置 and 本地化配置,我都要(上)
从 2.7.0 版本开始,Dubbo 正式支持配置中心,在服务自省架构中也依赖配置中心完成 Service ID 与 Service Name 的映射。配置中心在 Dubbo 中主要承担两个职责:
- 外部化配置;
- 服务治理,负责服务治理规则的存储与通知。
外部化配置目的之一是实现配置的集中式管理。 目前已经有很多成熟的专业配置管理系统(例如,携程开源的 Apollo、阿里开源的 Nacos 等),Dubbo 配置中心的目的不是再“造一次轮子”,而是保证 Dubbo 能与这些成熟的配置管理系统正常工作。
Dubbo 可以同时支持多种配置来源。在 Dubbo 初始化过程中,会从多个来源获取配置,并按照固定的优先级将这些配置整合起来,实现高优先级的配置覆盖低优先级配置的效果。这些配置的汇总结果将会参与形成 URL,以及后续的服务发布和服务引用。
Dubbo 目前支持下面四种配置来源,优先级由 1 到 4 逐级降低:
- System Properties,即 -D 参数;
- 外部化配置,也就是本课时要介绍的配置中心;
- API 接口、注解、XML 配置等编程方式收到的配置,最终得到 ServiceConfig、ReferenceConfig 等对象;
- 本地 dubbo.properties 配置文件。
Configuration
Configuration 接口是 Dubbo 中所有配置的基础接口,其中定义了根据指定 Key 获取对应配置值的相关方法,如下图所示:
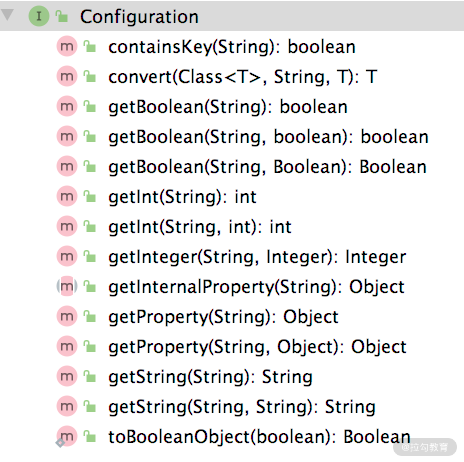
Configuration 接口核心方法
从上图中我们可以看到,Configuration 针对不同的 boolean、int、String 返回值都有对应的 get*() 方法,同时还提供了带有默认值的 get*() 方法。这些 get
*() 方法底层首先调用 getInternalProperty() 方法获取配置值,然后调用 convert() 方法将获取到的配置值转换成返回值的类型之后返回。getInternalProperty() 是一个抽象方法,由 Configuration 接口的子类具体实现。
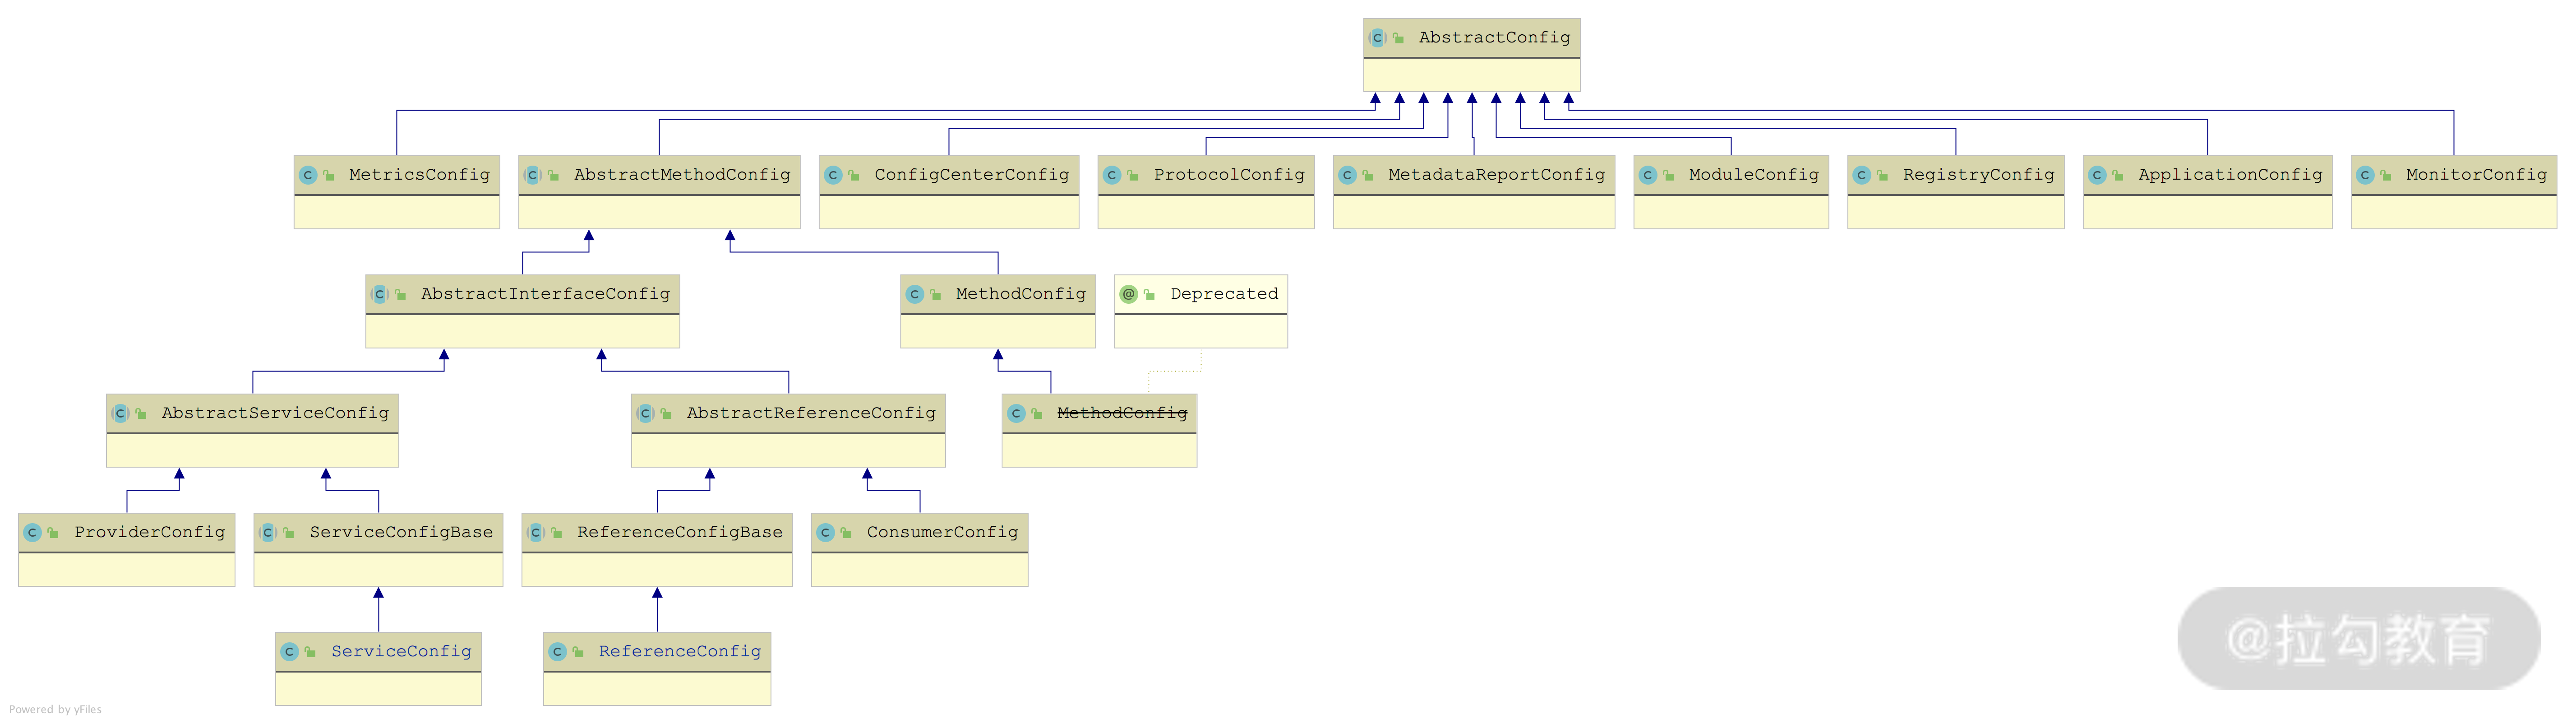
下图展示了 Dubbo 中提供的 Configuration 接口实现,包括:SystemConfiguration、EnvironmentConfiguration、InmemoryConfiguration、PropertiesConfiguration、CompositeConfiguration、ConfigConfigurationAdapter 和 DynamicConfiguration。下面我们将结合具体代码逐个介绍其实现。

Configuration 继承关系图
SystemConfiguration & EnvironmentConfiguration
SystemConfiguration 是从 Java Properties 配置(也就是 -D 配置参数)中获取相应的配置项,EnvironmentConfiguration 是从使用环境变量中获取相应的配置。两者的 getInternalProperty() 方法实现如下:
1
2
3
4
5
6
7
8
9
10
11
12
13
14
15
16
17
18
19
20
21
22
23
24
25
26
27
28
29
| public class SystemConfiguration implements Configuration {
public Object getInternalProperty(String key) {
return System.getProperty(key); // 读取-D配置参数
}
}
public class EnvironmentConfiguration implements Configuration {
public Object getInternalProperty(String key) {
String value = System.getenv(key);
if (StringUtils.isEmpty(value)) {
// 读取环境变量中获取相应的配置
value = System.getenv(StringUtils.toOSStyleKey(key));
}
return value;
}
}
|
InmemoryConfiguration
InmemoryConfiguration 会在内存中维护一个 Map<String, String> 集合(store 字段),其 getInternalProperty() 方法的实现就是从 store 集合中获取对应配置值:
1
2
3
4
5
6
7
8
9
10
11
12
13
14
15
| public class InmemoryConfiguration implements Configuration {
private Map<String, String> store = new LinkedHashMap<>();
@Override
public Object getInternalProperty(String key) {
return store.get(key);
}
// 省略addProperty()等写入store集合的方法
}
|
PropertiesConfiguration
PropertiesConfiguration 涉及 OrderedPropertiesProvider,其接口的定义如下:
1
2
3
4
5
6
7
8
9
10
11
12
13
| @SPI
public interface OrderedPropertiesProvider {
// 用于排序
int priority();
// 获取Properties配置
Properties initProperties();
}
|
在 PropertiesConfiguration 的构造方法中,会加载 OrderedPropertiesProvider 接口的全部扩展实现,并按照 priority() 方法进行排序。然后,加载默认的 dubbo.properties.file 配置文件。最后,用 OrderedPropertiesProvider 中提供的配置覆盖 dubbo.properties.file 文件中的配置。PropertiesConfiguration 的构造方法的具体实现如下:
1
2
3
4
5
6
7
8
9
10
11
12
13
14
15
16
17
18
19
20
21
22
23
24
25
26
27
28
29
30
31
32
33
34
35
36
37
38
39
40
41
42
43
44
45
46
47
48
49
50
51
| public PropertiesConfiguration() {
// 获取OrderedPropertiesProvider接口的全部扩展名称
ExtensionLoader<OrderedPropertiesProvider> propertiesProviderExtensionLoader = ExtensionLoader.getExtensionLoader(OrderedPropertiesProvider.class);
Set<String> propertiesProviderNames = propertiesProviderExtensionLoader.getSupportedExtensions();
if (propertiesProviderNames == null || propertiesProviderNames.isEmpty()) {
return;
}
// 加载OrderedPropertiesProvider接口的全部扩展实现
List<OrderedPropertiesProvider> orderedPropertiesProviders = new ArrayList<>();
for (String propertiesProviderName : propertiesProviderNames) {
orderedPropertiesProviders.add(propertiesProviderExtensionLoader.getExtension(propertiesProviderName));
}
// 排序OrderedPropertiesProvider接口的扩展实现
orderedPropertiesProviders.sort((OrderedPropertiesProvider a, OrderedPropertiesProvider b) -> {
return b.priority() - a.priority();
});
// 加载默认的dubbo.properties.file配置文件,加载后的结果记录在ConfigUtils.PROPERTIES这个static字段中
Properties properties = ConfigUtils.getProperties();
// 使用OrderedPropertiesProvider扩展实现,按序覆盖dubbo.properties.file配置文件中的默认配置
for (OrderedPropertiesProvider orderedPropertiesProvider :
orderedPropertiesProviders) {
properties.putAll(orderedPropertiesProvider.initProperties());
}
// 更新ConfigUtils.PROPERTIES字段
ConfigUtils.setProperties(properties);
}
|
在 PropertiesConfiguration.getInternalProperty() 方法中,直接从 ConfigUtils.PROPERTIES 这个 Properties 中获取覆盖后的配置信息。
1
2
3
4
5
| public Object getInternalProperty(String key) {
return ConfigUtils.getProperty(key);
}
|
CompositeConfiguration
CompositeConfiguration 是一个复合的 Configuration 对象,其核心就是将多个 Configuration 对象组合起来,对外表现为一个 Configuration 对象。
CompositeConfiguration 组合的 Configuration 对象都保存在 configList 字段中(LinkedList<Configuration> 集合),CompositeConfiguration 提供了 addConfiguration() 方法用于向 configList 集合中添加 Configuration 对象,如下所示:
1
2
3
4
5
6
7
8
9
10
11
| public void addConfiguration(Configuration configuration) {
if (configList.contains(configuration)) {
return; // 不会重复添加同一个Configuration对象
}
this.configList.add(configuration);
}
|
在 CompositeConfiguration 中维护了一个 prefix 字段和 id 字段,两者可以作为 Key 的前缀进行查询,在 getProperty() 方法中的相关代码如下:
1
2
3
4
5
6
7
8
9
10
11
12
13
14
15
16
17
18
19
20
21
22
23
24
25
26
27
28
29
30
31
32
33
| public Object getProperty(String key, Object defaultValue) {
Object value = null;
if (StringUtils.isNotEmpty(prefix)) { // 检查prefix
if (StringUtils.isNotEmpty(id)) { // 检查id
// prefix和id都作为前缀,然后拼接key进行查询
value = getInternalProperty(prefix + id + "." + key);
}
if (value == null) {
// 只把prefix作为前缀,拼接key进行查询
value = getInternalProperty(prefix + key);
}
} else {
// 若prefix为空,则直接用key进行查询
value = getInternalProperty(key);
}
return value != null ? value : defaultValue;
}
|
在 getInternalProperty() 方法中,会按序遍历 configList 集合中的全部 Configuration 查询对应的 Key,返回第一个成功查询到的 Value 值,如下示例代码:
1
2
3
4
5
6
7
8
9
10
11
12
13
14
15
16
17
18
19
20
21
22
23
24
25
26
27
28
29
30
31
32
33
34
35
| public Object getInternalProperty(String key) {
Configuration firstMatchingConfiguration = null;
for (Configuration config : configList) { // 遍历所有Configuration对象
try {
if (config.containsKey(key)) { // 得到第一个包含指定Key的Configuration对象
firstMatchingConfiguration = config;
break;
}
} catch (Exception e) {
logger.error("...");
}
}
if (firstMatchingConfiguration != null) { // 通过该Configuration查询Key并返回配置值
return firstMatchingConfiguration.getProperty(key);
} else {
return null;
}
}
|
ConfigConfigurationAdapter
Dubbo 通过 AbstractConfig 类来抽象实例对应的配置,如下图所示:
AbstractConfig 继承关系图
这些 AbstractConfig 实现基本都对应一个固定的配置,也定义了配置对应的字段以及 getter/setter() 方法。例如,RegistryConfig 这个实现类就对应了注册中心的相关配置,其中包含了 address、protocol、port、timeout 等一系列与注册中心相关的字段以及对应的 getter/setter() 方法,来接收用户通过 XML、Annotation 或是 API 方式传入的注册中心配置。
ConfigConfigurationAdapter 是 AbstractConfig 与 Configuration 之间的适配器,它会将 AbstractConfig 对象转换成 Configuration 对象。在 ConfigConfigurationAdapter 的构造方法中会获取 AbstractConfig 对象的全部字段,并转换成一个 Map<String, String> 集合返回,该 Map<String, String> 集合将会被 ConfigConfigurationAdapter 的 metaData 字段引用。相关示例代码如下:
1
2
3
4
5
6
7
8
9
10
11
12
13
14
15
16
17
18
19
20
21
| public ConfigConfigurationAdapter(AbstractConfig config) {
// 获取该AbstractConfig对象中的全部字段与字段值的映射
Map<String, String> configMetadata = config.getMetaData();
metaData = new HashMap<>(configMetadata.size());
// 根据AbstractConfig配置的prefix和id,修改metaData集合中Key的名称
for (Map.Entry<String, String> entry : configMetadata.entrySet()) {
String prefix = config.getPrefix().endsWith(".") ? config.getPrefix() : config.getPrefix() + ".";
String id = StringUtils.isEmpty(config.getId()) ? "" : config.getId() + ".";
metaData.put(prefix + id + entry.getKey(), entry.getValue());
}
}
|
在 ConfigConfigurationAdapter 的 getInternalProperty() 方法实现中,直接从 metaData 集合中获取配置值即可,如下所示:
1
2
3
4
5
| public Object getInternalProperty(String key) {
return metaData.get(key);
}
|
DynamicConfiguration
DynamicConfiguration 是对 Dubbo 中动态配置的抽象,其核心方法有下面三类。
- getProperties()/ getConfig() / getProperty() 方法:从配置中心获取指定的配置,在使用时,可以指定一个超时时间。
- addListener()/ removeListener() 方法:添加或删除对指定配置的监听器。
- publishConfig() 方法:发布一条配置信息。
在上述三类方法中,每个方法都用多个重载,其中,都会包含一个带有 group 参数的重载,也就是说配置中心的配置可以按照 group 进行分组。
与 Dubbo 中很多接口类似,DynamicConfiguration 接口本身不被 @SPI 注解修饰(即不是一个扩展接口),而是在 DynamicConfigurationFactory 上添加了 @SPI 注解,使其成为一个扩展接口。
在 DynamicConfiguration 中提供了 getDynamicConfiguration() 静态方法,该方法会从传入的配置中心 URL 参数中,解析出协议类型并获取对应的 DynamicConfigurationFactory 实现,如下所示:
1
2
3
4
5
6
7
8
9
| static DynamicConfiguration getDynamicConfiguration(URL connectionURL) {
String protocol = connectionURL.getProtocol();
DynamicConfigurationFactory factory = getDynamicConfigurationFactory(protocol);
return factory.getDynamicConfiguration(connectionURL);
}
|
DynamicConfigurationFactory 接口的定义如下:
1
2
3
4
5
6
7
8
9
10
11
12
13
14
15
16
17
18
19
| @SPI("nop")
public interface DynamicConfigurationFactory {
DynamicConfiguration getDynamicConfiguration(URL url);
static DynamicConfigurationFactory getDynamicConfigurationFactory(String name) {
// 根据扩展名称获取DynamicConfigurationFactory实现
Class<DynamicConfigurationFactory> factoryClass = DynamicConfigurationFactory.class;
ExtensionLoader<DynamicConfigurationFactory> loader = getExtensionLoader(factoryClass);
return loader.getOrDefaultExtension(name);
}
}
|
DynamicConfigurationFactory 接口的继承关系以及 DynamicConfiguration 接口对应的继承关系如下:
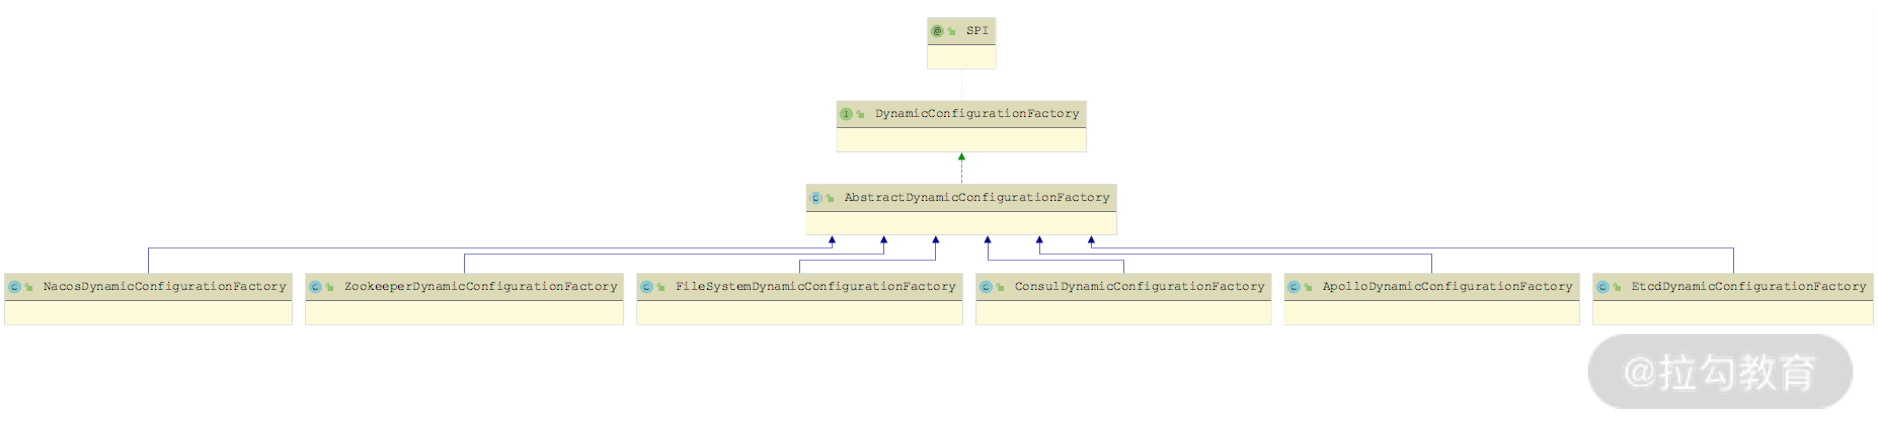
DynamicConfigurationFactory 继承关系图

DynamicConfiguration 继承关系图
我们先来看 AbstractDynamicConfigurationFactory 的实现,其中会维护一个 dynamicConfigurations 集合(Map<String, DynamicConfiguration> 类型),在 getDynamicConfiguration() 方法中会填充该集合,实现缓存DynamicConfiguration 对象的效果。同时,AbstractDynamicConfigurationFactory 提供了一个 createDynamicConfiguration() 方法给子类实现,来创建DynamicConfiguration 对象。
以 ZookeeperDynamicConfigurationFactory 实现为例,其 createDynamicConfiguration() 方法创建的就是 ZookeeperDynamicConfiguration 对象:
1
2
3
4
5
6
7
| protected DynamicConfiguration createDynamicConfiguration(URL url) {
// 这里创建ZookeeperDynamicConfiguration使用的ZookeeperTransporter就是前文在Transport层中针对Zookeeper的实现
return new ZookeeperDynamicConfiguration(url, zookeeperTransporter);
}
|
接下来我们再以 ZookeeperDynamicConfiguration 为例,分析 DynamicConfiguration 接口的具体实现。
首先来看 ZookeeperDynamicConfiguration 的核心字段。
- executor(Executor 类型):用于执行监听器的线程池。
- rootPath(String 类型):以 Zookeeper 作为配置中心时,配置也是以 ZNode 形式存储的,rootPath 记录了所有配置节点的根路径。
- zkClient(ZookeeperClient 类型):与 Zookeeper 集群交互的客户端。
- initializedLatch(CountDownLatch 类型):阻塞等待 ZookeeperDynamicConfiguration 相关的监听器注册完成。
- cacheListener(CacheListener 类型):用于监听配置变化的监听器。
- url(URL 类型):配置中心对应的 URL 对象。
在 ZookeeperDynamicConfiguration 的构造函数中,会初始化上述核心字段,具体实现如下:
1
2
3
4
5
6
7
8
9
10
11
12
13
14
15
16
17
18
19
20
21
22
23
24
25
26
27
28
29
30
31
32
33
34
35
36
37
38
39
40
41
42
43
44
45
46
47
48
49
50
51
| ZookeeperDynamicConfiguration(URL url, ZookeeperTransporter zookeeperTransporter) {
this.url = url;
// 根据URL中的config.namespace参数(默认值为dubbo),确定配置中心ZNode的根路径
rootPath = PATH_SEPARATOR + url.getParameter(CONFIG_NAMESPACE_KEY, DEFAULT_GROUP) + "/config";
// 初始化initializedLatch以及cacheListener,
// 在cacheListener注册成功之后,会调用cacheListener.countDown()方法
initializedLatch = new CountDownLatch(1);
this.cacheListener = new CacheListener(rootPath, initializedLatch);
// 初始化executor字段,用于执行监听器的逻辑
this.executor = Executors.newFixedThreadPool(1, new NamedThreadFactory(this.getClass().getSimpleName(), true));
// 初始化Zookeeper客户端
zkClient = zookeeperTransporter.connect(url);
// 在rootPath上添加cacheListener监听器
zkClient.addDataListener(rootPath, cacheListener, executor);
try {
// 从URL中获取当前线程阻塞等待Zookeeper监听器注册成功的时长上限
long timeout = url.getParameter("init.timeout", 5000);
// 阻塞当前线程,等待监听器注册完成
boolean isCountDown = this.initializedLatch.await(timeout, TimeUnit.MILLISECONDS);
if (!isCountDown) {
throw new IllegalStateException("...");
}
} catch (InterruptedException e) {
logger.warn("...");
}
}
|
在上述初始化过程中,ZookeeperDynamicConfiguration 会创建 CacheListener 监听器。在前面[第 15 课时]中,我们介绍了 dubbo-remoting-zookeeper 对外提供了 StateListener、DataListener 和 ChildListener 三种类型的监听器。这里的 CacheListener 就是 DataListener 监听器的具体实现。
在 CacheListener 中维护了一个 Map<String, Set> 集合(keyListeners 字段)用于记录所有添加的 ConfigurationListener 监听器,其中 Key 是配置信息在 Zookeeper 中存储的 path,Value 为该 path 上的监听器集合。当某个配置项发生变化的时候,CacheListener 会从 keyListeners 中获取该配置对应的 ConfigurationListener 监听器集合,并逐个进行通知。该逻辑是在 CacheListener 的 dataChanged() 方法中实现的:
1
2
3
4
5
6
7
8
9
10
11
12
13
14
15
16
17
18
19
20
21
22
23
24
25
26
27
28
29
30
31
32
33
34
35
36
37
38
39
40
41
42
43
44
45
46
47
48
49
50
51
52
53
54
55
56
57
58
59
60
61
62
63
64
65
66
67
68
69
70
71
72
| public void dataChanged(String path, Object value, EventType eventType) {
if (eventType == null) {
return;
}
if (eventType == EventType.INITIALIZED) {
// 在收到INITIALIZED事件的时候,表示CacheListener已经成功注册,会释放阻塞在initializedLatch上的主线程
initializedLatch.countDown();
return;
}
if (path == null || (value == null && eventType != EventType.NodeDeleted)) {
return;
}
if (path.split("/").length >= MIN_PATH_DEPTH) { // 对path层数进行过滤
String key = pathToKey(path); // 将path中的"/"替换成"."
ConfigChangeType changeType;
switch (eventType) { // 将Zookeeper中不同的事件转换成不同的ConfigChangedEvent事件
case NodeCreated:
changeType = ConfigChangeType.ADDED;
break;
case NodeDeleted:
changeType = ConfigChangeType.DELETED;
break;
case NodeDataChanged:
changeType = ConfigChangeType.MODIFIED;
break;
default:
return;
}
// 使用ConfigChangedEvent封装触发事件的Key、Value、配置group以及事件类型
ConfigChangedEvent configChangeEvent = new ConfigChangedEvent(key, getGroup(path), (String) value, changeType);
// 从keyListeners集合中获取对应的ConfigurationListener集合,然后逐一进行通知
Set<ConfigurationListener> listeners = keyListeners.get(path);
if (CollectionUtils.isNotEmpty(listeners)) {
listeners.forEach(listener -> listener.process(configChangeEvent));
}
}
}
|
CacheListener 中调用的监听器都是 ConfigurationListener 接口实现,如下图所示,这里涉及[第 33 课时]介绍的 TagRouter、AppRouter 和 ServiceRouter,它们主要是监听路由配置的变化;还涉及 RegistryDirectory 和 RegistryProtocol 中的四个内部类(AbstractConfiguratorListener 的子类),它们主要监听 Provider 和 Consumer 的配置变化。
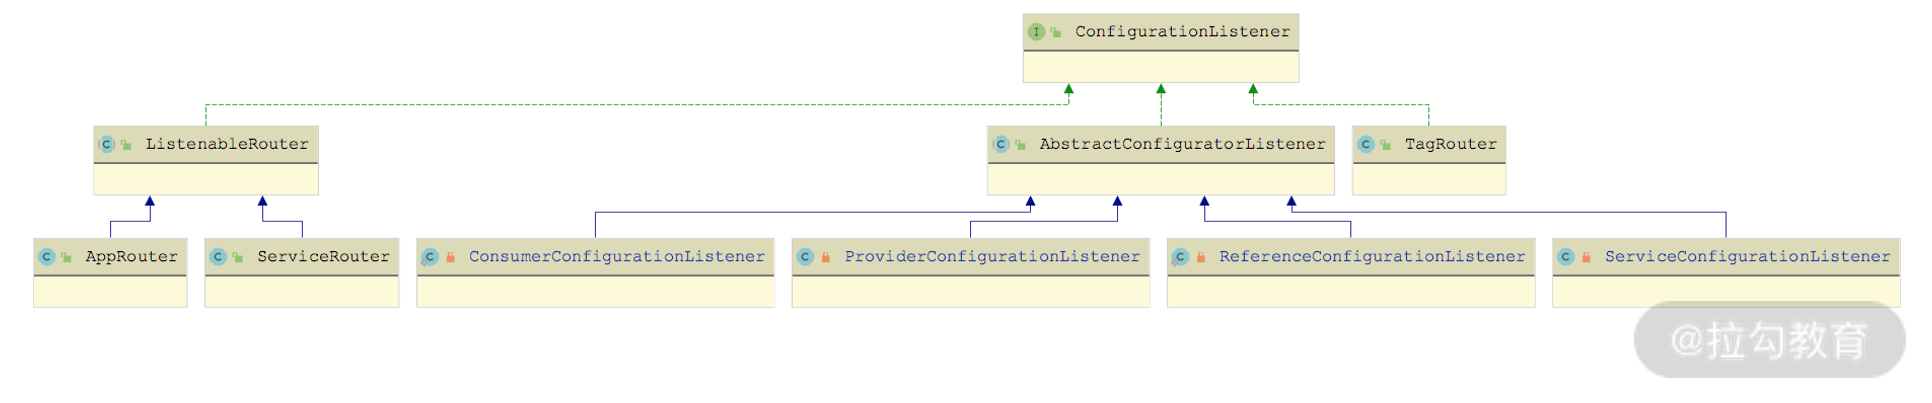
ConfigurationListener 继承关系图
这些 ConfigurationListener 实现在前面的课程中已经详细介绍过了,这里就不再重复。ZookeeperDynamicConfiguration 中还提供了 addListener()、removeListener() 两个方法用来增删 ConfigurationListener 监听器,具体实现比较简单,这里就不再展示,你若感兴趣的话可以参考源码进行学习。
介绍完 ZookeeperDynamicConfiguration 的初始化过程之后,我们再来看 ZookeeperDynamicConfiguration 中读取配置、写入配置的相关操作。相关方法的实现如下:
1
2
3
4
5
6
7
8
9
10
11
12
13
14
15
16
17
18
19
20
21
| public Object getInternalProperty(String key) {
// 直接从Zookeeper中读取对应的Key
return zkClient.getContent(key);
}
public boolean publishConfig(String key, String group, String content) {
// getPathKey()方法中会添加rootPath和group两部分信息到Key中
String path = getPathKey(group, key);
// 在Zookeeper中创建对应ZNode节点用来存储配置信息
zkClient.create(path, content, false);
return true;
}
|
总结
本课时我们重点介绍了 Dubbo 配置中心中的多种配置接口。首先,我们讲解了 Configuration 这个顶层接口的核心方法,然后介绍了 Configuration 接口的相关实现,这些实现可以从环境变量、-D 启动参数、Properties文件以及其他配置文件或注解处读取配置信息。最后,我们还着重介绍了 DynamicConfiguration 这个动态配置接口的定义,并分析了以 Zookeeper 为动态配置中心的 ZookeeperDynamicConfiguration 实现。
下一课时,我们将深入介绍 Dubbo 动态配置中心启动的核心流程,记得按时来听课。