04 如何维护接口文档供外部调用——在线接口文档管理 上个章节初步将一个应用运行起来,由于服务不会单独存在,服务开发团队必然与其他服务团队进行服务调用,暴露出对外接口势在必行。早期做开发的时候,大家习惯于以 word 或 excel 的形式,但弊端显而易见,一旦接口发生变动,文档需要同步更新,遗憾的是很多接口已经更新,但文档都没有跟上,相信你也有过痛苦的经历。本文带领你认识几款接口文档管理工具,并实现本案例实践中用到的在线接口文档管理。
几款 API 工具介绍 我们迫切需要一个接口文档工具,能实时与系统接口保持同步,无须额外付出成本(资金成本、时间成本)最好。这里介绍几个开源的 API 工具,可以选择使用。
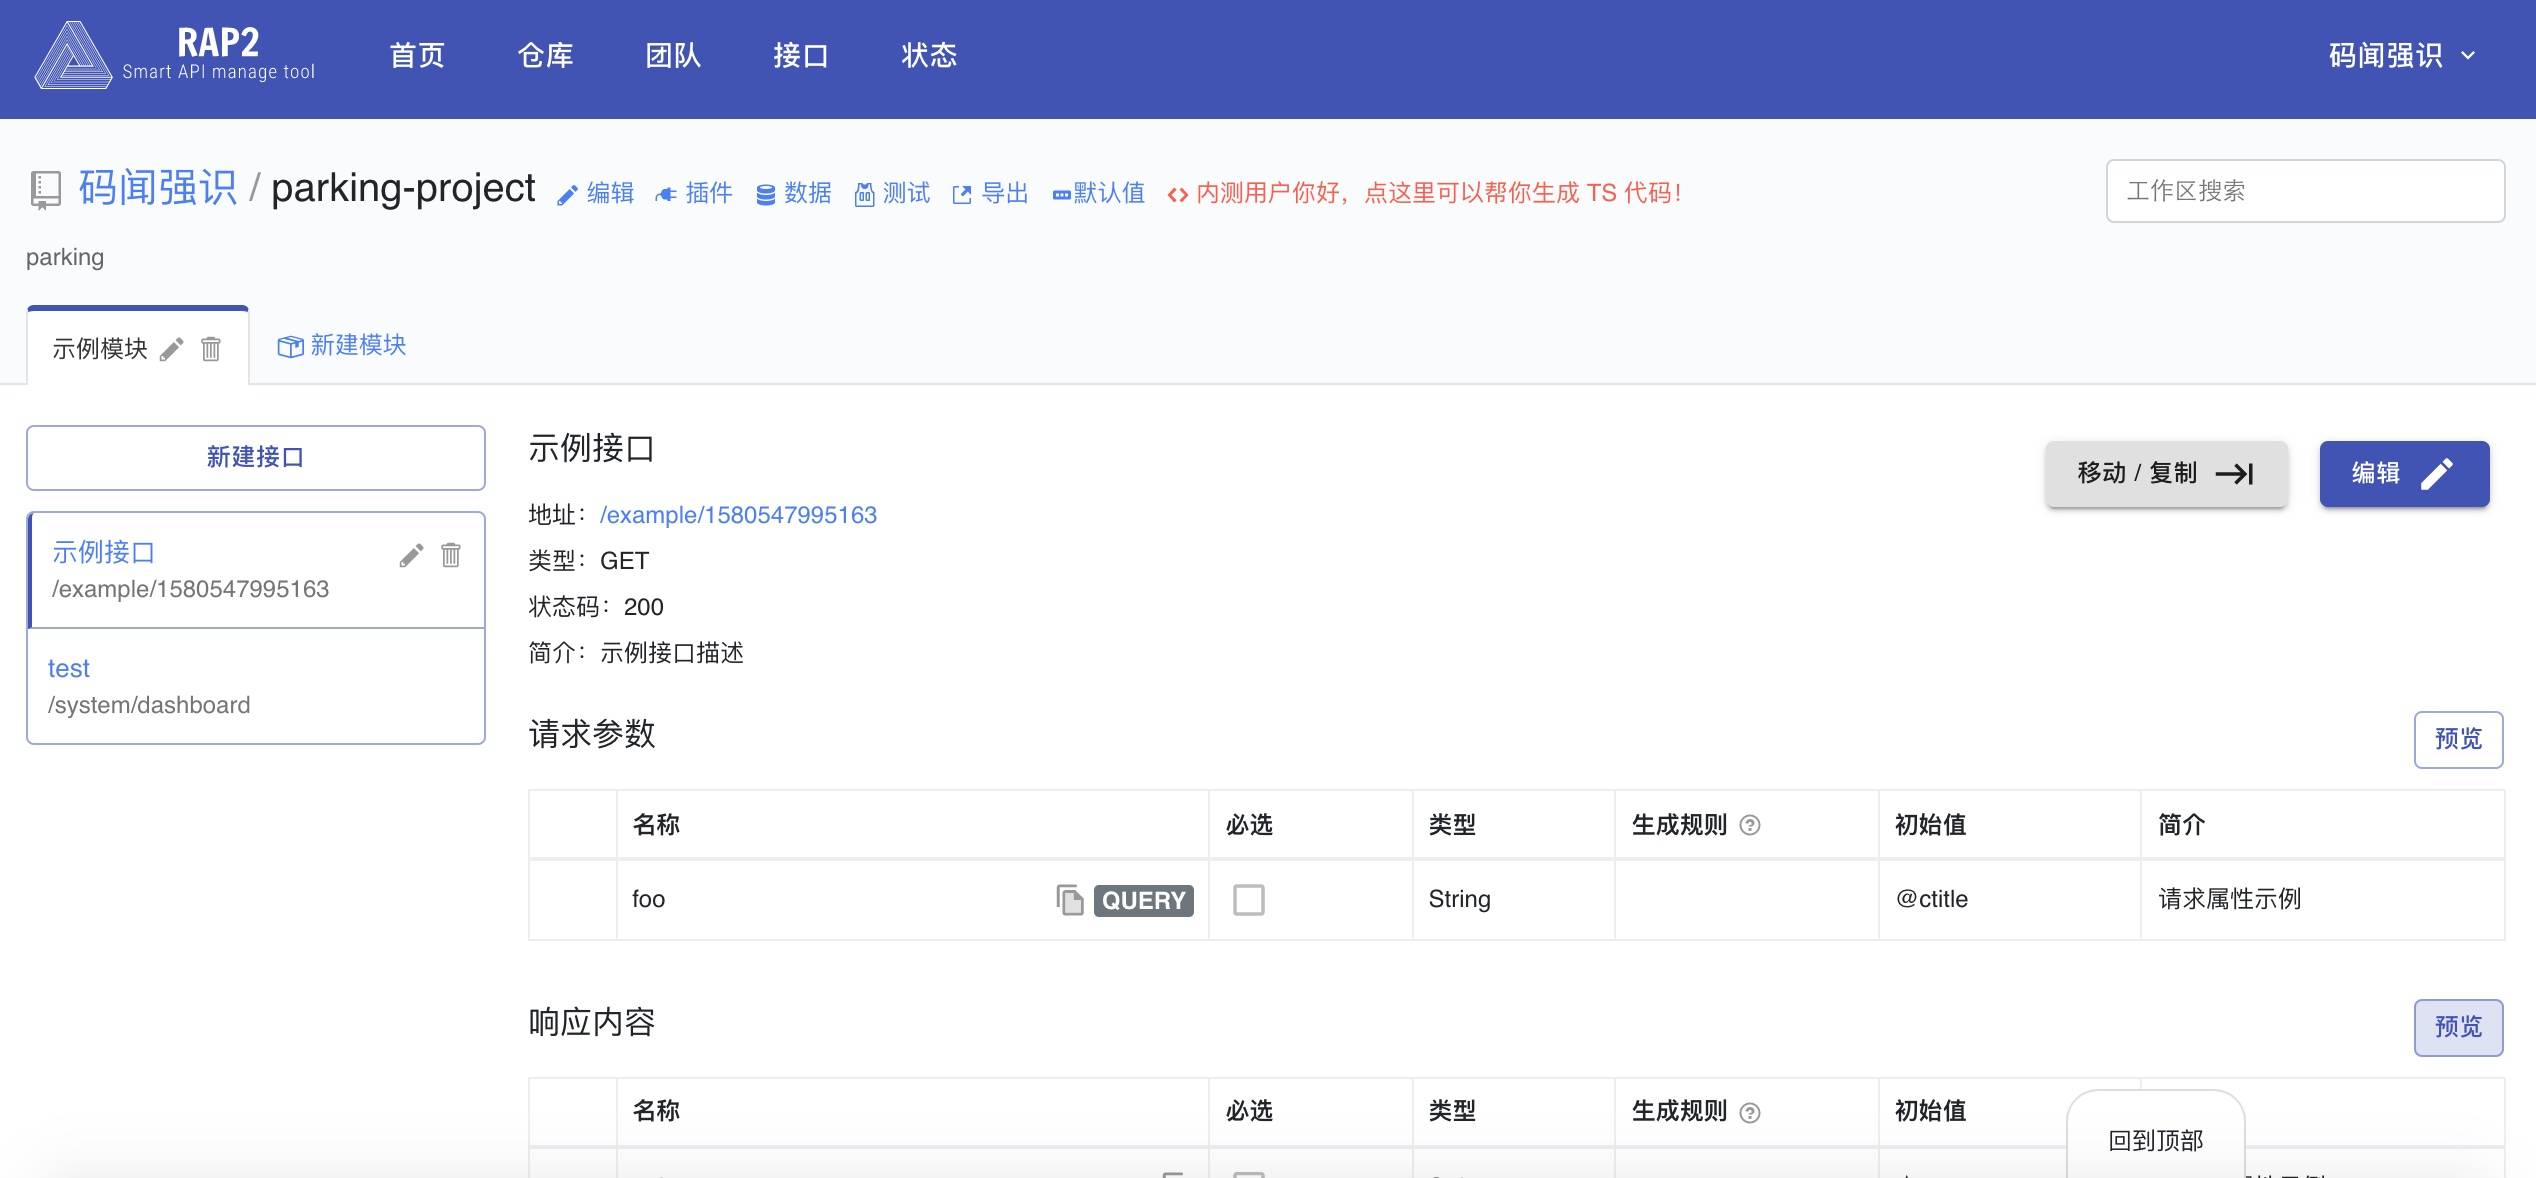
RAP2 官方地址:http://rap2.taobao.org/ ,早期称为 RAP ,阿里妈妈 MUX 团队出品,后面项目停止维护,转移至 RAP2 项目。
来自官网的介绍:RAP2 是时下流行的开发接口管理工具,通常用于前后端分离的开发模式中,共同约定接口,而 RAP2 可以根据约定的接口自动生成 Mock 数据、对后端接口进行校验,拥有较好的文档编写体验,支持复杂的 Mock 逻辑,为开发提供了便利。 RAP2 是参照 RAP1 第一代的基础上,使用 Node + React 重构了所有主要功能。
可以在线使用,也可以本地部署使用,本地部署有详细的步骤介绍,从部署手册来看,产品还是比较重的,环境依赖也比较多。部署后,同样存在要花时间保持与代码同步的问题,针对提供比较稳定接口的项目而言,是个不错的选择。
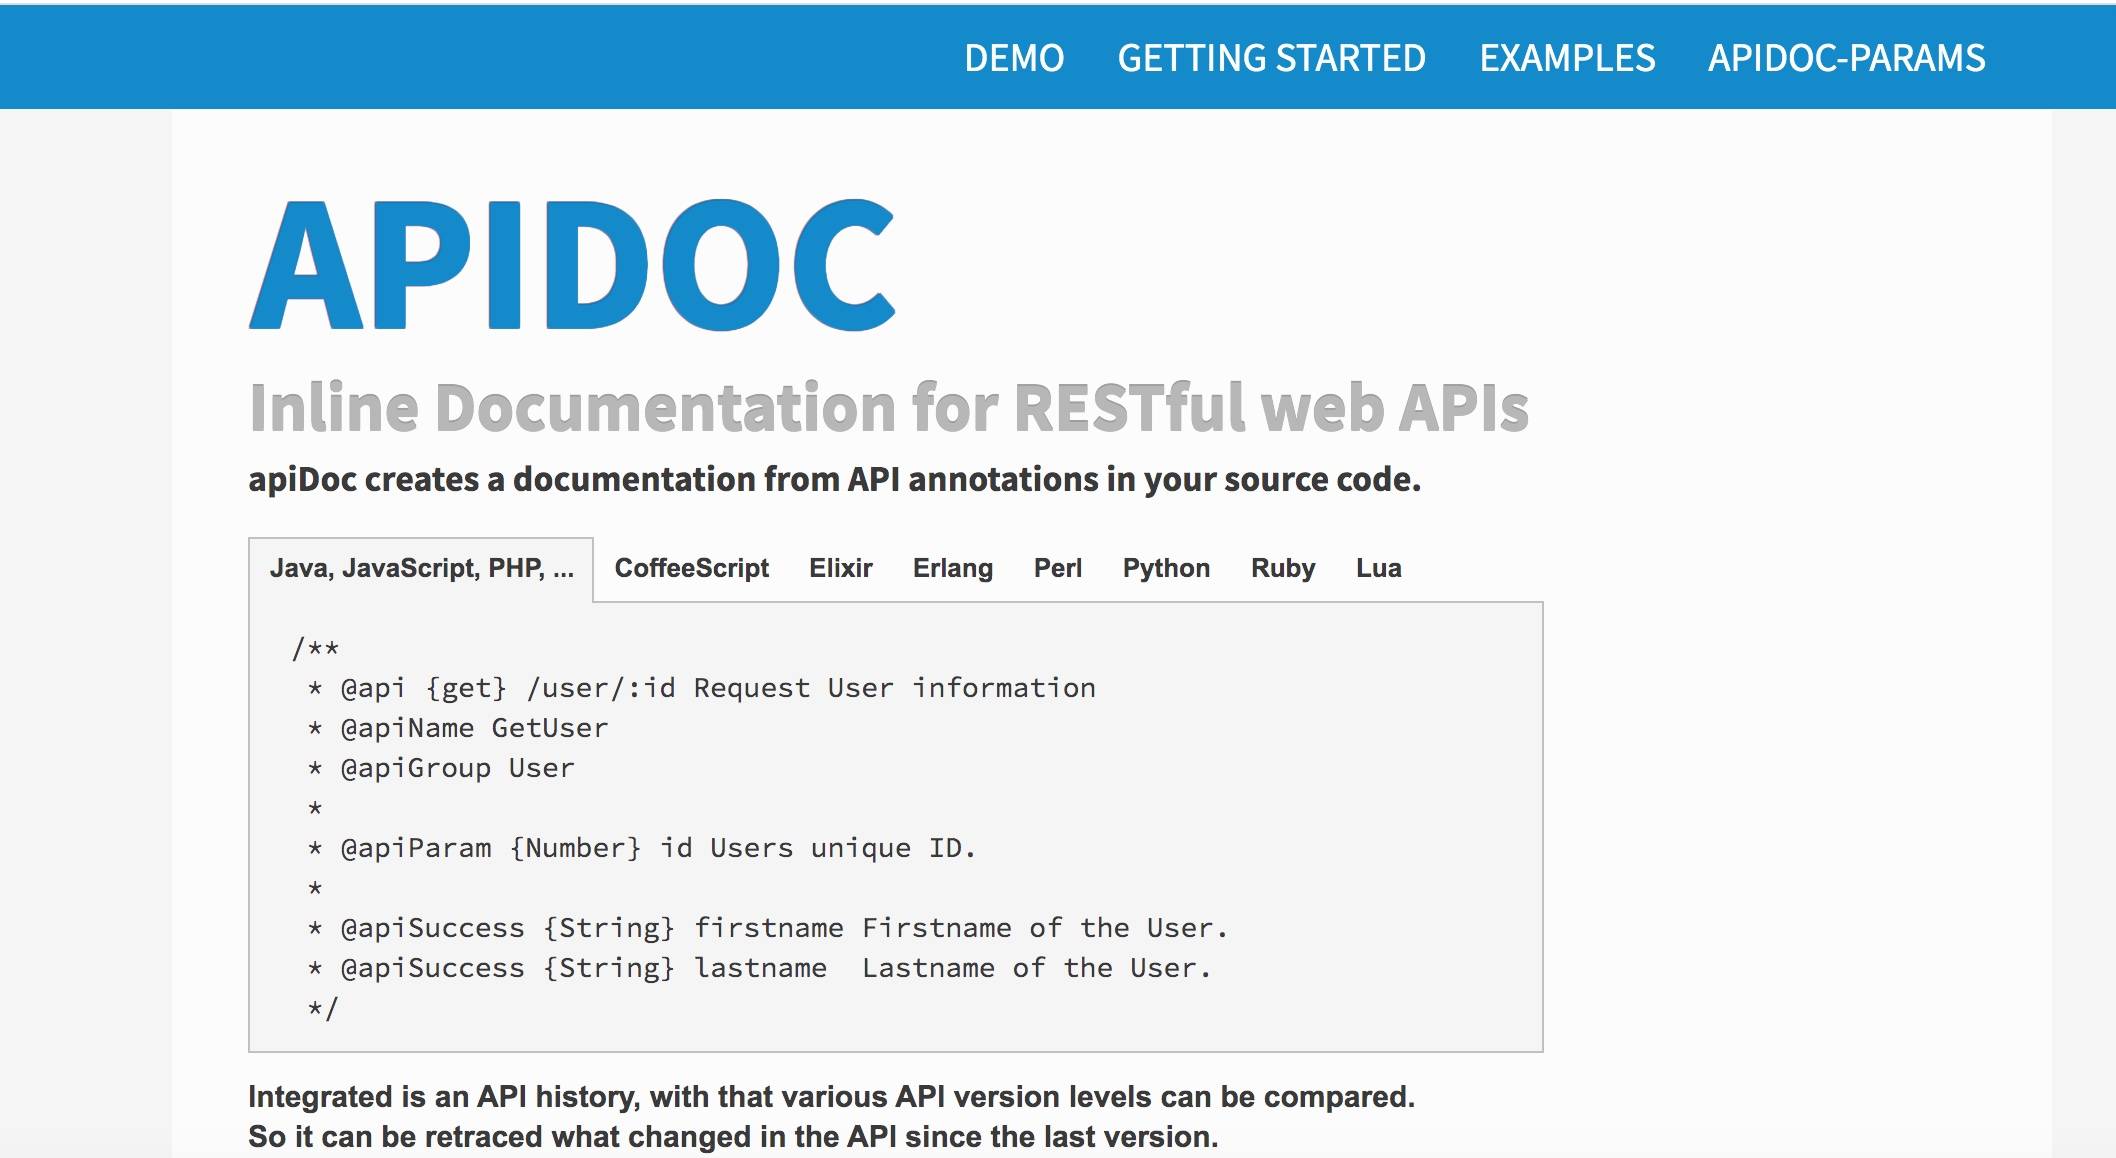
APIDOC 官方地址:https://apidocjs.com/ ,通过代码中的相当格式的注释来生成 API 接口文档,依赖 Node.js 环境。使用比较简单,弊端:接口发生变动时,需要花时间来同步文档。针对比较稳定的接口系统而言,可以做个备选。
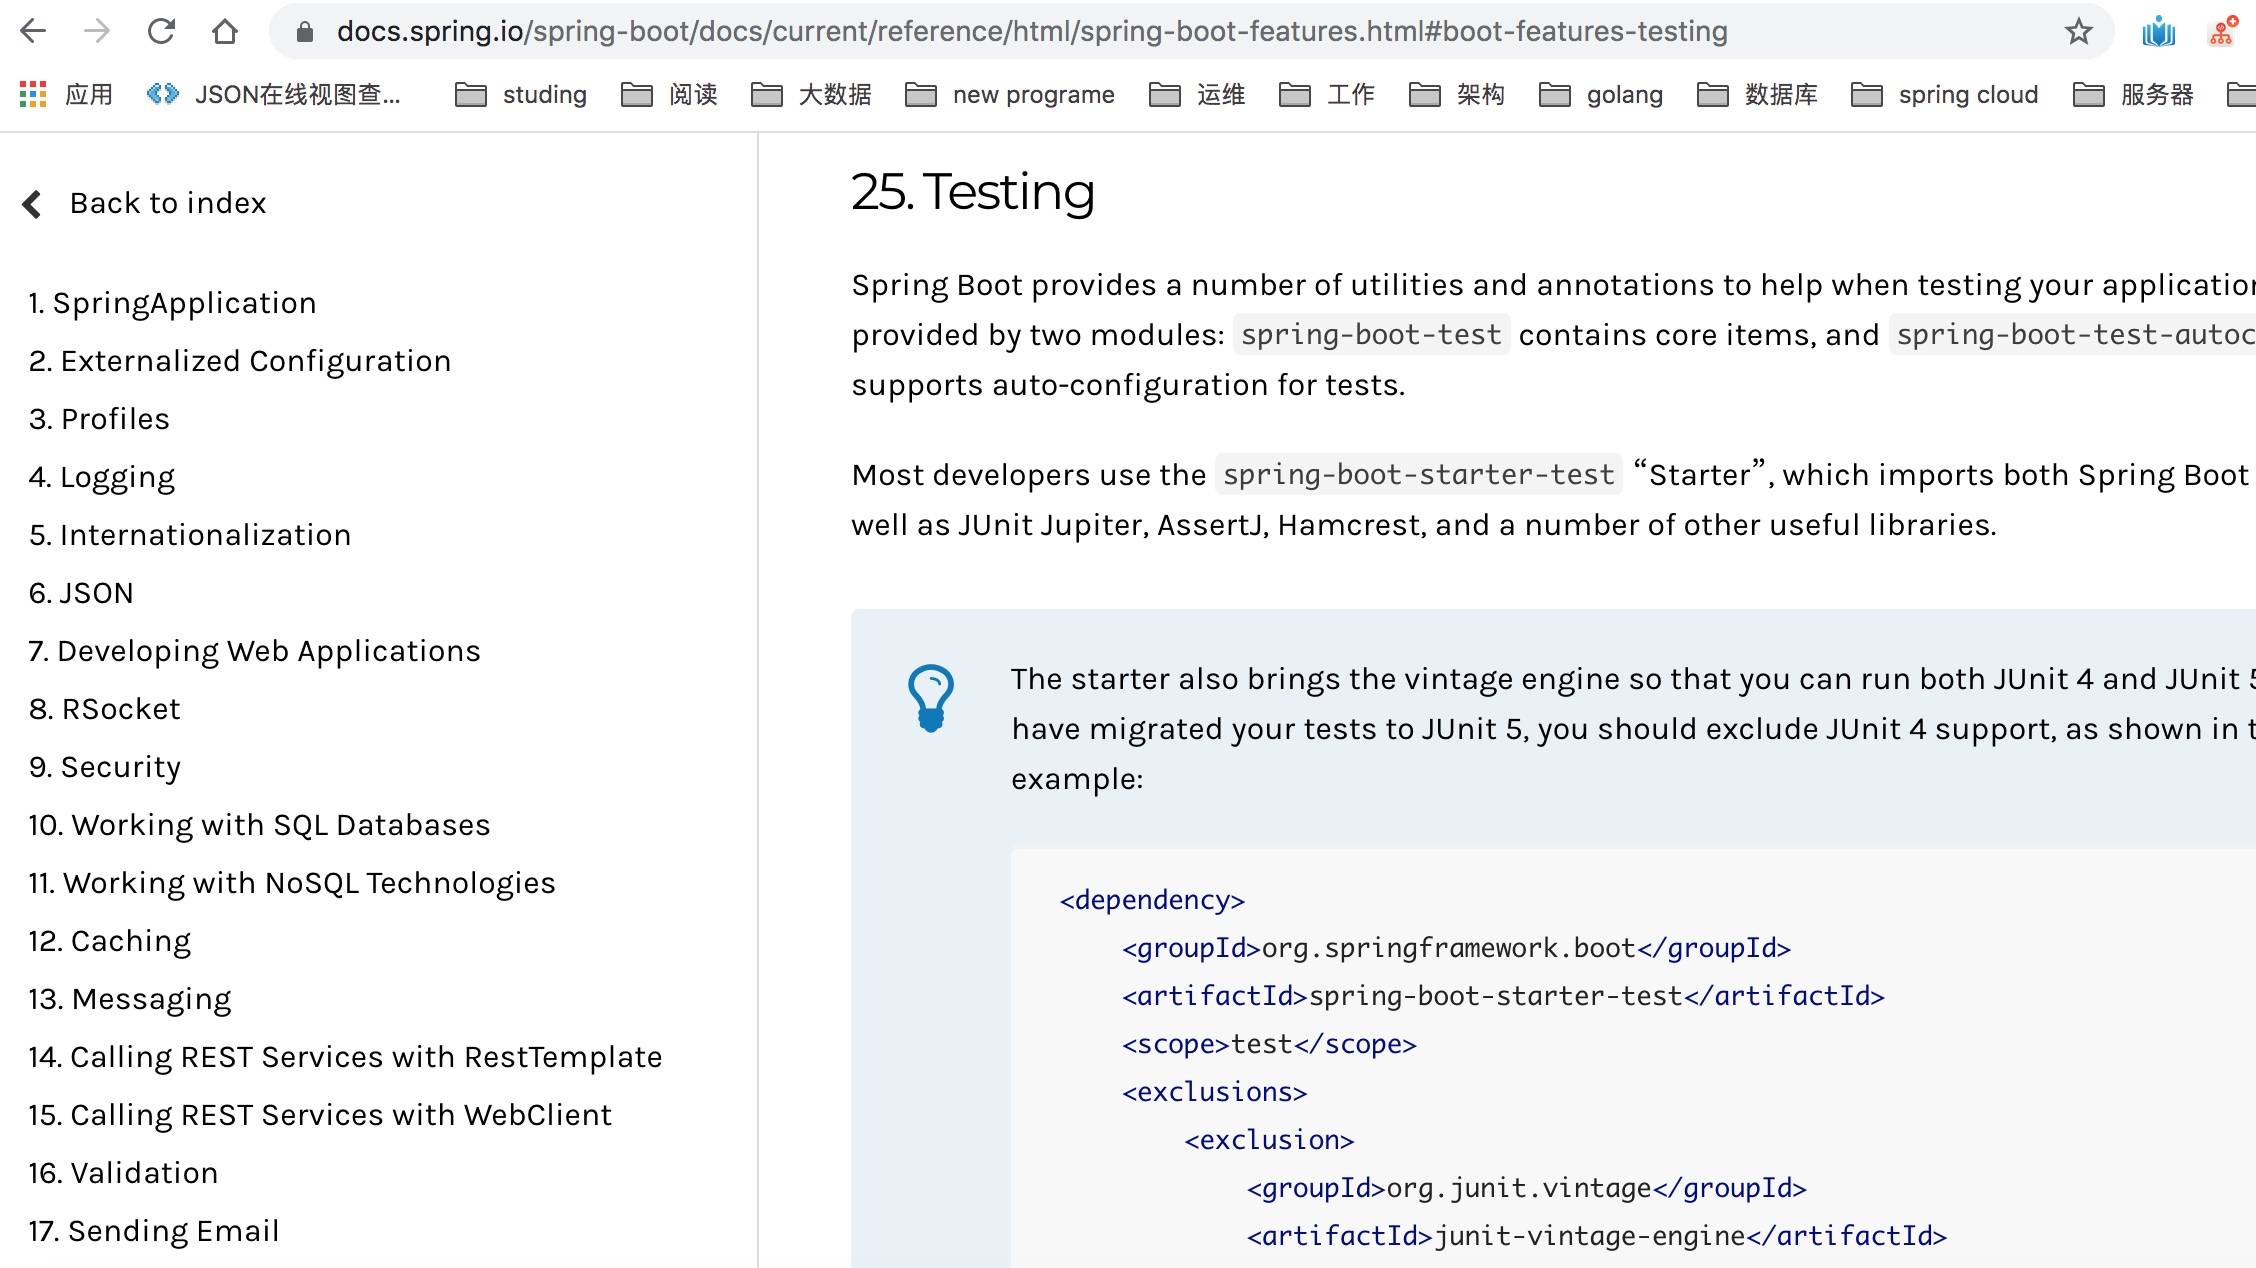
Spring REST Docs Spring 全家桶中很多 API 文档,都是基于此组件生成,据官方提供的使用方法需要编写相应的代码片断,还有相应的语法规范,再通过项目构建的方式生成离线文档。操作起来比较繁琐,这里不推荐使用。生成的文档形如下面截图中所示:
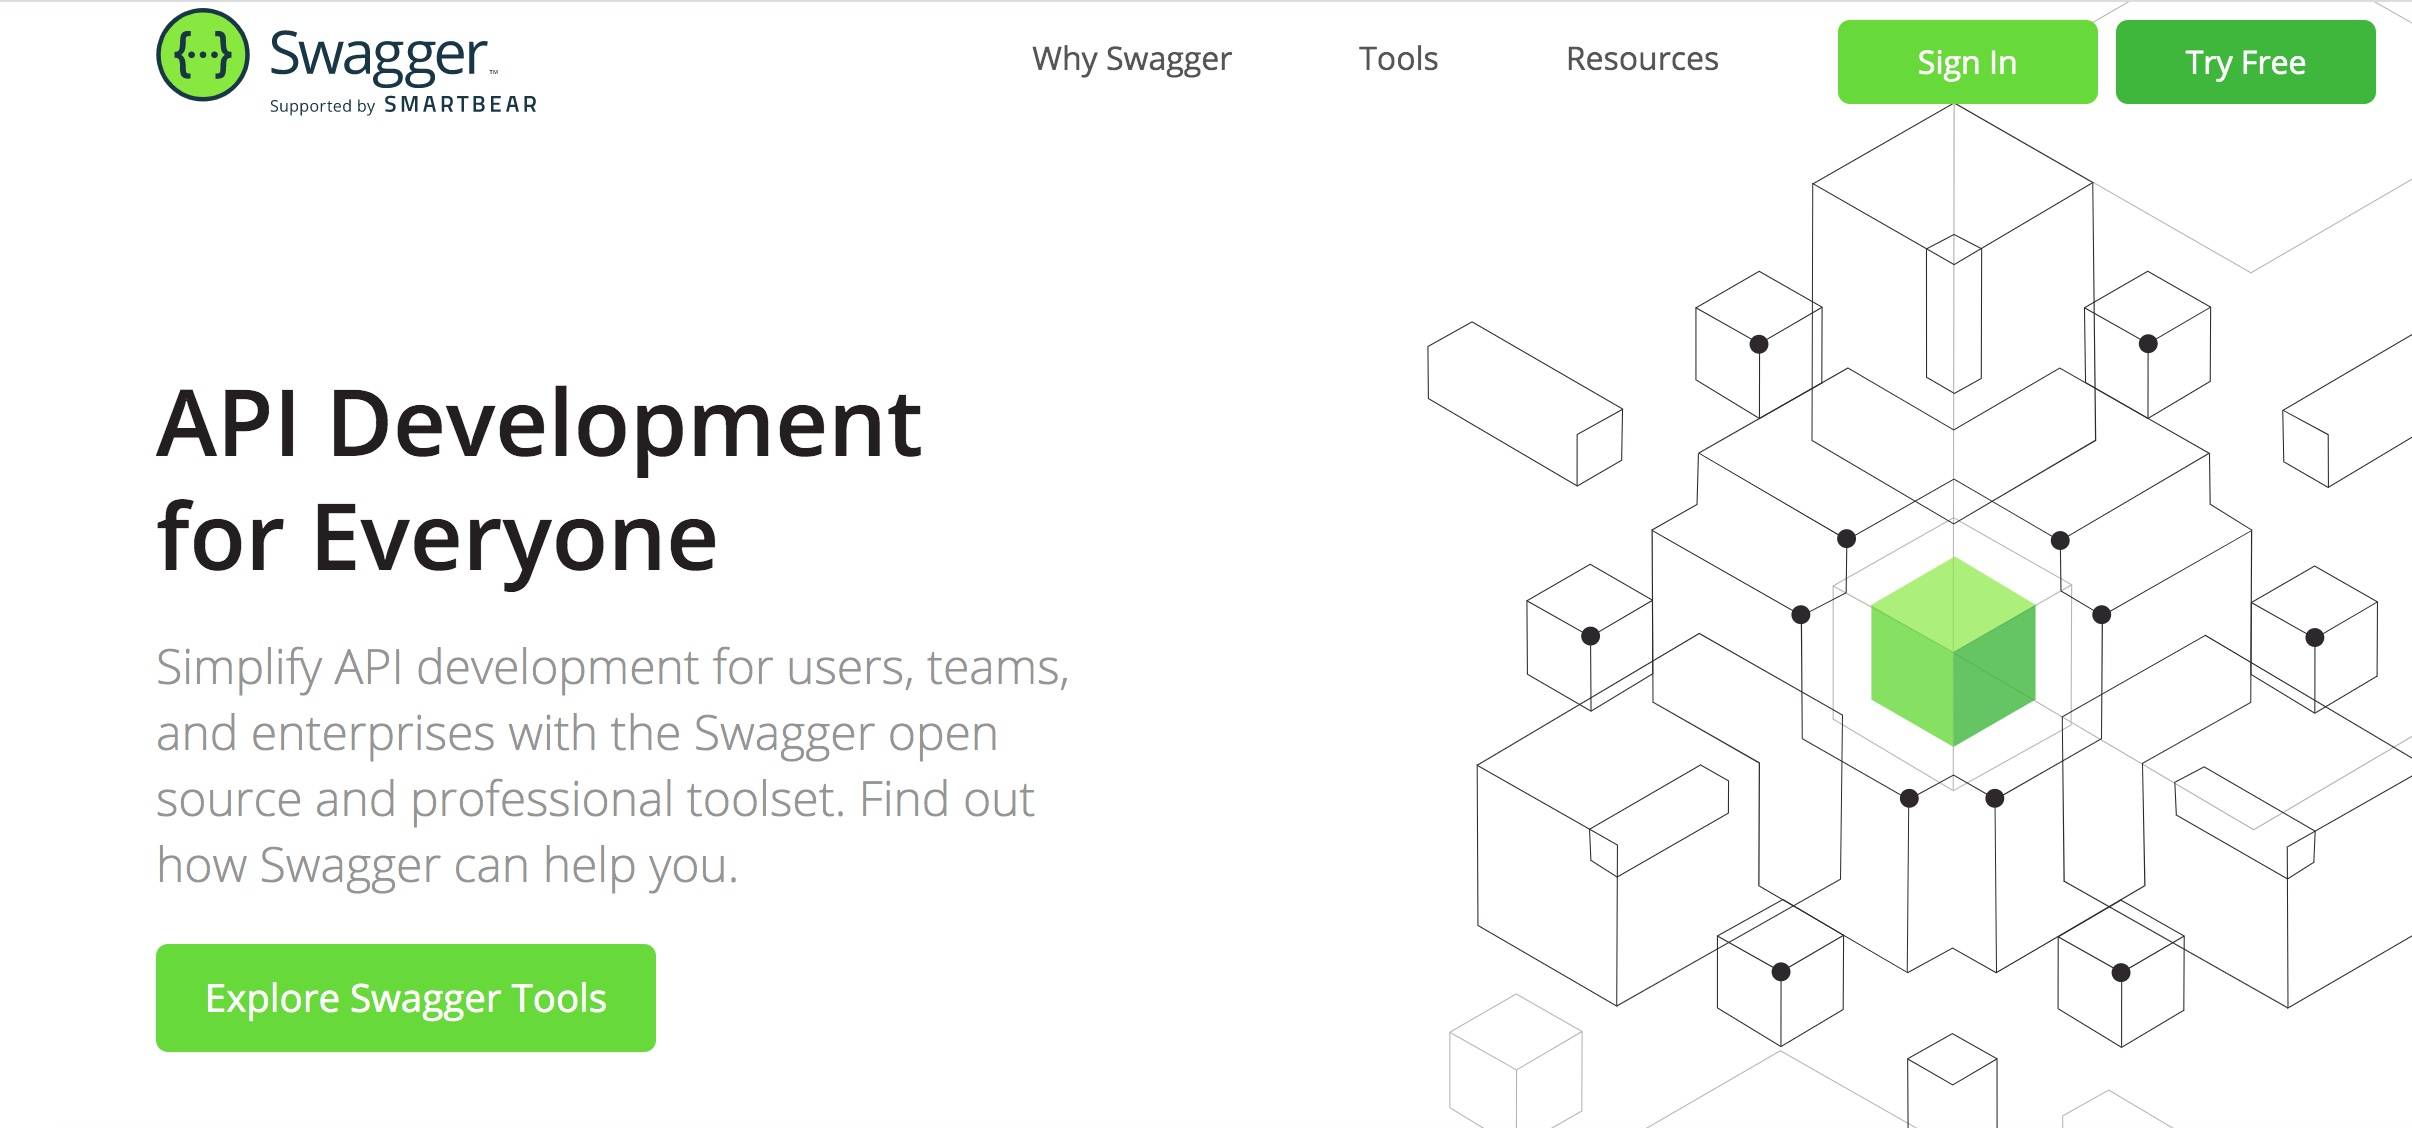
Swagger 官网地址:https://swagger.io , 是一款 RESTFU L 接口的文档在线自动生成+功能测试功能软件,是一个规范和完整的框架,标准的,语言无关,用于生成、描述、调用和可视化 RESTful 风格的 Web 服务。总体目标是使客户端和文件系统作为服务器以同样的速度来更新。文件的方法,参数和模型紧密集成到服务器端的代码,允许 API 来始终保持同步。Swagger 让部署管理和使用功能强大的 API 从未如此简单。
本实战案例中采用 Swagger 来进行的 API 的管理。
Spring Boot 整合 Swagger2 1、引入依赖 加入 Swagger 相关的 jar 依赖,由于各个子模块都有用到,这里将 Swagger 在根 pom.xml 中进行统一的版本管理
1 2 3 4 5 6 7 8 9 10 11 12 13 14 15 16 17 18 19 20 21 22 23 24 25 26 27 28 29 <properties> <swagger.version>2.8.0</swagger.version> </properties> <!--swagger2 --> <dependency> <groupId>io.springfox</groupId> <artifactId>springfox-swagger2</artifactId> <version>${swagger.version}</version> </dependency> <dependency> <groupId>io.springfox</groupId> <artifactId>springfox-swagger-ui</artifactId> <version>${swagger.version}</version> </dependency>
子模块中无须配置 version,直接引入即可,如果需要变更 version,直接在根 pom.xml 中修改,所有依赖子模块的版本也会一同发生变更。
1 2 3 4 5 6 7 8 9 10 11 12 13 14 15 16 17 18 19 <!--swagger2 --> <dependency> <groupId>io.springfox</groupId> <artifactId>springfox-swagger2</artifactId> </dependency> <dependency> <groupId>io.springfox</groupId> <artifactId>springfox-swagger-ui</artifactId> </dependency>
2、Swagger2 配置 建立 config 包,新增 Swagger 配置类。通过 @EnableSwagger2 注解启用 Swagger2 ,然后配置一个 Docket Bean ,配置映射路径和要扫描的接口的位置,在 apiInfo 中,主要配置一下 Swagger2 文档网站的信息,例如网站的 title ,网站的描述,联系人的信息,使用的协议、接口的版本等等。
1 2 3 4 5 6 7 8 9 10 11 12 13 14 15 16 17 18 19 20 21 22 23 24 25 26 27 28 29 30 31 32 33 34 35 36 37 @EnableSwagger2 @Configuration public class Swagger2Config { @Bean public Docket createRestApi () { return new Docket (DocumentationType.SWAGGER_2).apiInfo(apiInfo()).select() .apis(RequestHandlerSelectors.any()).paths(PathSelectors.any()).build(); } private ApiInfo apiInfo () { return new ApiInfoBuilder () .title("Member 会员模块接口层(基于 SpringBoot2+Swagger2)." ) .contact(new Contact ("growithus" , "https://backkoms.github.io/" , "[email protected]" )) .version("1.0" ) .description("" ).build(); } }
由于采用的是较高版本,相应的 Controller 类中无须再编写 Swagger 相应的代码注解,代码侵入性进一步降低。旧版本相关的注解,如 @Api、@ApiOperation、@ApiImplicitParams、@ApiImplicitParam、@ApiModel 等,如果是旧版本,必须要在相关代码中增加以上相应的注解,对代码有一定侵入性。
经过以上两个步骤,Swagger2 就算配置成功了,非常简捷。启动项目,输入 http://localhost:10060/swagger-ui.html,能够看到如下 UI,说明已经配置成功了。
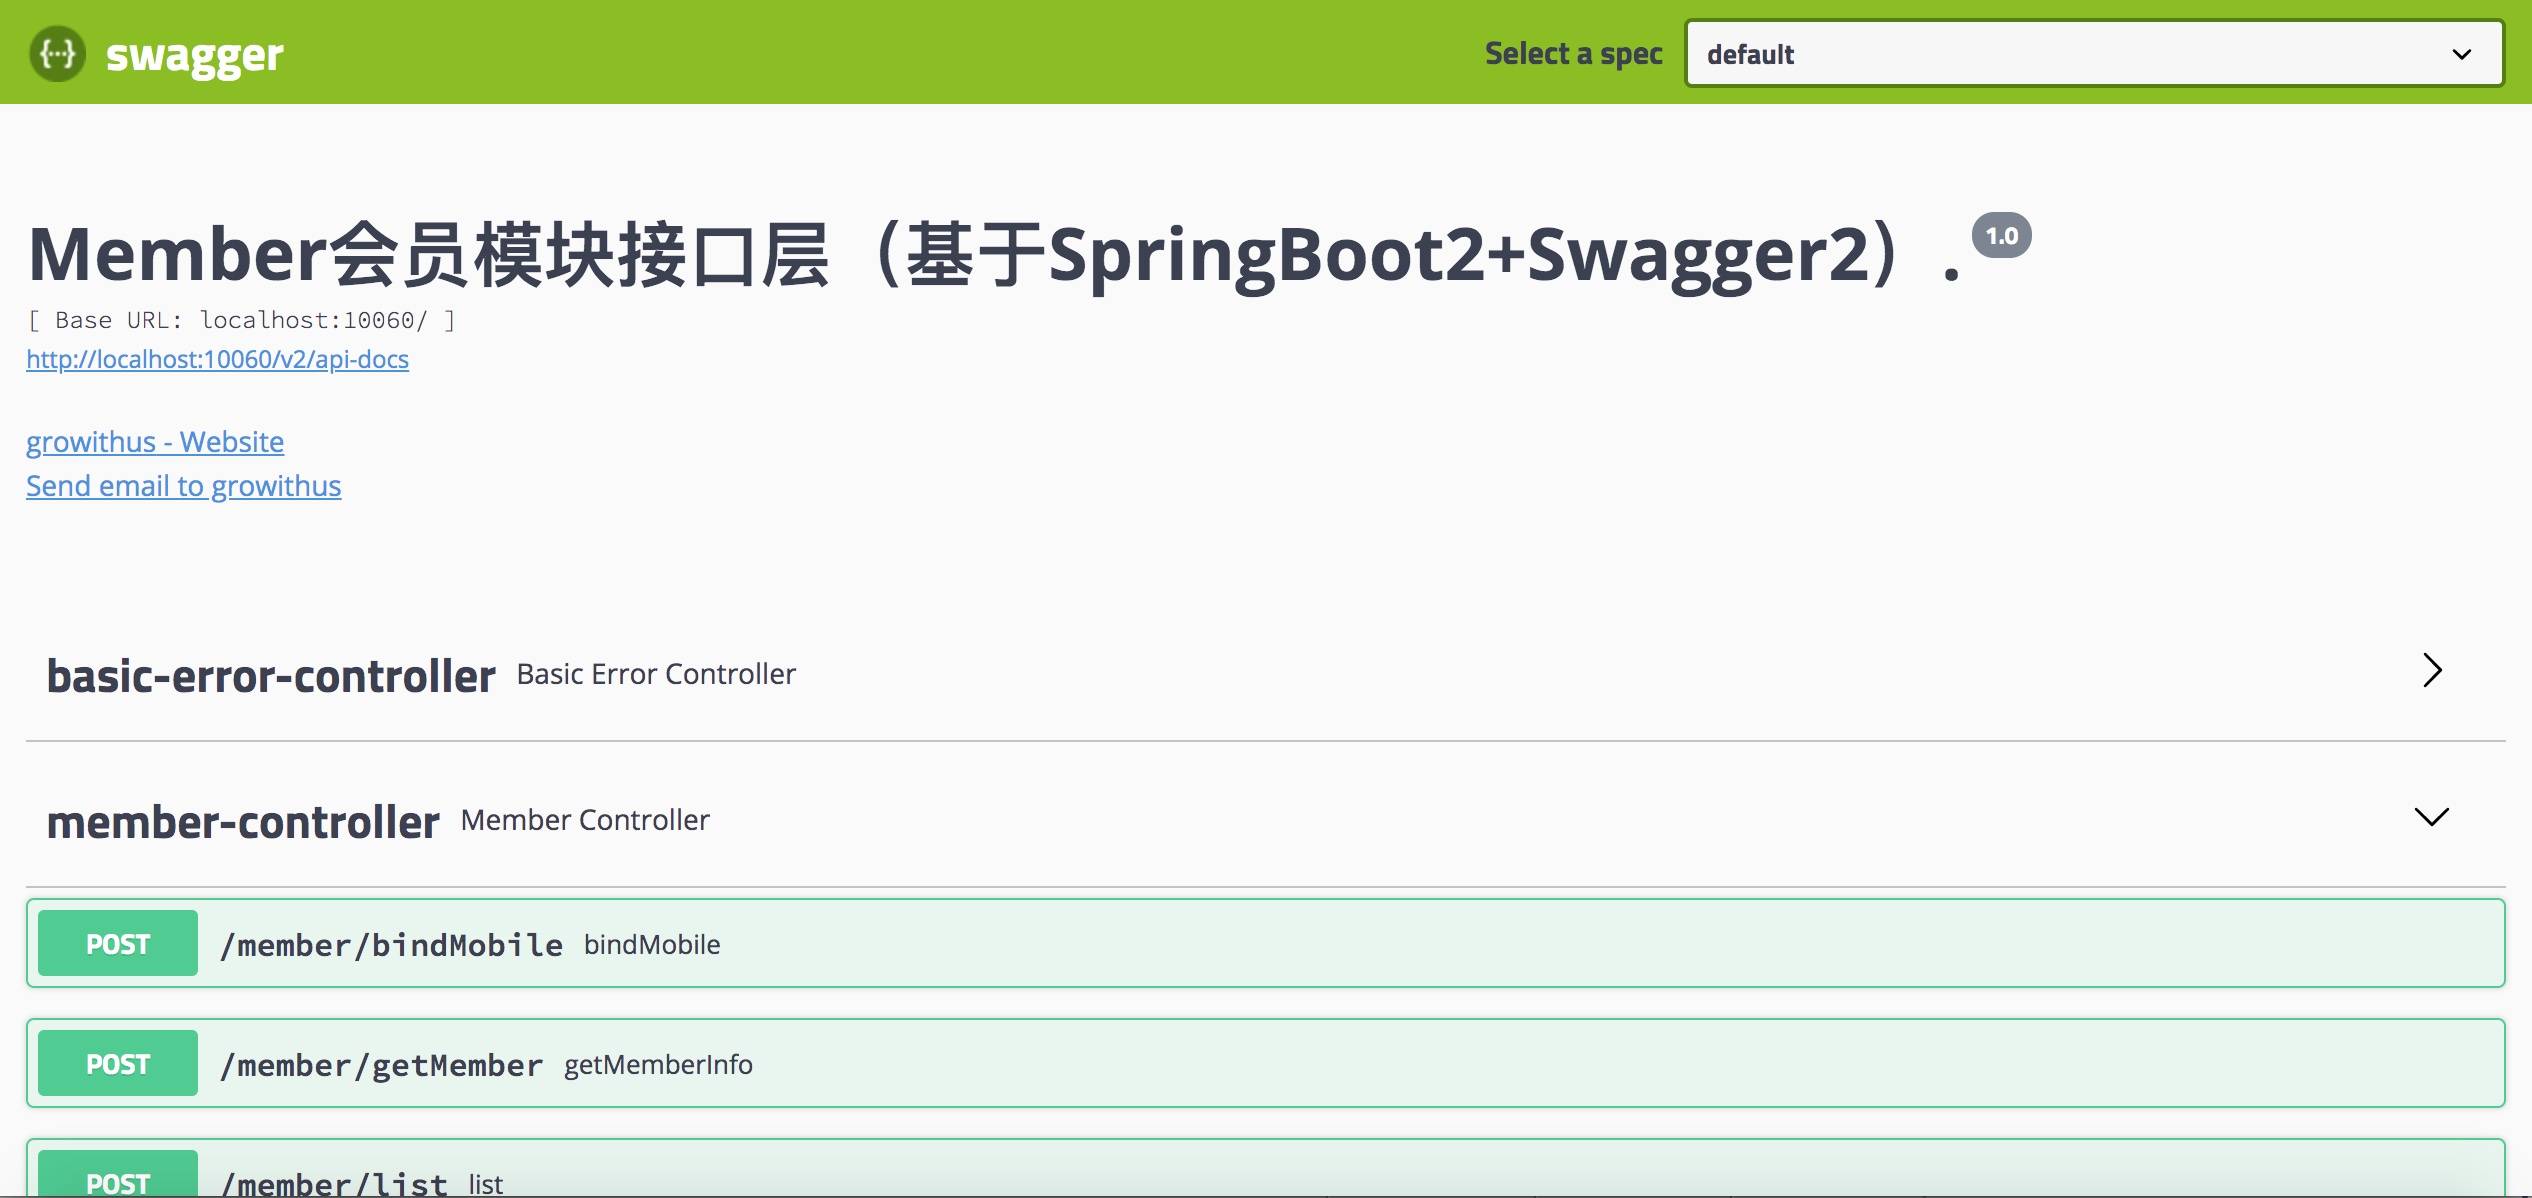
3、API 验证测试 编写测试类,启动项目
1 2 3 4 5 6 7 8 9 10 11 12 13 14 15 16 17 18 19 20 21 22 23 @RestController @RequestMapping("test") public class APITestController { @PostMapping("/hello") public String hello (String name) { return "hello " + name; } }
Request 方法有 8 种请求类型:POST \ GET \ OPTIONS \ HEAD \ PUT \ DELETE \ TRACE \ PATCH,为确保不必要的请求造成的潜在威胁,案例建议中直接采用 POST 方式一种,禁用其它请求方式。 @PostMapping(“/hello”) 功能等同于 @RequestMapping(name = “hello”, method = { RequestMethod.POST })
1、直接使用 Shell 脚本进行请求测试:
appledeMacBook-Air:~ apple$ curl -X POST “http://localhost:10060/test?name=world “ hello world
可以看到正常输出结果,再测试一下其它请求方式能否正常请求数据:
appledeMacBook-Air:~ apple$ curl -X GET “http://localhost:10060/test?name=world “ {“timestamp”:”2020-02-01T12:59:09.508+0000”,”status”:405,”error”:”Method Not Allowed”,”message”:”Request method ‘GET’ not supported”,”path”:”/test”}
响应输出方法不支持,只支持 POST 方式请求。
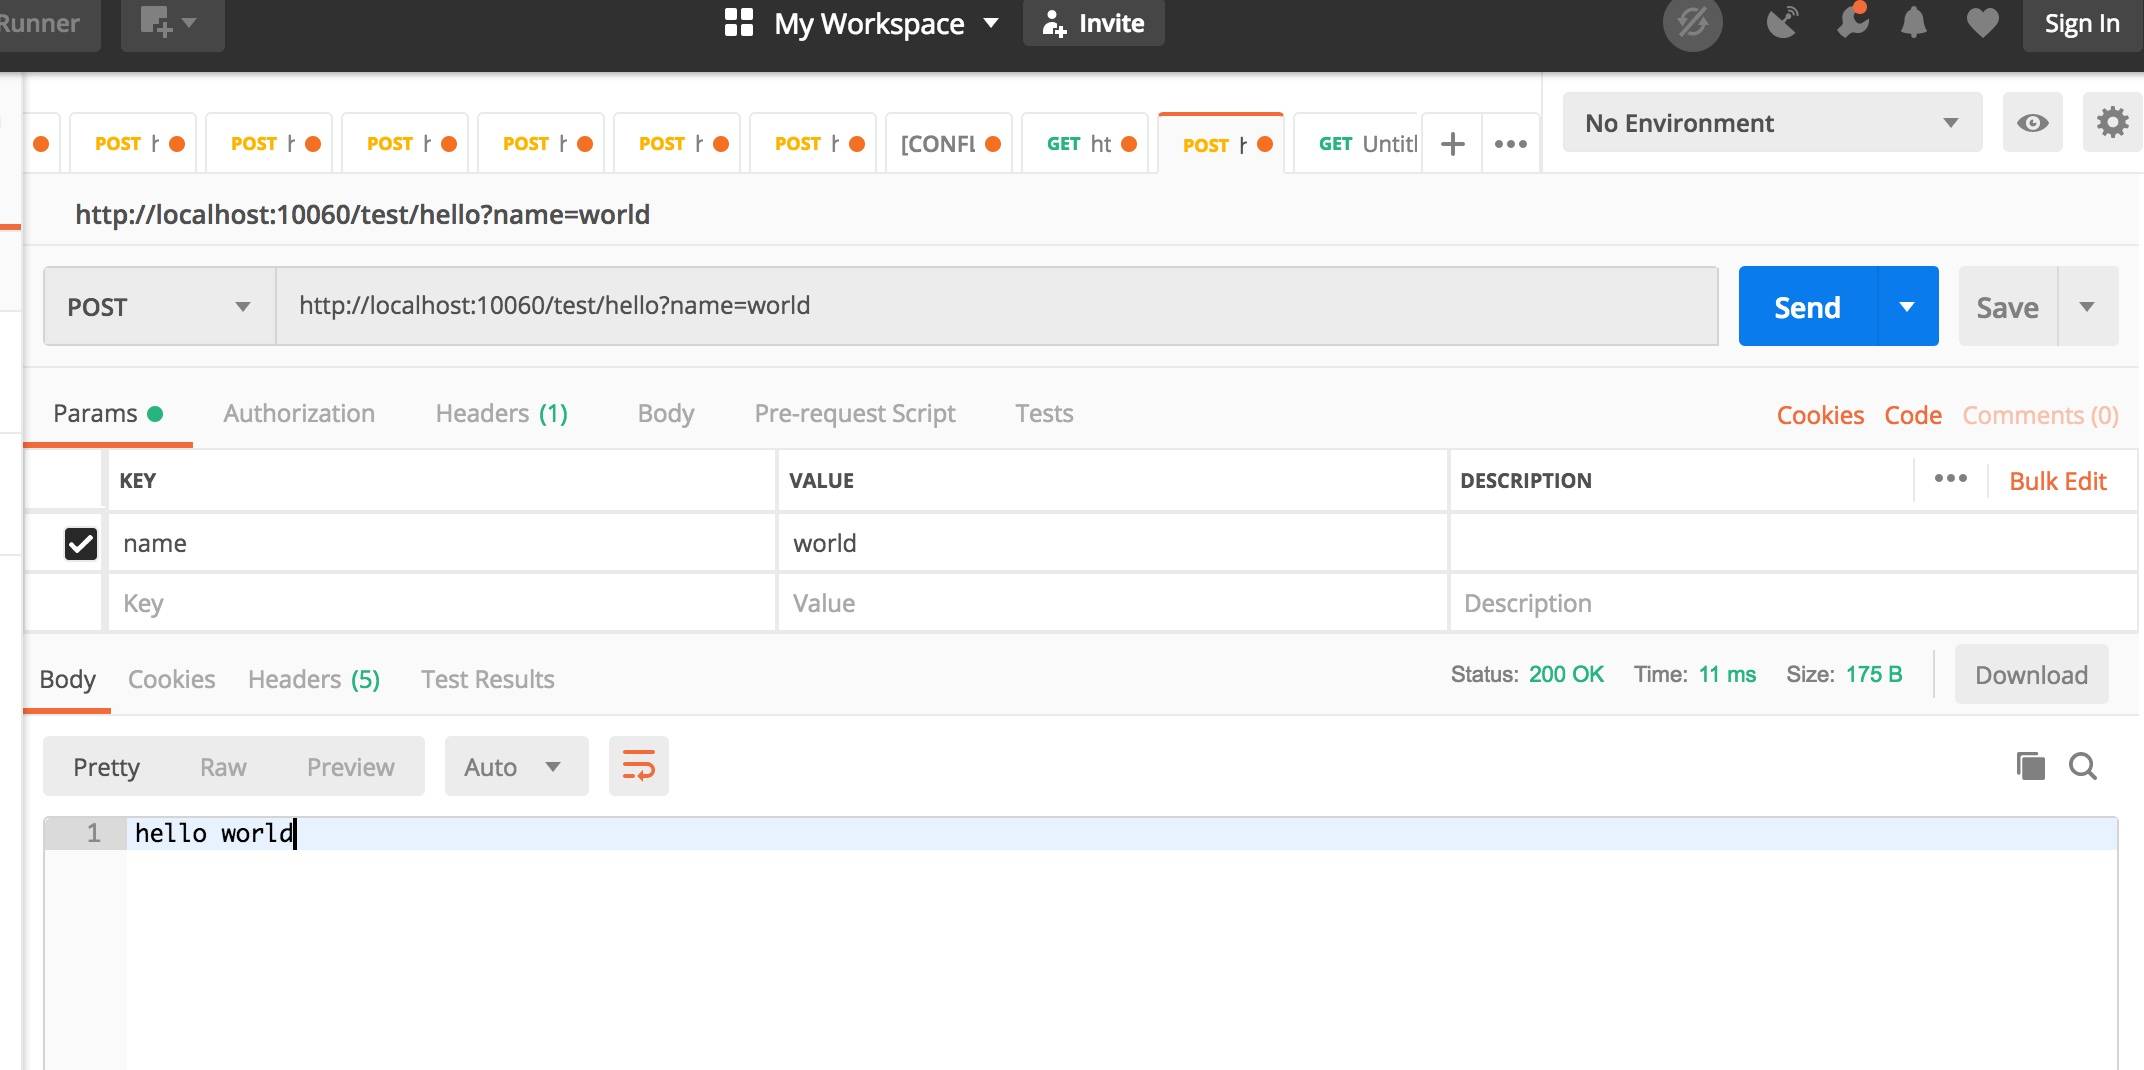
2、未使用 Swagger 时,可以采用 Postman 测试工具进行接口调试。
3、现在已经集成了 Swagger 功能,打开http://localhost:10060/swagger-ui.html ,找到 api-test-controller 下对应的方法,点击” try it out “,输入参数,执行” Execute “功能。查看正常输出结果:
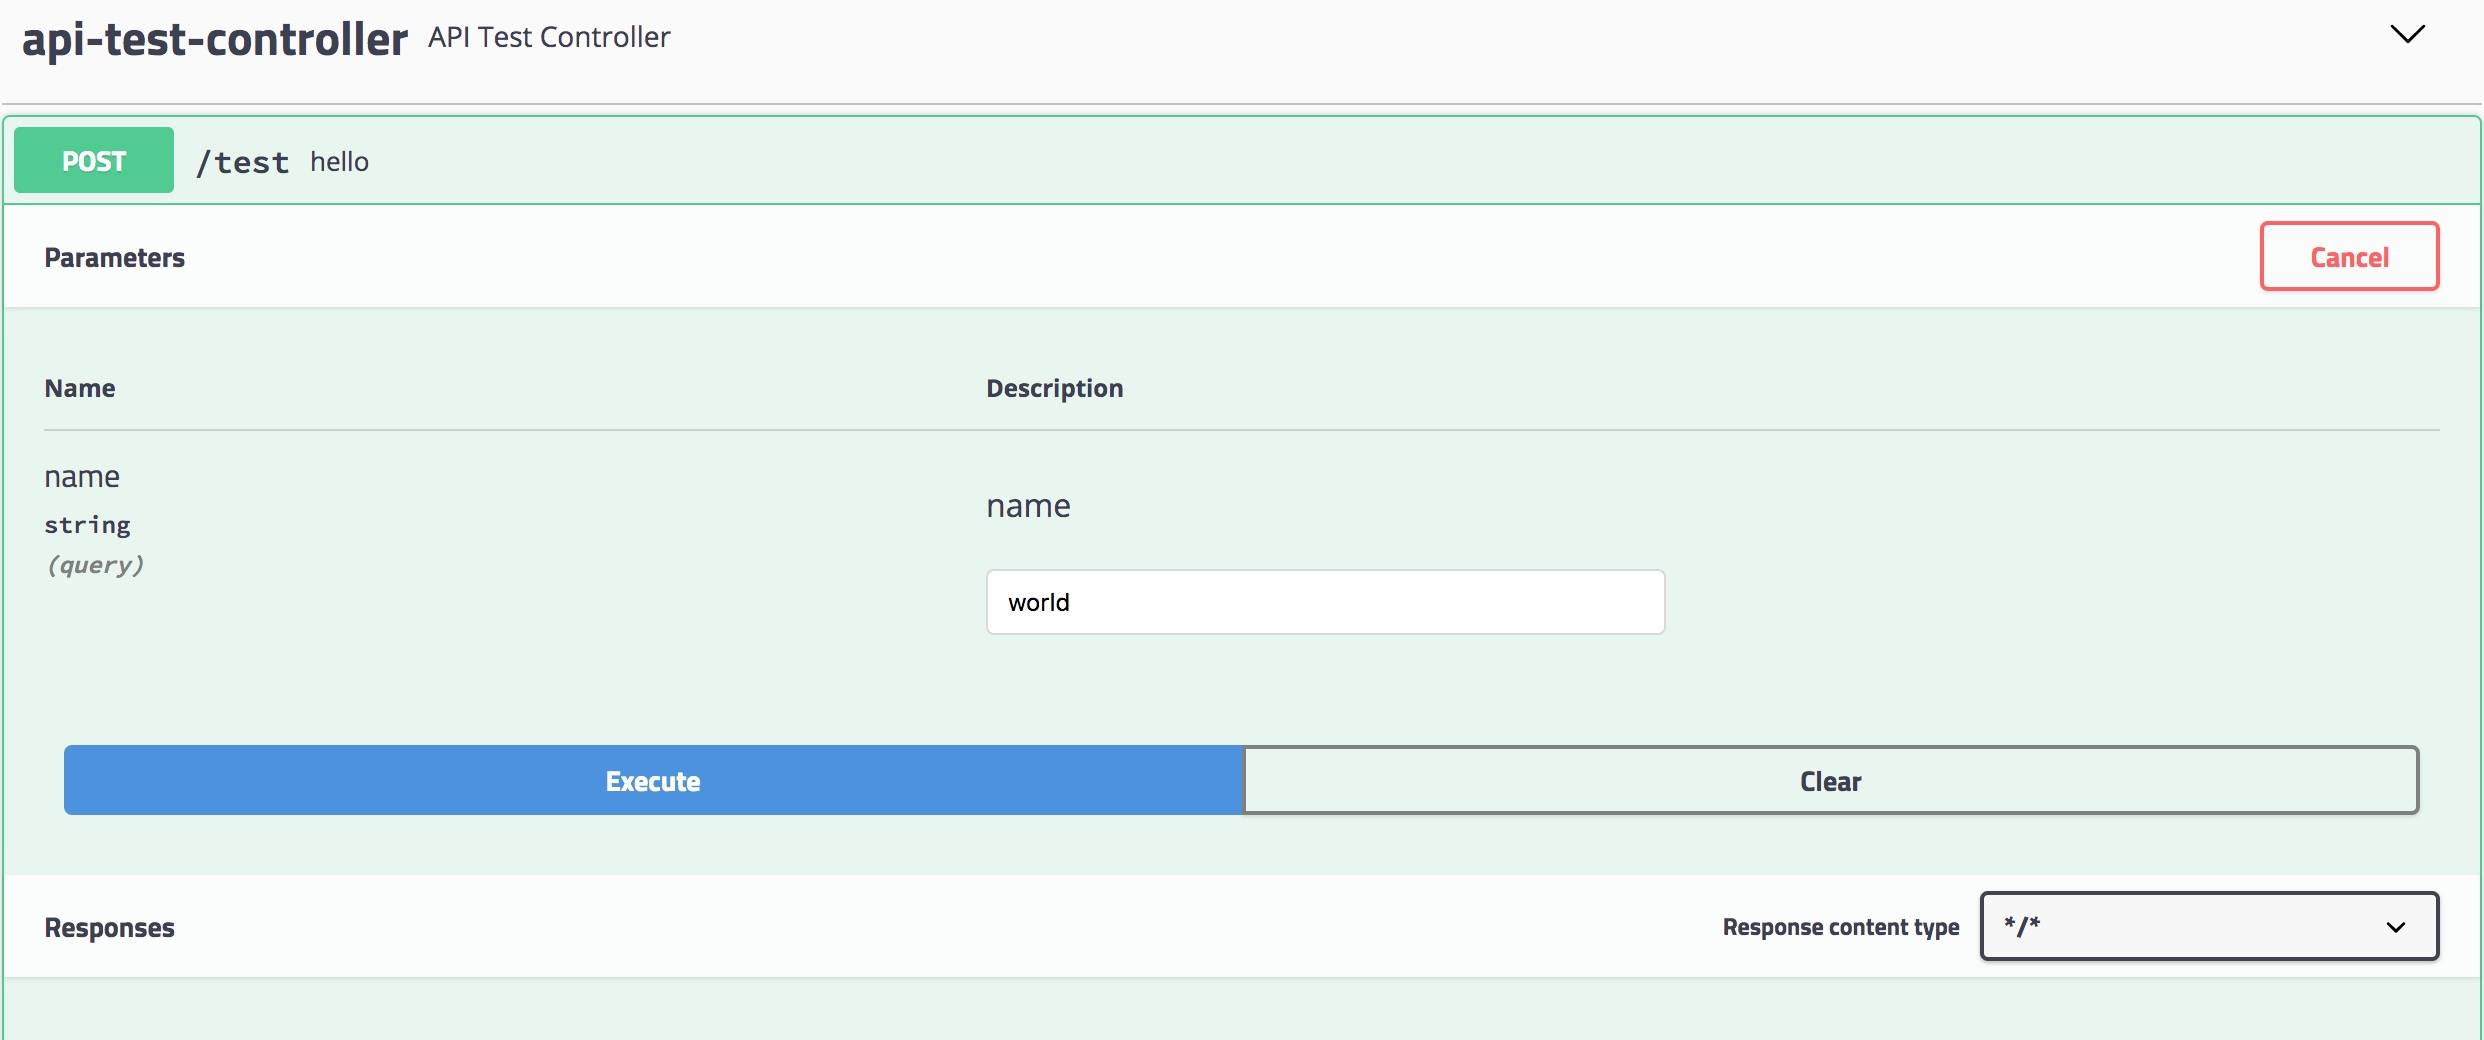
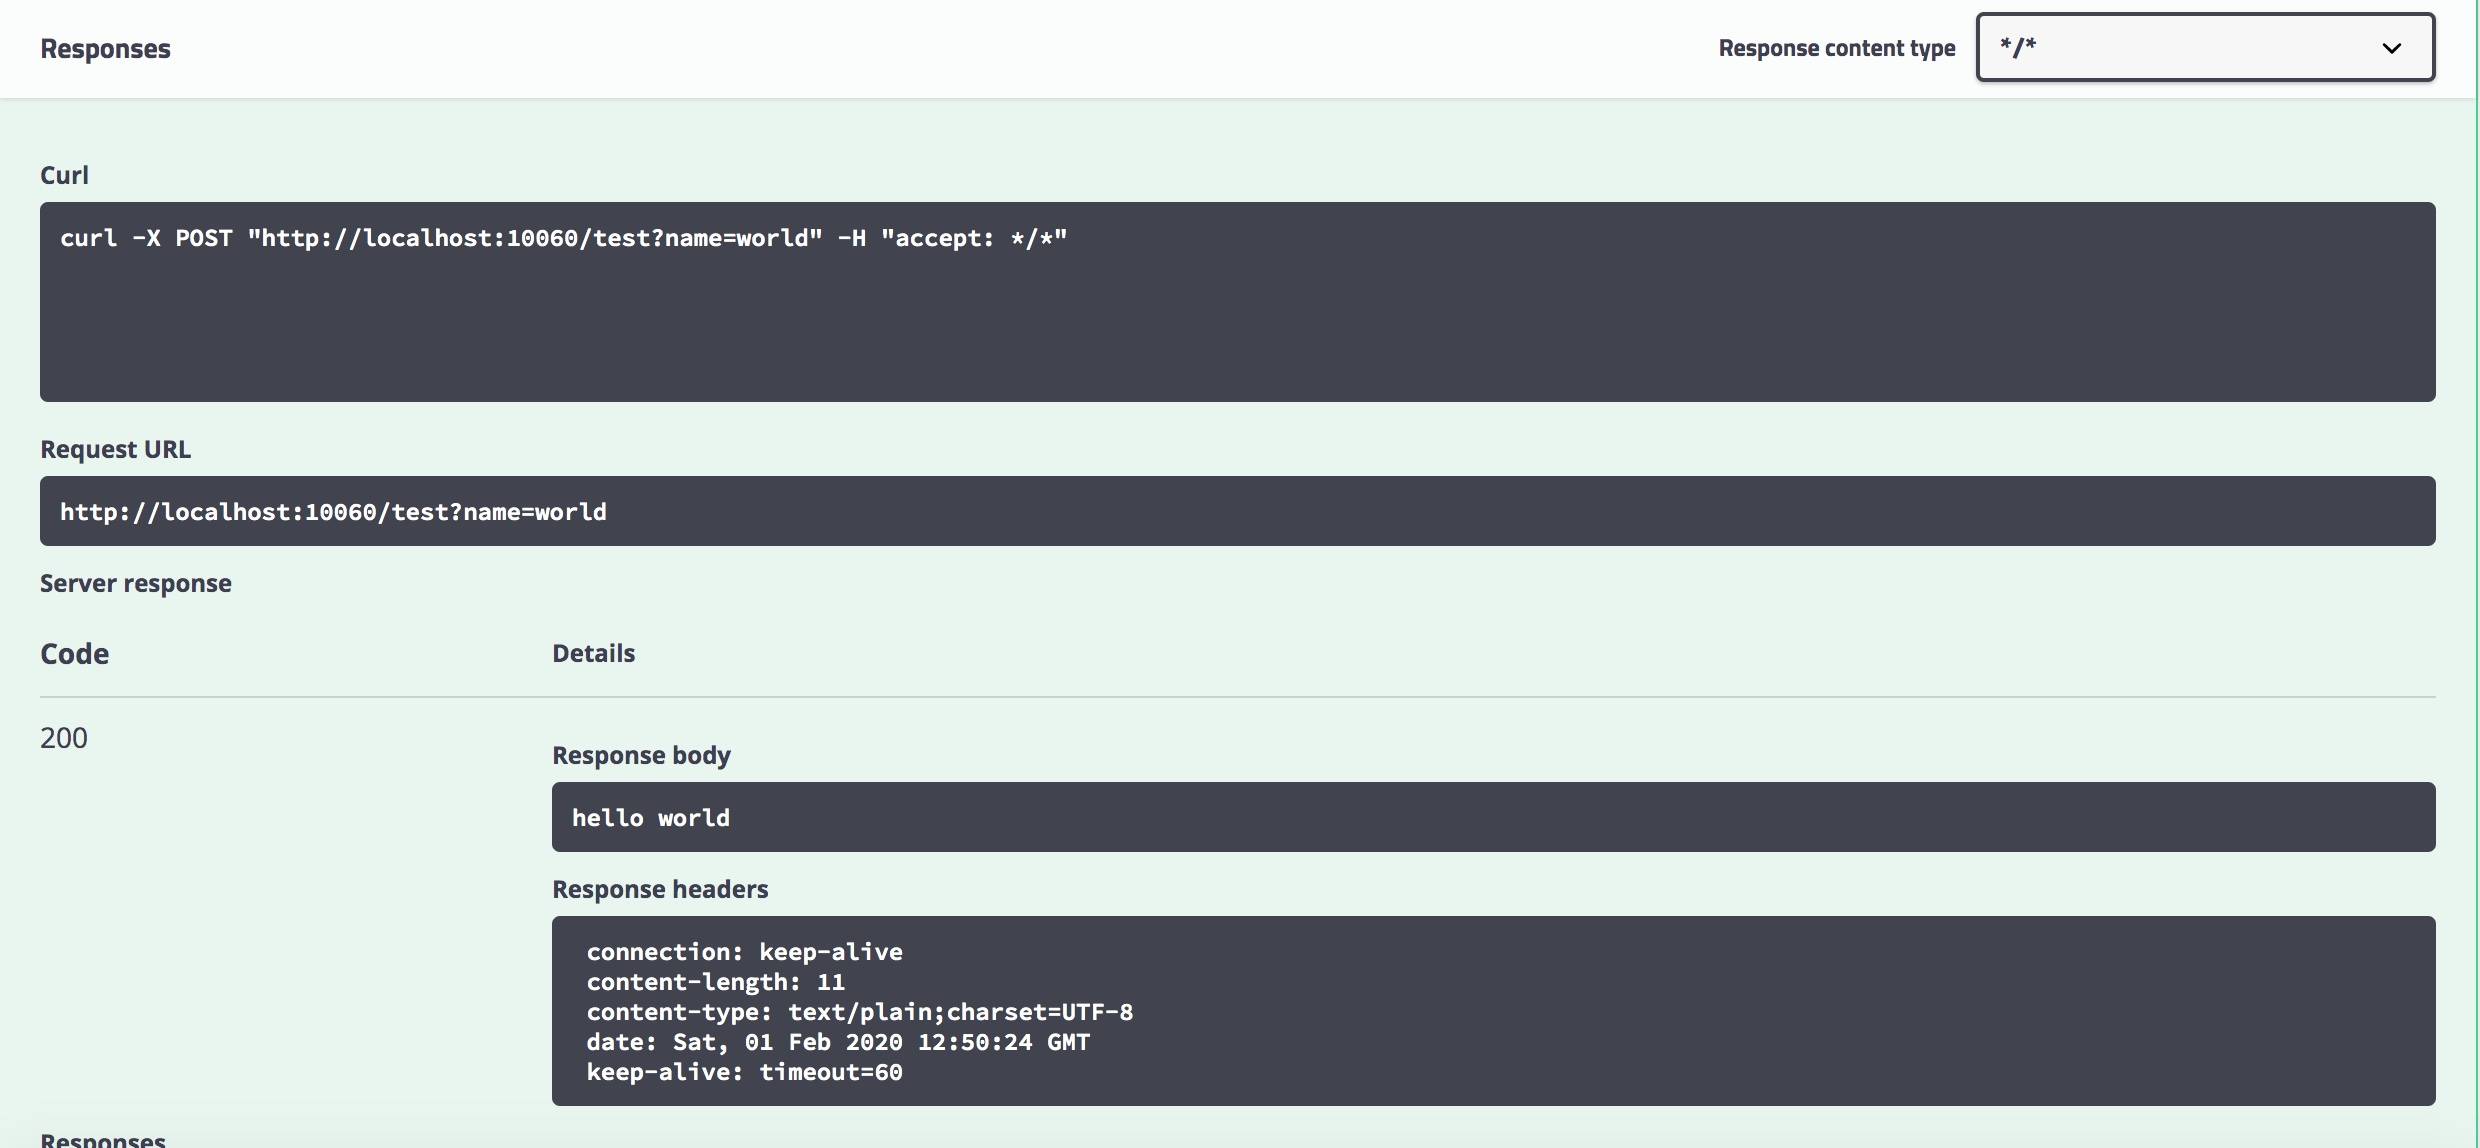
使用 Swagger 即可在直接在线感知接口变更,还能在 UI 上直接进行接口测试,不再依赖第三方组件。
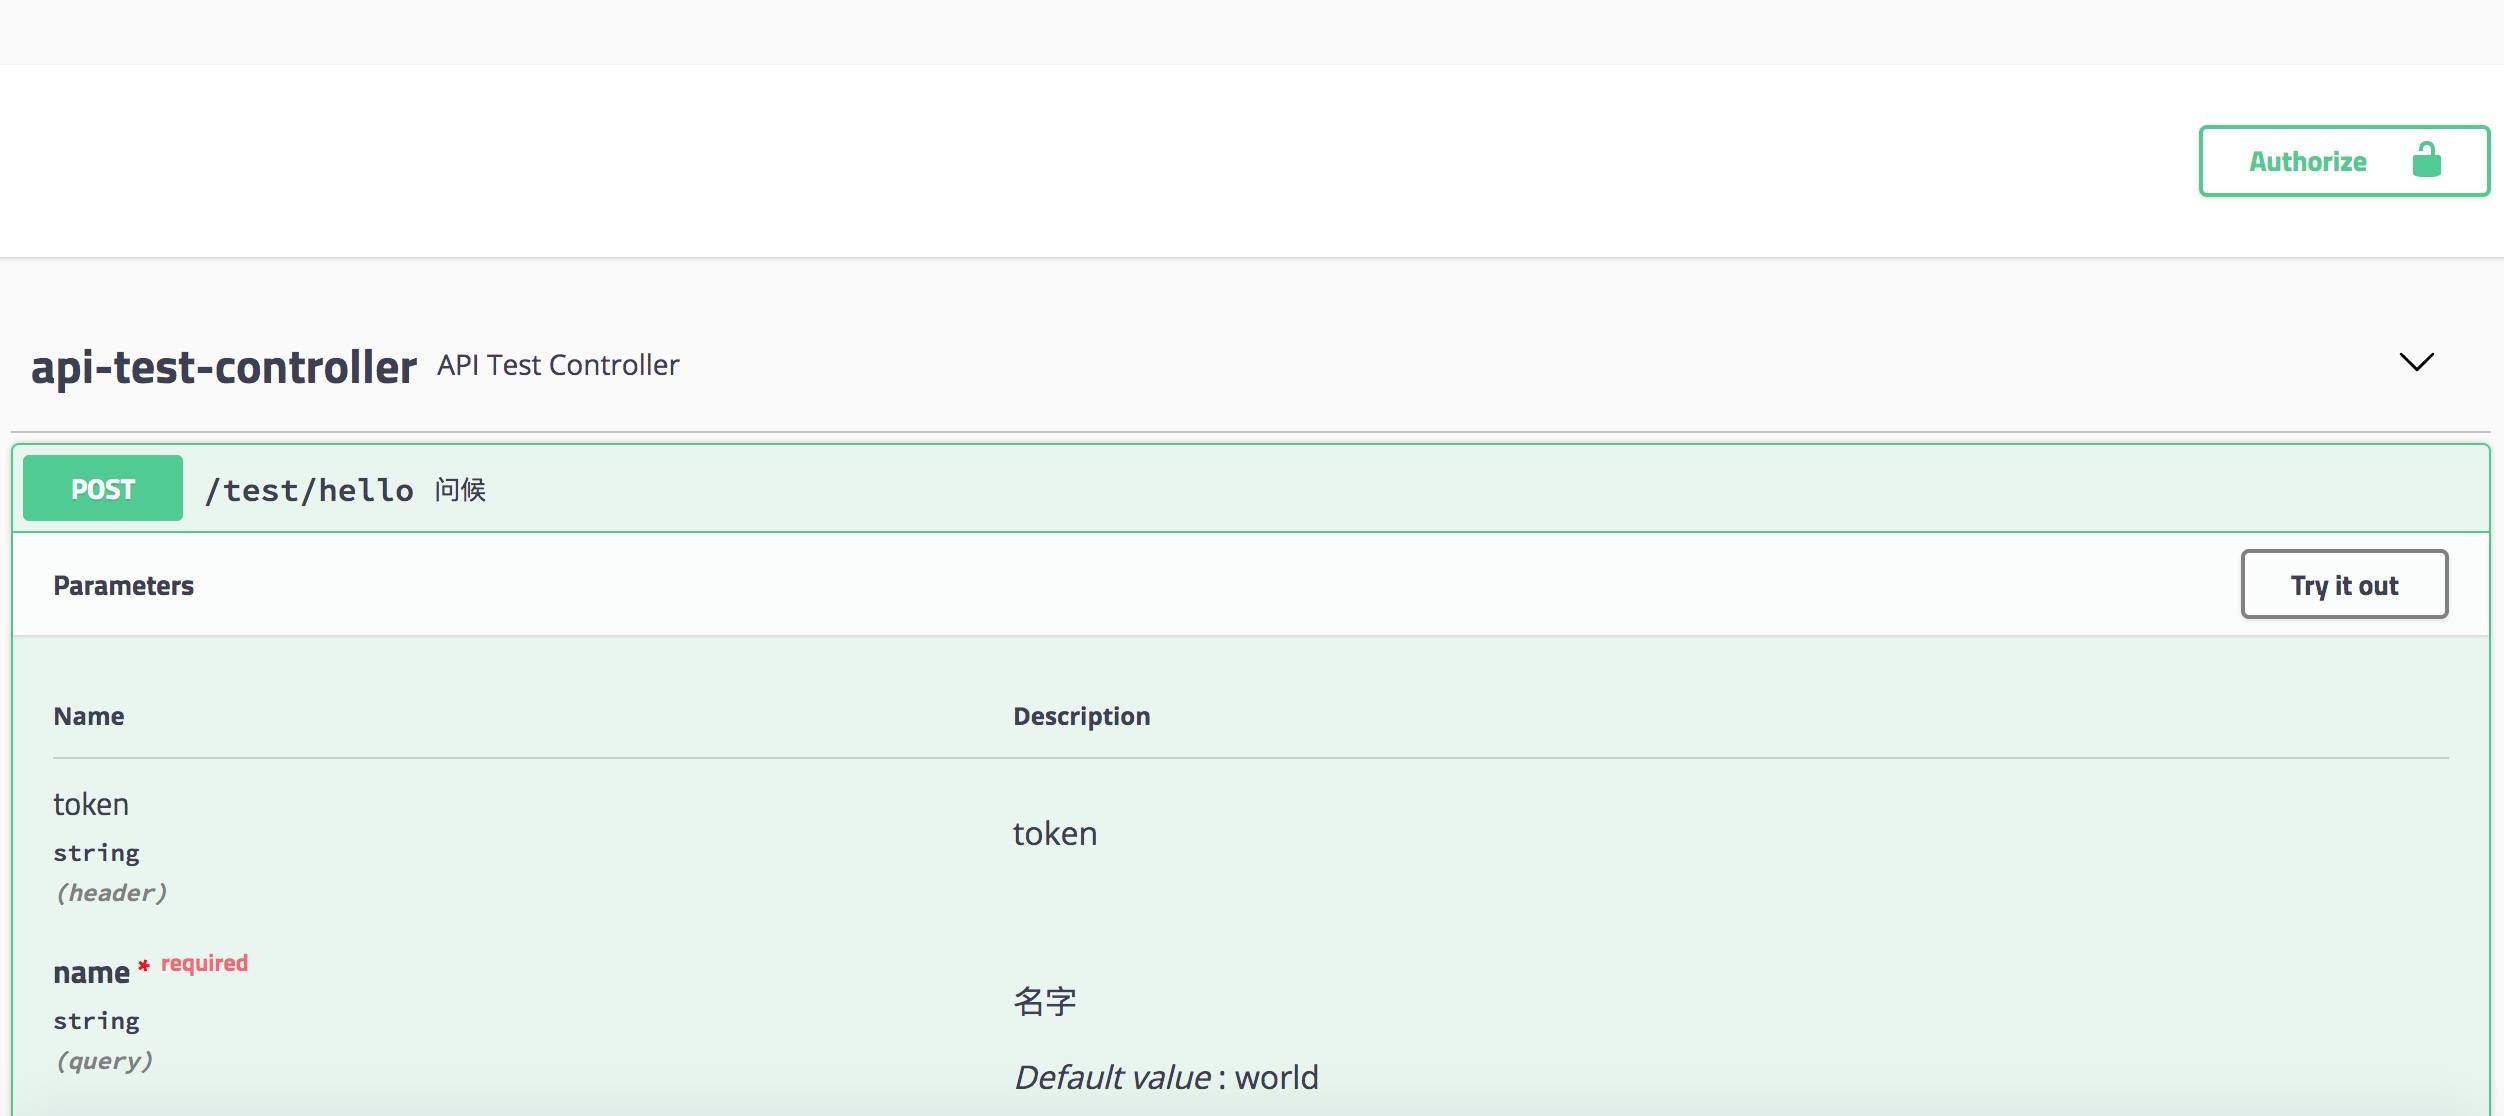
如果参数中存在必输项,又当如何设置呢?此时,必须采用代码注解侵入的方式 @ApiImplicitParam
1 2 3 4 5 6 7 8 9 10 11 12 13 14 15 16 17 18 19 20 21 22 23 24 25 26 27 @ApiImplicitParam(required = true, name = "name", dataType = "String", value = "名字", defaultValue = "world",paramType="query")
常用的注解还如下几个,与旧版本的注解略有不同。
1 2 3 4 5 6 7 8 9 10 11 12 13 14 15 16 17 @Api @ApiOperation @ApiImplicitParams @ApiImplicitParam @ApiResponses @ApiResponse @ApiModel @ApiModelProperty
加入以上注解后,测试类演变如下:
1 2 3 4 5 6 7 8 9 10 11 12 13 14 15 16 17 18 19 20 21 22 23 24 25 26 27 28 29 30 31 32 33 34 35 36 37 38 39 40 41 42 43 44 45 46 47 48 49 50 51 52 53 54 55 56 57 58 59 60 61 62 63 64 65 66 67 68 69 70 71 72 73 74 75 76 77 78 79 80 81 82 83 @RestController @RequestMapping("test") @Api("测试类") public class APITestController { @ApiOperation("问候") @PostMapping("/hello") @ApiImplicitParam(required = true, name = "name", dataType = "String", value = "名字", defaultValue = "world", paramType = "query") public Hello hello (String name) { Hello hello = new Hello (); hello.setName(name); return hello; } } @ApiModel class Hello { @ApiModelProperty("姓名") private String name; @ApiModelProperty("年龄") private int age = 10 ; public String getName () { return name; } public void setName (String name) { this .name = name; } public int getAge () { return age; } public void setAge (int age) { this .age = age; } }
重新打开http://localhost:10060/swagger-ui.html 地址,发现参数已变成必输项,并且有默认值,输出响应值为 Hello 值对象的 JSON 数据格式。
4、生产环境屏蔽 使用 Swagger 大大提高接口的开发测试效率,如果不加以限制,暴露在生产环境中,那就是一个潜在的安全风险,所以在开发、测试环节正常使用,但要在生产环境中屏蔽 Swagger 的功能。上一篇中提及到多环境配置的问题,这里可以利用它来做文章。
实现方式很简单,在 Swagger 配置类增加注解 @Profile({ "dev", "test" })
,标记只有在 dev 或 test 环境下才能正常使用 swagger 的接口调试功能,在生产环境下这个类是不会加载的,也就达到了生产环境下屏蔽的目标。启动后测试发现,swagger-ui.html 页面已不能正常加载接口进行测试。
1 2 3 4 5 6 7 8 9 10 11 @EnableSwagger2 @Configuration @Profile({ "dev", "test" }) public class Swagger2Config {}
注意:任何 @Componen t 或 @Configuration 注解的类都可以使用 @Profile 注解。
5、增加 token 统一参数 不少内部服务是需要用户登陆后才能正常使用的,比如用户签到领取积分,必须登陆后才正常使用,如果在每个接口中增加 token 参数,重复度太高,设计也不够优雅,一般情况下将 token 放到请求头中较为合适, Swagger 页面中如何显性增加输入 token 的位置就变成了我们的目标。
在 Swagger 配置类修改配置,完成后如下:
1 2 3 4 5 6 7 8 9 10 11 12 13 14 15 16 17 18 19 20 21 22 23 24 25 26 27 28 29 30 31 32 33 34 35 36 37 38 39 40 41 42 43 44 45 46 47 48 49 50 51 52 53 54 55 56 57 58 59 60 61 62 63 64 65 66 67 @EnableSwagger2 @Configuration @Profile({ "dev", "test" }) public class Swagger2Config { @Bean public Docket createRestApi () { ParameterBuilder parameterBuilder = new ParameterBuilder (); List<Parameter> parameters = new ArrayList <>(); parameterBuilder.modelRef(new ModelRef ("String" )).name("token" ).parameterType("header" ).description("token" ).defaultValue("" ). required(false ).build(); parameters.add(parameterBuilder.build()); return new Docket (DocumentationType.SWAGGER_2).apiInfo(apiInfo()).select() .apis(RequestHandlerSelectors.any()).paths(PathSelectors.any()).build().globalOperationParameters(parameters).securitySchemes(getSecuritySchemes()); } private ApiInfo apiInfo () { return new ApiInfoBuilder () .title("Member 会员模块接口层(基于 SpringBoot2+Swagger2)." ) .contact(new Contact ("growithus" , "https://backkoms.github.io/" , "[email protected]" )) .version("1.0" ) .description("" ).build(); } private List<ApiKey> getSecuritySchemes () { List<ApiKey> keys = new ArrayList <>(); ApiKey key = new ApiKey ("token" , "token" , "header" ); keys.add(key); return keys; } }
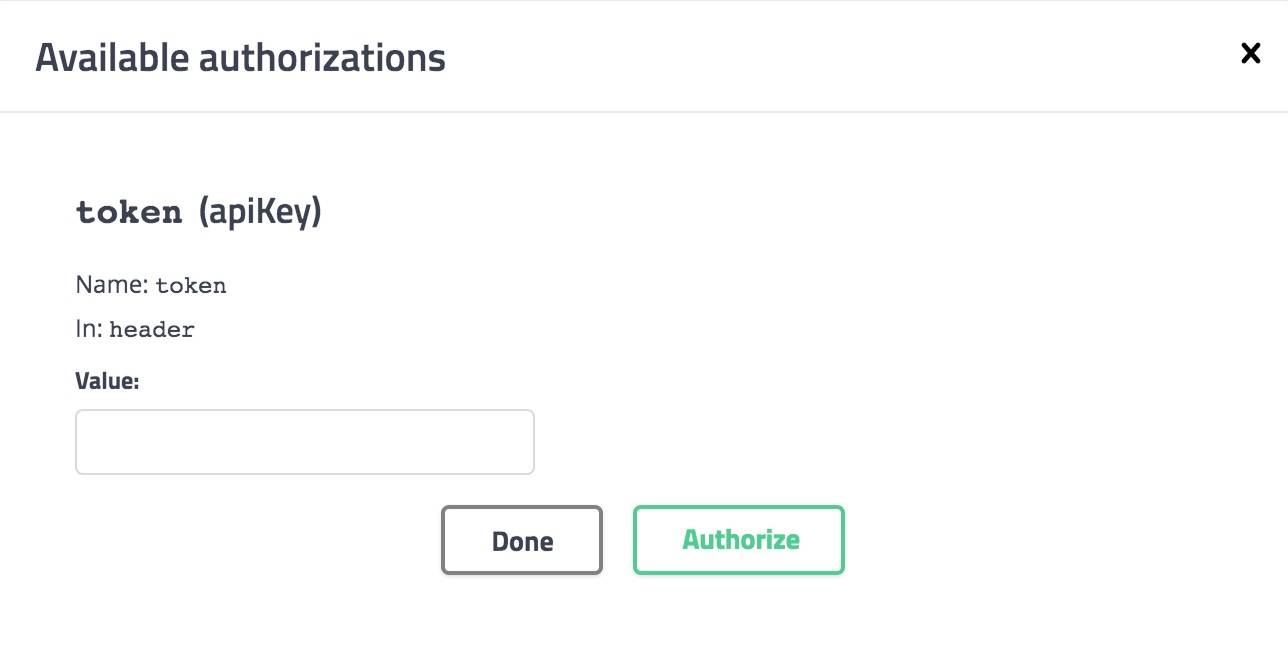
启动项目后,打开 swagger-ui.html 页面,会发现多出一个 Authorize 的按钮,打开后输入有效 token 就实现登陆,其它接口直接使用即可,无须多次再输入 token (此时并未实现 token 验证,后续可通过 AOP 编程来验证 token 的有效性)。
到此,Swagger 已经可以正常应用在项目中,后续直接 Copy 本示例的配置即可复用。
留下个思考题 每个子服务模块都会对外暴露接口,如果调用服务很多,将不得不面对接口页面来回切换的繁琐,有没有什么办法简化一下呢?