16 案例实战:基于 Spring Security 和 Spring Cloud 构建微服务安全架构

通过前面课程的学习,我们已经知道 Spring Security 可以集成 OAuth2 协议并实现分布式环境下的访问授权。同时,Spring Security 也可以和 Spring Cloud 框架无缝集成,并完成对各个微服务的权限控制。

今天我们将设计一个案例系统,从零构建一个完整的微服务系统,除了演示微服务系统构建过程,还将重点展示 OAuth2 协议以及 JWT 在其中所起到的作用。

案例驱动:SpringAppointment

在本课程中,我们通过构建一个相对精简的完整系统,来展示微服务架构相关的设计理念以及各项技术组件,这个案例系统称为 SpringAppointment。

SpringAppointment 包含的业务场景比较简单,可以用来模拟就医过程中的预约处理流程。一般而言,预约流程势必会涉及三个独立的微服务,即就诊卡(Card)服务、预约(Appointment)服务,以及医生(Doctor)服务。

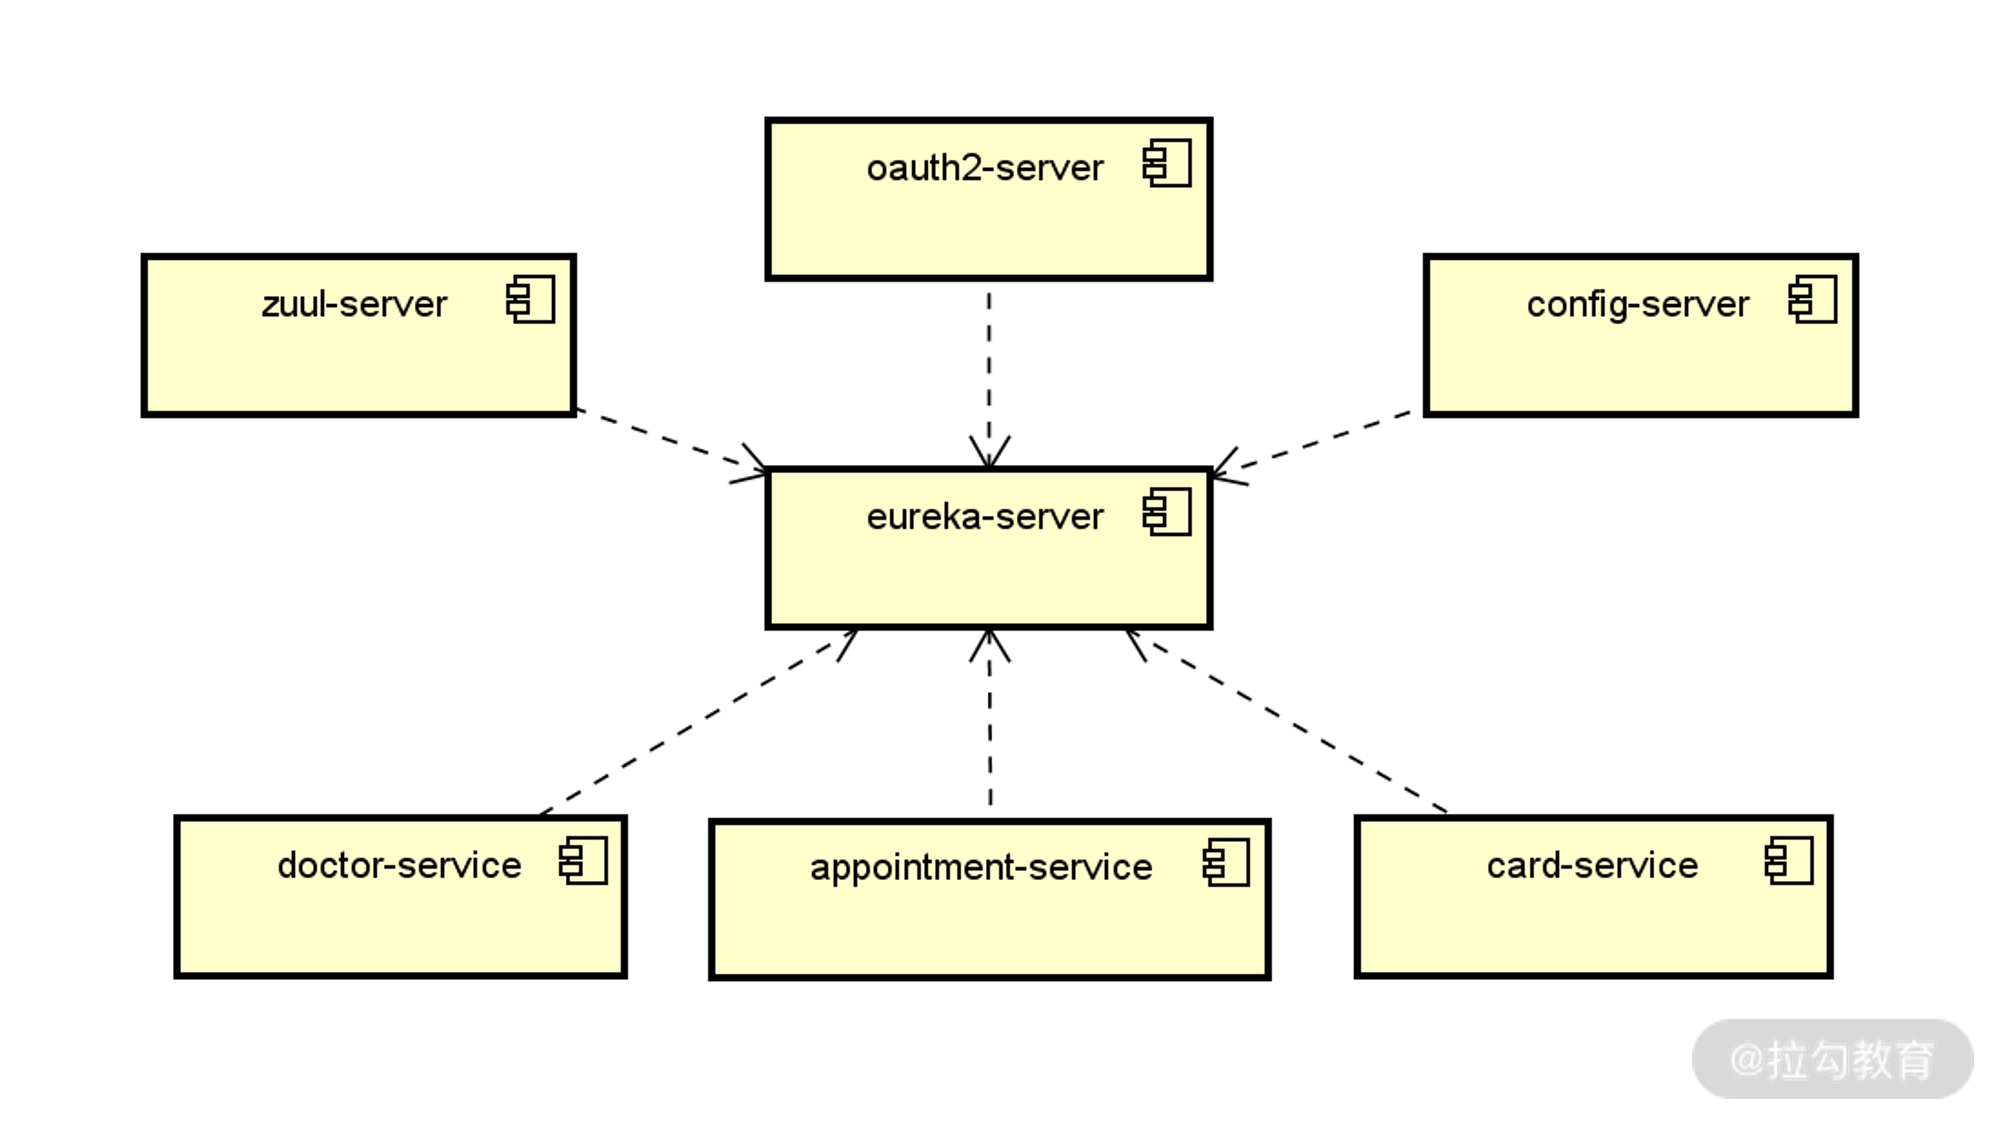
我们把以上三个服务统称为业务服务。纵观整个 SpringAppointment 系统,除了这三个业务微服务之外,还有一批非业务性的基础设施类服务,具体包括:注册中心服务(Eureka)、配置中心服务(Spring Cloud Config),以及 API 网关服务(Zuul)。关于 Spring Cloud 中基础设施类服务的构建过程不是本专栏的重点,你可以参考拉勾上[《Spring Cloud 原理与实战》]专栏做详细了解。

虽然案例中的各个服务在物理上都是独立的,但就整个系统而言,需要各服务相互协作构成一个完整的微服务系统。也就是说,服务运行时存在一定的依赖性。我们结合系统架构对 SpringAppointment 的运行方式进行梳理,梳理的基本方法就是按照服务列表构建独立服务,并基于注册中心来管理它们之间的依赖关系,如下图所示:
图片1.png

基于注册中心的服务运行时依赖关系图

构建 OAuth2 授权服务

在上图中,我们注意到还存在着案例系统中的最后一个基础设施类微服务,即 OAuth2 授权服务,在这里充当着授权中心的作用。关于 OAuth2 授权服务的具体构建步骤已经在[《授权体系:如何在微服务架构中集成OAuth2协议?》]做了详细介绍,这里我们直接创建 WebSecurityConfigurerAdapter 的子类 WebSecurityConfigurer

以及 AuthorizationServerConfigurerAdapter 的子类 JWTOAuth2Config,实现代码如下所示:

1
2
3
4
5
6
7
8
9
10
11
12
13
14
15
16
17
18
19
20
21
22
23
24
25
26
27
28
29
30
31
32
33
34
35
36
37
38
39
40
41
42
43
44
45
46
47
48
49
50
51
52
53
54
55
56
57
58
59
60
61
62
63
64
65
66
67
68
69
70
71
72
73
74
75
76
77
78
79
80
81
82
83
84
85
86
87
88
89
90
91
92
93
94
95
96
97
98
99
100
101
102
103
104
105
106
107
108
109
110
111
112
113
114
115
116
117
118
119
120
121
122
123
124
125
126
127
128
129
130
131
132
133
134
135
136
137
138
139
140
141
142
143
144
145
146
147
148
149
150
151
152
153
154
155
156
157
158
159
160
161
162
163
164
165
166
167
168
169
170
171
172
173
@Configuration


public class WebSecurityConfigurer extends WebSecurityConfigurerAdapter {


@Override


@Bean


public AuthenticationManager authenticationManagerBean() throws Exception {


return super.authenticationManagerBean();


}


@Override


@Bean


public UserDetailsService userDetailsServiceBean() throws Exception {


return super.userDetailsServiceBean();


}


@Override


protected void configure(AuthenticationManagerBuilder builder) throws Exception {


builder.inMemoryAuthentication().withUser("user").password("{noop}password1").roles("USER").and()


.withUser("admin").password("{noop}password2").roles("USER", "ADMIN");


}


}


@Configuration


public class JWTOAuth2Config extends AuthorizationServerConfigurerAdapter {


@Autowired


private AuthenticationManager authenticationManager;


@Autowired


private UserDetailsService userDetailsService;


@Override


public void configure(AuthorizationServerEndpointsConfigurer endpoints) throws Exception {


endpoints.authenticationManager(authenticationManager).userDetailsService(userDetailsService);


}


@Override


public void configure(ClientDetailsServiceConfigurer clients) throws Exception {


clients.inMemory().withClient("appointment_client").secret("{noop}appointment_secret")


.authorizedGrantTypes("refresh_token", "password", "client_credentials")


.scopes("webclient", "mobileclient");


}


}

初始化业务服务

在 SpringAppointment 案例系统中,我们需要构建三个业务微服务,即 card-service、appointment-service 和 doctor-service,它们都是独立的 Spring Boot 应用程序。在构建业务服务时,我们首先需要完成它们与基础设施类服务集成。因为 API 网关起到的是服务路由作用,所以对于各个业务服务而言是透明的,而其他的注册中心、配置中心和授权中心都需要每个业务服务完成与它们之间的集成。

集成注册中心

对于注册中心 Eureka 而言,card-service、appointment-service 和 doctor-service 都是它的客户端,所以需要 spring-cloud-starter-netflix-eureka-client 的依赖,如下所示。

1
2
3
4
5
6
7
8
9
10
11
12
13
<dependency>


<groupId>org.springframework.cloud</groupId>


<artifactId>spring-cloud-starter-netflix-eureka-client</artifactId>


</dependency>

然后,我们以 appointment-service 为例,来看它的 Bootstrap 类,如下所示:

1
2
3
4
5
6
7
8
9
10
11
12
13
14
15
16
17
18
19
20
21
22
23
24
25
26
27
28
29
@SpringBootApplication


@EnableEurekaClient


public class AppointmentApplication {


public static void main(String[] args) {


SpringApplication.run(AppointmentApplication.class, args);


}


}

这里引入了一个新的注解 @EnableEurekaClient,该注解用于表明当前服务就是一个 Eureka 客户端,这样该服务就可以自动注册到 Eureka 服务器。当然,我们也可以直接使用统一的 @SpringCloudApplication 注解来实现 @SpringBootApplication 和 @EnableEurekaClient这两个注解整合在一起的效果。

接下来就是最重要的配置工作,appointment-service 中的配置内容如下所示:

1
2
3
4
5
6
7
8
9
10
11
12
13
14
15
16
17
18
19
20
21
22
23
24
25
26
27
28
29
30
31
32
33
34
35
36
37
38
39
40
41
42
43
44
45
spring:


application:


name: appointmentservice


server:


port: 8081


eureka:


client:


registerWithEureka: true


fetchRegistry: true


serviceUrl:


defaultZone: http://localhost:8761/eureka/

显然,这里包含两段配置内容。其中,第一段配置指定了服务的名称和运行时端口。在上面的示例中 appointment-service 的名称通过“spring.application.name=appointmentservice”进行指定,也就是说 appointment-service 在注册中心中的名称为 appointmentservice。在后续的示例中,我们会使用这一名称获取 appointment-service 在 Eureka 中的各种注册信息。

集成配置中心

要想获取配置服务器中的配置信息,我们首先需要初始化客户端,也就是在将各个业务微服务与 Spring Cloud Config 服务器端进行集成。初始化客户端的第一步是引入 Spring Cloud Config 的客户端组件 spring-cloud-config-client,如下所示。

1
2
3
4
5
6
7
8
9
10
11
12
13
<dependency>


<groupId>org.springframework.cloud</groupId>


<artifactId>spring-cloud-config-client</artifactId>


</dependency>

然后我们需要在配置文件 application.yml 中配置服务器的访问地址,如下所示:

1
2
3
4
5
6
7
8
9
10
11
12
13
14
15
16
17
spring: 


cloud:


config:


enabled: true


uri: http://localhost:8888

以上配置信息中,我们指定了配置服务器所在的地址,也就是上面的 uri:http://localhost:8888

一旦我们引入了 Spring Cloud Config 的客户端组件,相当于在各个微服务中自动集成了访问配置服务器中 HTTP 端点的功能。也就是说,访问配置服务器的过程对于各个微服务而言是透明的,即微服务不需要考虑如何从远程服务器获取配置信息,而只需要考虑如何在 Spring Boot 应用程序中使用这些配置信息。而对于常见的关系型数据访问配置而言,Spring 已经帮助我们内置了整合过程,我们要做的就是引入相关的依赖组件而已。

我们以 appointment-service 为例来演示数据库访问功能,案例中使用的是 JPA 和 MySQL,因此需要在服务中引入相关的依赖,如下所示:

1
2
3
4
5
6
7
8
9
10
11
12
13
14
15
16
17
18
19
20
21
22
23
24
25
26
27
28
29
30
31
32
33
<dependency>


<groupId>org.springframework.boot</groupId>


<artifactId>spring-boot-starter-data-jpa</artifactId>


</dependency>


<dependency>


<groupId>mysql</groupId>


<artifactId>mysql-connector-java</artifactId>


</dependency>

现在,我们就可以使用 JPA 提供的数据访问功能来访问 MySQL 数据库了。

集成授权中心

在业务服务中集成授权中心的实现方法,我们已经在[《14.资源保护:如何使用OAuth2协议实现对微服务访问进行授权?》]中做了详细介绍,这里做一些简单的回顾。首先,我们需要在 Spring Boot 的启动类上添加 @EnableResourceServer 注解:

1
2
3
4
5
6
7
8
9
10
11
12
13
14
15
16
17
18
19
20
21
22
23
24
25
26
27
28
29
@SpringCloudApplication


@EnableResourceServer


public class AppointmentApplication {


public static void main(String[] args) {


SpringApplication.run(AppointmentApplication.class, args);


}


}

然后,我们需要在配置文件中指定授权中心服务的地址:

1
2
3
4
5
6
7
8
9
10
11
12
13
security:


oauth2:


resource:


userInfoUri: http://localhost:8080/userinfo

最后,要做的就是在每个业务服务中嵌入访问授权控制。我们可以使用用户层级的权限访问控制、用户+角色层级的权限访问控制,以及用户+角色+操作层级的权限访问控制这三种策略中的任意一种来实现这一目标。

集成和扩展 JWT

让我们再次回到 SpringAppointment 案例系统,以用户下单这一业务场景为例,就涉及 appointment-service 同时调用 doctor-service 和 card-service,这三个服务之间的交互方式如下图所示: 图片2.png
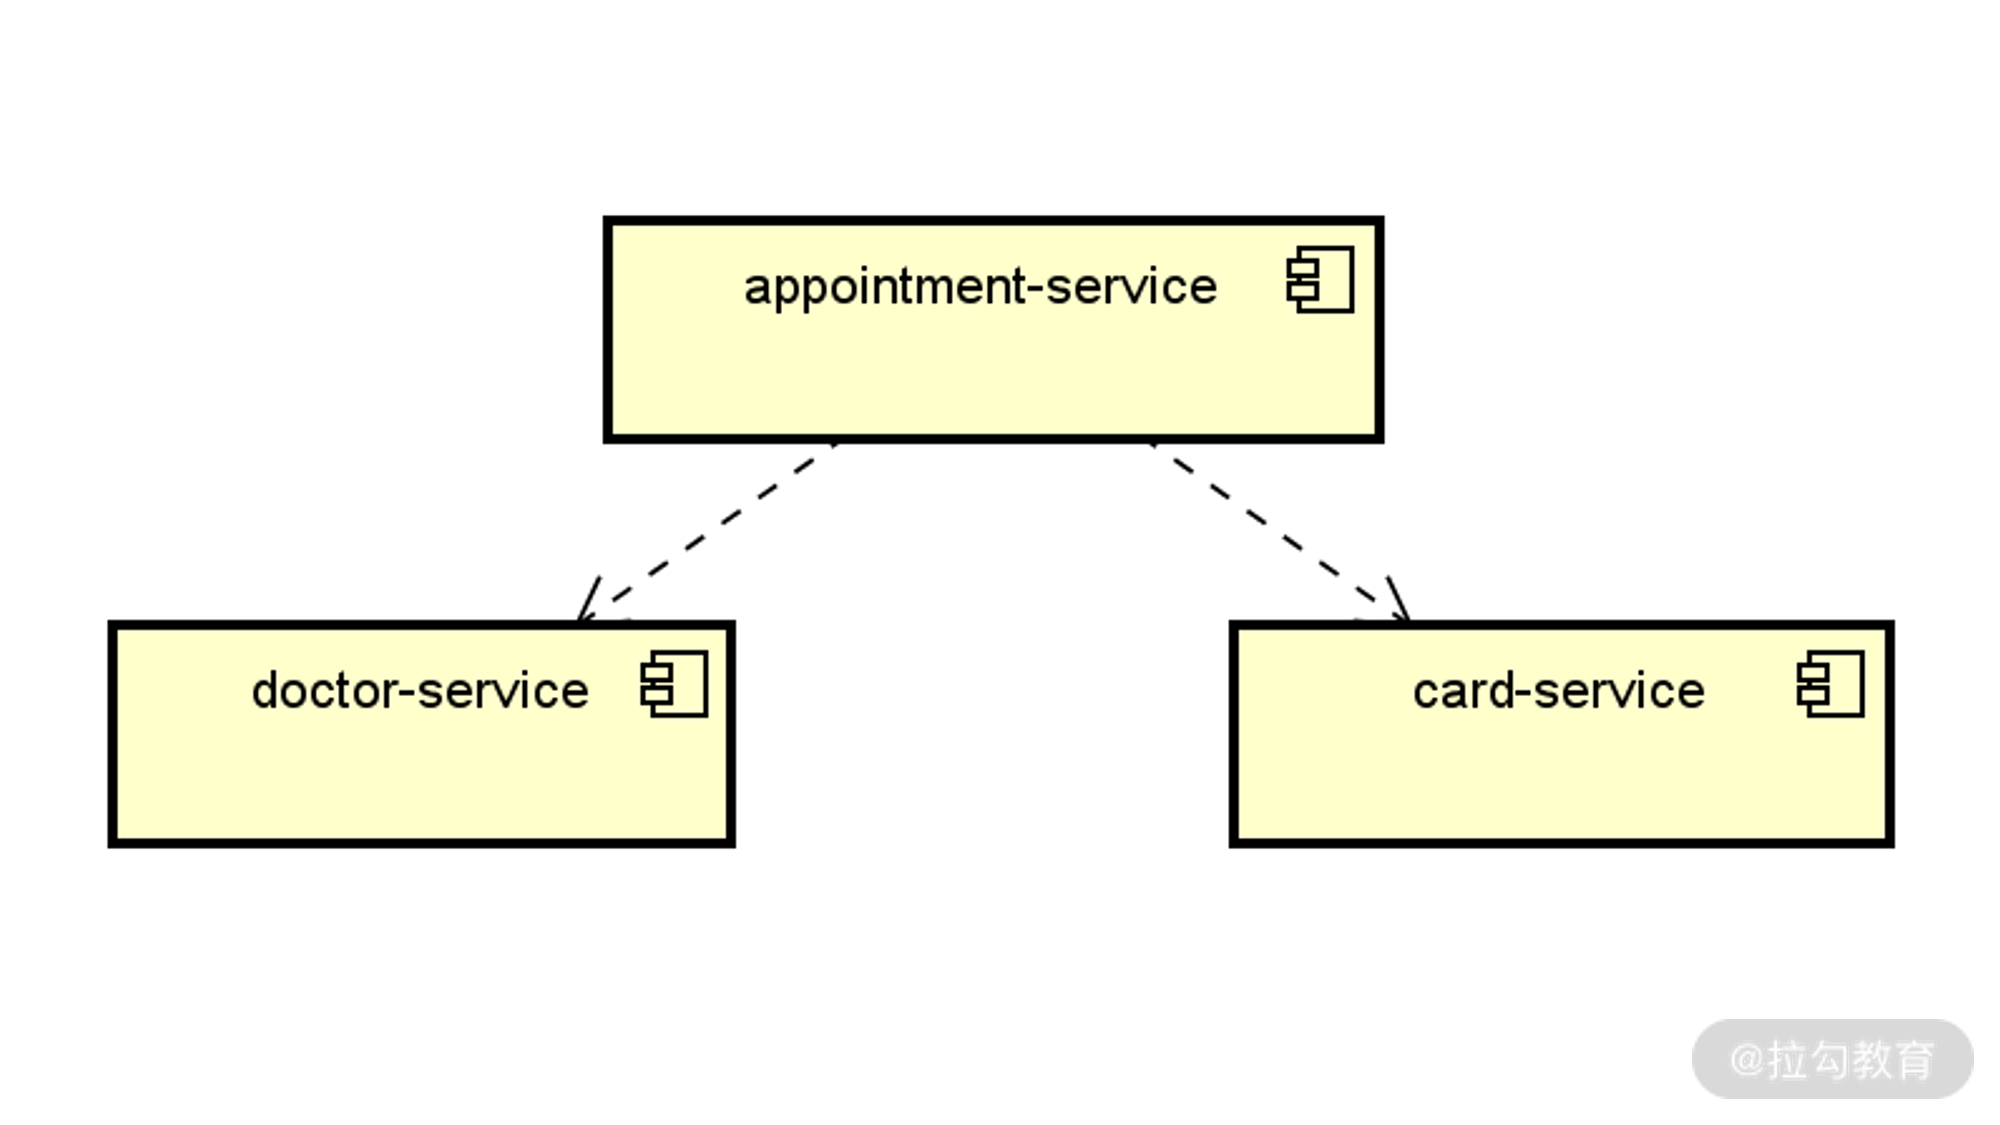
SpringAppointment 案例系统中三个业务微服务的交互方式图

通过这个交互图,实际上我们已经可以梳理出这一场景下的代码结构了,如下所示:

1
2
3
4
5
6
7
8
9
10
11
12
13
14
15
16
17
18
19
20
21
22
23
24
25
26
27
28
29
30
31
32
33
34
35
36
37
38
39
40
41
42
43
44
45
46
47
48
49
50
51
52
53
public Appointment generateAppointment(String doctorName, String cardCode) {


Appointment appointment = new Appointment();


//获取远程 Card 信息


CardMapper card = getCard(cardCode);


//获取远程 Doctor 信息


DoctorMapper doctor = getDoctor(doctorName);


appointmentRepository.save(appointment);


return appointment;


}

其中 appointment-service 从 card-service 获取 Card 对象,以及从 doctor-service 中获取 Doctor 对象,这两个步骤都会涉及远程 Web 服务的访问。因此,我们首先需要分别在 card-service 和 doctor-service 服务中创建对应的 HTTP 端点。这一过程不是课程的重点,如果你感兴趣,可以参考案例源码自己进行学习:https://github.com/lagouEdAnna/SpringSecurity-jianxiang/tree/main/SpringAppointment

集成 JWT

在《15 | 令牌扩展:如何使用JWT实现定制化 Token?》中,我们引入了 JWT 并完成了与 OAuth2 协议的集成,从而实现了定制化的 Token。JWT 同样也需要在整个服务调用链路中进行传递。而持有 JWT 的客户端访问 appointment-service 提供的 HTTP 端点进行下单操作,该服务会验证所传入 JWT 的有效性。然后,appointment-service 会再通过网关访问 card-service 和 doctor-service,同样这两个服务也会分别对所传入的 JWT 进行验证,并返回相应的结果。

现在,让我们在 appointment-service 中构建一个 CardRestTemplateClient 类,会发现它使用了在《15 | 令牌扩展:如何使用 JWT 实现定制化 Token?》中所创建的 RestTemplate 对象来发起远程调用,代码如下所示:

1
2
3
4
5
6
7
8
9
10
11
12
13
14
15
16
17
18
19
20
21
22
23
24
25
26
27
28
29
30
31
32
33
34
35
36
37
38
39
40
41
42
43
44
45
46
47
48
49
50
51
52
53
@Service


public class CardRestTemplateClient {


@Autowired


RestTemplate restTemplate;


public CardMapper getCardByCardCode(String cardCode) {


ResponseEntity<CardMapper> result =


restTemplate.exchange("http://cardservice/cards/{cardCode}", HttpMethod.GET, null,


CardMapper.class, cardCode);


return result.getBody();


}


}

我们知道在这个 RestTemplate 中,基于 AuthorizationHeaderInterceptor 对请求进行了拦截,从而完成了 JWT 在各个服务中的正确传播。

最后,我们通过 Postman 来验证以上流程的正确性。通过访问 Zuul 中配置的 appointment-service 端点,并传入角色为“ADMIN”的用户对应的 Token 信息,可以看到订单记录已经被成功创建。你可以尝试通过生成不同的 Token 来执行这一流程,并验证授权效果。

扩展 JWT

在案例的最后,我们来讨论一下如何扩展 JWT。JWT 具有良好的可扩展性,开发人员可以根据需要在 JWT Token 中添加自己想要添加的各种附加信息。

针对 JWT 的扩展性场景,Spring Security 专门提供了一个 TokenEnhancer 接口来对 Token 进行增强(Enhance),该接口定义如下:

1
2
3
4
5
6
7
8
9
public interface TokenEnhancer {


OAuth2AccessToken enhance(OAuth2AccessToken accessToken, OAuth2Authentication authentication);


}

可以看到这里处理的是一个 OAuth2AccessToken 接口,而该接口有一个默认的实现类 DefaultOAuth2AccessToken。我们可以通过该实现类的 setAdditionalInformation 方法,以键值对的方式将附加信息添加到 OAuth2AccessToken 中,示例代码如下所示:

1
2
3
4
5
6
7
8
9
10
11
12
13
14
15
16
17
18
19
20
21
22
23
24
25
26
27
28
29
30
31
32
33
34
35
36
37
38
39
40
41
public class JWTTokenEnhancer implements TokenEnhancer {


@Override


public OAuth2AccessToken enhance(OAuth2AccessToken accessToken, OAuth2Authentication authentication) {


Map<String, Object> systemInfo = new HashMap<>();


systemInfo.put("system", "Appointment System");


((DefaultOAuth2AccessToken) accessToken).setAdditionalInformation(systemInfo);


return accessToken;


}


}

这里我们以硬编码的方式添加了一个“system”属性,你也可以根据需要进行相应的调整。

要想使得上述 JWTTokenEnhancer 类能够生效,我们需要对 JWTOAuth2Config 类中的 configure 方法进行重新配置,并将 JWTTokenEnhancer 嵌入到 TokenEnhancerChain 中,如下所示:

1
2
3
4
5
6
7
8
9
10
11
12
13
14
15
16
17
18
19
20
21
22
23
24
25
26
27
28
29
30
31
32
33
34
35
36
37
38
39
40
41
@Override


public void configure(AuthorizationServerEndpointsConfigurer endpoints) throws Exception {


TokenEnhancerChain tokenEnhancerChain = new TokenEnhancerChain();


tokenEnhancerChain.setTokenEnhancers(Arrays.asList(jwtTokenEnhancer, jwtAccessTokenConverter));


endpoints.tokenStore(tokenStore)


.accessTokenConverter(jwtAccessTokenConverter)


.tokenEnhancer(tokenEnhancerChain)


.authenticationManager(authenticationManager)


.userDetailsService(userDetailsService);


}

请注意,我们在这里通过创建一个 TokenEnhancer 的列表将包括 JWTTokenEnhancer 在内的多个 TokenEnhancer 嵌入到 TokenEnhancerChain 中。

现在,我们已经扩展了 JWT Token。那么,如何从这个 JWT Token 中获取所扩展的属性呢?方法也比较简单和固定,如下所示:

1
2
3
4
5
6
7
8
9
10
11
12
13
14
15
16
17
18
19
20
21
22
23
24
25
26
27
28
29
30
31
32
33
34
35
36
37
38
39
40
41
42
43
44
45
//获取 JWTToken


RequestContext ctx = RequestContext.getCurrentContext();


String authorizationHeader = ctx.getRequest().getHeader(AUTHORIZATION_HEADER);


String jwtToken = authorizationHeader.replace("Bearer ","");


//解析 JWTToken


String[] split_string = jwtToken.split("\\.");


String base64EncodedBody = split_string[1];


Base64 base64Url = new Base64(true);


String body = new String(base64Url.decode(base64EncodedBody));


JSONObject jsonObj = new JSONObject(body);


//获取定制化属性值


String systemName = jsonObj.getString("system");

我们可以把这段代码嵌入到需要使用到自定义“system”属性的任何场景中。

小结与预告

案例分析是掌握一个框架应用方式的最好方法,对于 OAuth2 协议也是一样。本讲中,我们将 Spring Security 结合 Spring Cloud 构建了一个微服务案例系统 SpringAppointment。然后根据 SpringAppointment 案例中的业务场景划分了各个微服务,并重点介绍了各个业务服务的构建过程。我们一方面展示了业务服务与基础设施服务的集成过程,另一方面也演示了如何集成和扩展 JWT 的实现过程。

最后再给你留一道思考题:在业务系统中如何实现对 JWT 进行定制化的扩展呢?欢迎在留言区和我分享你的收获。